PeterAtt's blog
Single Stall Engine House Part 10
So this weekend I did the roofing, was a bit tedious, but in the end it came out good and I’m pleased so far.
First image is a sheet of corrugated roofing marked out with an ultra fine sharpie. the point of the sharpie fits well in the grooves. If you find your cut point ends up on a hump instead of a groove, flip it over and you’ll be in the groove. No pun intended. Lol
Single Stall Engine House Part 9
Been a busy week, but squeezed in some time today to work on the Engine House.
Received my roofing material last week and trimmed to size today and also installed the sky lights today.
The material comes in long strips so had to trim down to 4' X 8' sheets. they come 10' wide by 57' long.

I save the left over bits to use on the roof cap.
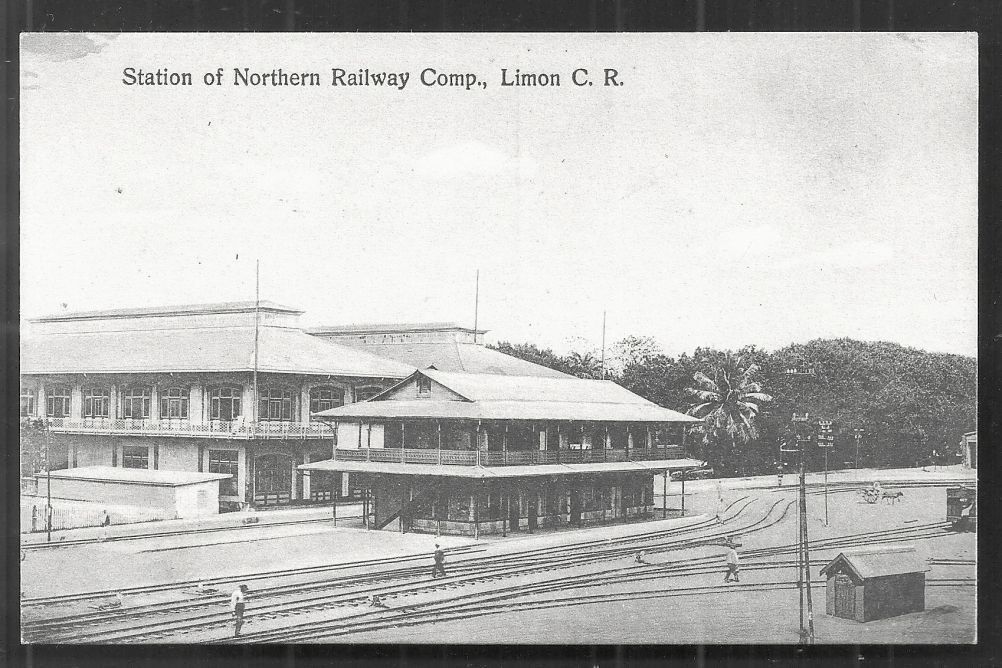
Looking for Station Kit
I'm looking for a kit similar to the smaller front building in the following images. Or something I could possibly bash to look like it. The station was originally run by the United Fruit Company and then transferred to the Northern Railway in Costa Rica. Any tips would be appreciated.
Another view and in color.
Single Stall Engine House Part 8
Well I'm still awaiting more roofing material to finish the main roof off. So for now I've mounted hinges on the doors and put them in place as you'll see in the following images.
I decided to use after market hinges as the ones in the kit are peel and stick and I wanted something a little more realistic with a working hinge. So I came across campbell scale models strap hinges and ordered a them.

Single Stall Engine House Part 7
In this part I've started the roofing on the work shop portion of the engine shed and put together the stove pipe for the shop.
I used corrugated metal for the roof material, from Northwestern scale lumber. I first cut it into scale 4' x 8' sheets. The easiest way I found to do this was to score it with my hobby knife and then with a metal ruler held along the score bend the metal back and forth a few times until it breaks along the score. I used CY glue to attach the roofing material as tacky glue would not stick to the smooth metal surface very well.
Single Stall Engine House Part 6
The same day I finished the last update, I received the Grandt Lines smoke jacks in the mail. So this part we'll deal with the base roof assembly and installing the smoke jacks.
So first off I have a question as to why they are called smoke Jacks? If anyone knows out there let me know.
So first image I set the two roof halves in place and tacked them with some CY glue. The roof can be removable so I just glued the ridge together. This way you can add interior detail later and retrieve that derailed loco too.
Single Stall Engine House Part 5
Yesterday I assembled window sashes & the glazing, and this morning I did some wall assembly.
First image showing parts for windows and doors. The long windows have two pieces, the upper sash with a small frame where the bottom sash mounts, and the bottom sash. the parts have adhesive backs so it's peel n stick. I suggest assembling the two sash parts first then add the glazing.

Single Stall Engine House Part 4
I've managed to finish up the painting and start some assembly now. I also found a solution to hide my paint creep problem on the two tone paint job.
First image painted window and door frames and trim pieces.

Single Stall Engine House Part 3
I'm still working on the two tone paint and I've tried some of the tips shown in the following pics.
First tip, I applied the tape and with the end of a paint brush pressed it down between the battens. second I applied a coat of the vintage white over the edge of the tape.

Next I applied the Green.
Single Stall Engine House Part 2
I had a busy weekend but managed to apply some paint. I was able to get the vintage white applied but ran to into some issues when applying the green for the two tone as you'll see in the images to follow. so I'm a little dissapointed in my paint job and trying to figure out how to resolve the issue before moving on.
First two pics show Vintage White Acrylic applied.

>> Posts index
Navigation
Journals/Blogs
Recent Blog posts: