alcoted

A few months back, I stumbled upon an old boxcar kit that I had purchased around 25 years ago, and then horse-traded away to a friend not long afterwards. I’ll spare the details of the find, as that’s a whole story unto itself. This post will deal with my efforts to improve upon HO-scale freight car kits manufactured 30+ years ago, and finish them off to represent a boxcar of the 1970’s era.


0-550x83.jpg 

Reply 0
alcoted

Finishing a kit ...25 years later

The re-discovered kit was an old Front Range Products 40-foot double-door boxcar model, factory painted for the DT&I. It was purchased back when I was an undergrad (aka - a starving student) back in the late 1980’s, from ‘Rails West’ - what was the last true model train store in the K-W area. Already frustrated with the 60’s-era inaccuracies of the Athearn and Roundhouse boxcars of those times, I had begun collecting whatever Front Range, McKean, Details West, and Robins Rails kits I could afford. Over the years, many of these un-assembled kits were flea-marketed away as better models became available (and I came to realise I would probably never build them at this stage), but this DT&I car really brought back memories. This one had to be built.

Looking over the shell, the basic car body stood the test of time. The overall dimensions of the Front Range cars were bang-on, a big selling feature of their kits back in the 80’s. Yes the rivet-detail wasn’t as fine as current Intermountain, P2K, Atlas (ex-Branchline) or even Accurail offerings, but still decent. The paint and lettering was still crisp enough, besides the finished car would be weathered anyhow.

Most importantly for me, it had separately-applied detail parts, a major reason for my purchases of these kits years back. However, circa-2013, these parts now became the kit’s Achilles Heel – they were crude compared to current technology. To resuscitate this kit, I’d have to replace pretty much all FRP’s separate detail parts with better ones.

Apologies for not having the foresight to take any ‘before’ or ‘in-progress’ photos, I wasn’t thinking of writing a blog about this project. However the following images show what I had done prior to application of additional decals and weathering. All extra parts/details used were from my personal collection of modelling junque acquired over the years. The challenge was to update this kit without spending a penny more then I already had on kits/parts.

Before doing anything on the main body, the under-body needed to be squared away. Doing this afterwards risks damaging the more visible upper-body detail work.

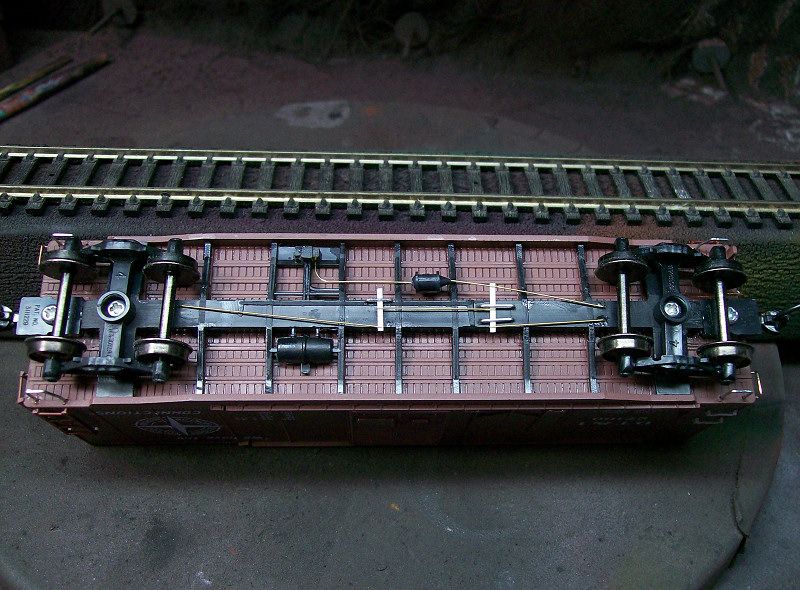
First thing I did was to cut off and sand smooth FRP’s moulded-in coupler pockets, and installed Kadee #58 scale-couplers with their coupler boxes (standard #5’s or their scale centring spring-less #158’s are great too). Nothing (and I mean nothing!) works better than a Kadee coupler in its own box.

Next, after test fitting the kit-supplied underframe, I remembered that these Front Range cars rode high if assembled as is. So, after cutting apart the moulded-on airbrake rigging from the frame, I sanded down the base until I lost a millimetre or so from the overall height. I also sanded flat the ring-base on the tops of the bolsters. This drops the car about 2mm (almost two scale feet!) to get the coupler height to NMRA standards. The underframe is then glued in place, and trucks screwed-in using Bettendorf-style truck sideframes from Accurail, with Intermountain 33’’ metal wheelsets. This is a favourite combination of mine.

If you’re playing along at home… at this point, you should use a coupler gauge here to ensure couplers are at the proper height. If not, Kadee washers may be needed to raise the car height, or, possibly, styrene plastic added above the coupler boxes to lower their positions. Do whatever it takes to get this right before proceeding any further.

The brake-piping is done with 0.01’’ diameter brass wire, some scrap pieces of styrene plastic for the levers, and straightened/re-bent aluminium staples used for the hangers. This detailing is just visible when the car is viewed at eye-level, so (contrary to what you might think) I didn’t really go into too much work for this. If you want even less work for similar effect, Accurail sells their new Delran-plastic underbody brake-work at very reasonable prices.

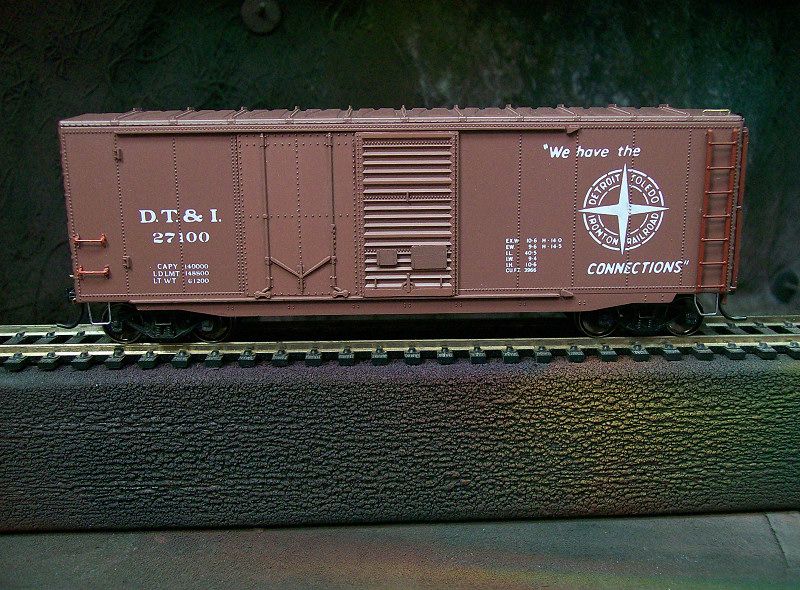
The kit-supplied doors were still good-enough quality, so they were installed as FRP intended. The tack-boards on the main door are also FRP-supplied, but the backs were sanded down to reduce thickness, and installed in lowered (post-1960’s) positions. All other detail parts came from other sources.

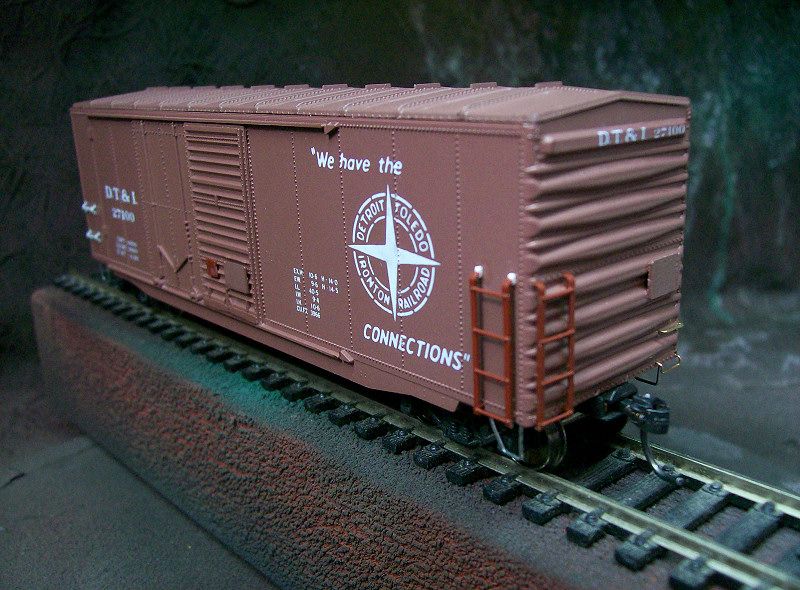
Ladders and grabirons were Intermountain parts, from my collection of unused details that have been horded over the years (these can be purchased directly from Intermountain if needed). The A-end ladders have been shortened as per 1970’s practice, along with the absence of a roofwalk. B-end ladders retain their full-height, and an A-Line ‘L-shaped’ corner-grabiron installed at the roof corner above them.

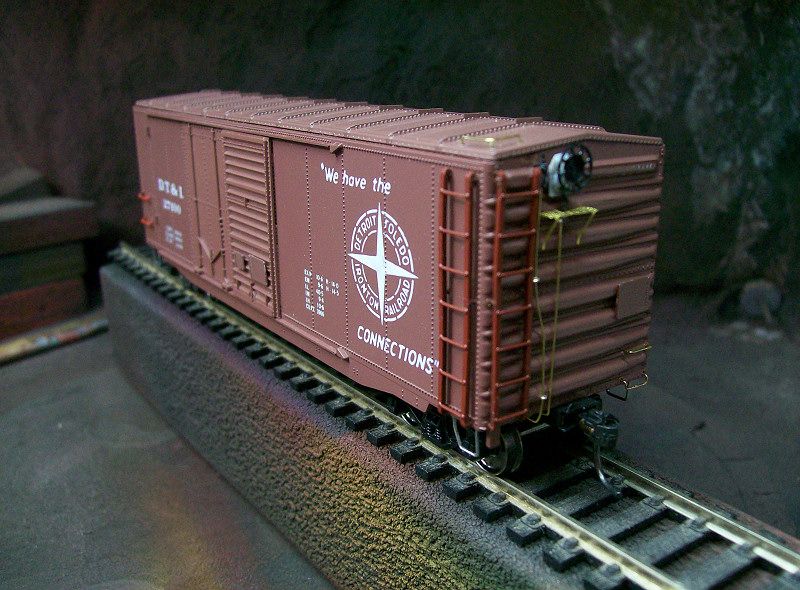
The brake-wheel housing and airline valve on the B-end were from a Tichy Trains Group AB brake set. Brass wire (0.01” diam) was used for the brake- & air-lines, with O-rings used to hold/aid in installation. The brake wheel itself is from Kadee, who sell their superb PS-1 boxcar detail parts separately. The brake platform is a photo-etched brass Details Associate part. The brass wire 18” grabirons (upper straight and lower drop-grab) are Tichy Trains items.

The final items added to the body were the stirrups. These are, wait for it, aluminium staples that I straighten out, and re-bend into appropriate shapes. This is a modeller’s trick I discovered as a starving student, and have retained over the years. The stirrups never oxidize and are quite durable against fat-fingered train crews. For convenience, A-Line produces brass stirrups that are just as durable, for those who don’t wish to play with staples.


0-550x83.jpg 

Reply 0
alcoted

Painting, decalling and weathering

The FRP factory paint was matched with PollyScale Milwaukee Road Maroon, mixed with a few drops of white. Sorry I didn’t come up with a precise formula, I just mixed these two until I got a very close match from the airbrush. I then carefully sprayed the appropriate areas to match the new detailing with the existing factory paint. The underbody was sprayed with PollyScale Grimy Black.

Additional decaling was done from a variety of sources. Again, sorry for not cataloguing everything, but most of this came from various Microscale sets. I then weathered the model using a combination of weathering powders, and then airbrushed grime along the lower-body of the car. To really make the finished car ‘pop’ and scream 1970’s, I applied paint-patches and new decals to simulate re-weighed dimensional data, in addition to some patches around where past lubrication data would have been prior to the COTS-stencil (the black/white squares) being applied. I airbrushed the whole car with clear flat finish to protect all the decaling/weathering work.

Finally, this DT&I combo-door car is ready for revenue service. Importantly, this car stands up to any recent models being produced, though it did take me over 25 years to finish.

I hope this blog helps some MRH readers to dust off old FRP (or McKean, Robins Rails or whatever) kits of their own, and try to finally complete them. Or perhaps you may find an old kit that tickles your fancy on Ebay or some flea market somewhere, there are many still available at moderate prices. I also invite anyone to post their own old car kit projects here, and share their experiences. I’d like to start a little mutual admiration society if possible.


0-550x83.jpg 

Reply 0
Deemiorgos

Bravo! Looks great.  

Bravo! Looks great.

Reply 0
wp8thsub

I like it

My kind of freight car.

Rob Spangler MRH Blog

Reply 0
Bernd

Old Freight Car Kit

Ted,

Excellent post on bringing an "ancient" kit up to date.

Looks better than the RTR's one get's today.

Bernd

New York, Vermont & Northern Rwy. - Route of the Black Diamonds - NCSWIC

Reply 0
Bill Brillinger

nice!

Nice work Ted. Looks great!  I love the staple trick.

50/50 chance I know who sold that FRP model to you!

Bill Brillinger

Modeling the BNML in HO Scale, Admin for the RailPro User Group, and owner of Precision Design Co.

Reply 0
alcoted

Small world

Hello Bill, great to get back in touch with you after all these years. I'm enjoying your blogs here, and I always thought the BNML operation would make for a pretty cool layout.

Yes it could only have been you or Gerry that sold it to me, my mind is too foggy to remember. BTW, the FRP box still had the Rails West price sticker on it.

The staple trick works to help replace broken stirrups too. I highly recommend it.


0-550x83.jpg 

Reply 0
Tom Patterson

Nice job

Nice job, Ted. The additional details, the decals and the weathering really make that a great looking car. I have a number of those old kits in the basement and I plan to make some of the changes that you've suggested in order to get them onto the layout. And being a '70's modeler, I'm always interested in whatever you're up to in the way of rolling stock. Thanks for taking the time to make the post.

Tom Patterson

Reply 0
alcoted

The mutual admiration society

Thank you for all the kind compliments everyone. Especially the follow 70's modellers. Not many choose to follow this particular era, I guess Penn Central and all the northeastern bankruptcies tend to jaundice people's memories. Either that or disco and bell-bottom jeans make you want to forget this decade ever happened ...I can relate.

It's too bad though, because the 1970's was actually a pretty cool decade to model. There was serious mixing of old and new over those 10 short years.


0-550x83.jpg 

Reply 0
Benny

....

I dare say Ancient would be something out of a silver streak or ulrich or mantua box...

25 years, it's still a spring chicken!

It came out nice.

--------------------------------------------------------

Benny's Index or Somewhere Chasing Rabbits

Reply 0
RSeiler

I get the double whammy...

I'm modeling the Penn Central in the 70s, its the double whammy of model railroading.  I get some interesting responses about my interest, but one of the reasons I like it is that it is unusual.  I have no interest in creating another transition era layout.  And yes, I know my trackwork can be super sloppy with lots of derailments if I want to be prototypical.    

Love the work on the car, looks great.  

Randy 

Randy

Cincinnati West -  B&O/PC  Summer 1975

http://model-railroad-hobbyist.com/node/17997

Reply 0
Deemiorgos

alcoted, you inspired me to

alcoted, you inspired me to get off my ass today and finish a model I started over two years ago. I put an ACI plate on it plus a bell and a tad of weathering. Also prototypical pilots on both ends.

22187(1).jpg 

22188(1).jpg 

Reply 0
wp8thsub

OK Then

Quote:

I also invite anyone to post their own old car kit projects here, and share their experiences.

Here are some off my layout.  I mostly engage in layout-quality models to participate in op sessions, so I normally don't add a lot of extra detailing.  Metal wheelsets and Kadee couplers are mandatory inclusions, but beyond that the amount of work varies a lot between cars.

This is a Walthers Airslide hopper, one of the first released under that brand.  It retains the original sprung plastic trucks (Walthers went with Athearn roller bearing trucks for a time after these proved unsatisfactory, then switched to a rigid one-piece version of the sprung design which they continue to use today).  I substituted an etched running board, and added consolidated stencil decals.  Weathering was done with oil washes.

Remember Robin's Rails?  This PS-1 received some cushioned draft gear, new grabs (some but not all were replaced), modified ladders and a new Details West door.  I finished it with Scalecoat paints and Detail Associates decals for the WP specific stuff, and various others for repainted data, ACI labels, and so on.  Thios photo reveals that I never got around to adding the shop stencil for the reweigh.

I read somewhere that you can't say you model freight cars without doing some kind of Life Like X-72 project.  This is the old train set car with a Details West Evans underframe.  I used a new brakewheel and steps, and carved off some molded-on detail from the door (the top three panels on WP's examples were plain as shown here).  Paint and lettering were done in similar fashion to the previous car.

Since no discussion of the 70s "malaise era" is complete without mentioning the Penn Central, here's my only PC car.  It's an unmodified Athearn kit with some added decals, but that's it.  Part of weathering involved fading the paint with white-ish pastel chalks so it wasn't so garish.  Watercolor pencils accentuated door gouges and rivet seams.  I remember seeing plenty of PC cars back then, so I'd like to add some more, and better, models of them.

Rob Spangler MRH Blog

Reply 0
SeaJay

Old Kits

Really enjoyed reading your narrative describing your steps to update and improve the detail of an older kit.  I have a couple old "craftsman" kits to build and you've shown some simple additions that really look nice!  Thanks for taking the time to share your talent with us.

Chuck J.

Reply 0
alcoted

Penn Central Fan Club

Rob, we've got a few members of the PC Fan Club in our little gang of modellers, one of the biggest being myself. This doesn't count as an older kit (only bought it 5 years ago) but it is proof of my adulation of the Penn Central Daze.

This is a Branchline kit (now taken over by Atlas) factory painted as a PC ex-NYC Despatch Shops built boxcar (complete with their distinctive ends and roof). Aside from assembly and weathering, only thing I've had to add was some additional decalling on the main door, well along with the usual COTS plates, ACI labels and 'Keep Off Roof' stickers.

Atlas seems to be pretty good at matching details on their R-T-R ex-Branchline models thus far, so NYC, PC and Conrail fans should see some of these Despatch Shops boxcars return in the future.

Oh, and yes there is a PC X72 car kicking around somewhere on our club layout that I should take a photo of and add to this thread. I've also got one I picked up at a flea market eons ago, maybe this post will get me off my backside to finally start stripping it and carving off Like-Life's ladder-blobs.


0-550x83.jpg 

Reply 0
Nate Niell

"Ancient" Car kits

I've found that searching out and rehabilitating older cars is a good, economical way of fleshing out your fleet.  Often there are cars that represented prototypes that aren't available today.  For example, I recently have been on a quest to find a 50' mechanical reefer that was something other than the Athearn cars.  That quest led me to this car:

IMG_3086.jpg 

It's a "Golden Spike" series by Pacific HO, which from what I can see was a Walthers brand.  The kit came out in 1972, and it's pretty much every bit the equal in detail to modern cars.  Separate grabs and ladders, full underframe detail...the works.  Difficulty-wise, it sits somewhere between an Intermountain kit (which isn't difficult if you take your time) and a craftsman-style resin kit.  Most of the holes needed to be drilled out, and some of the parts didn't fit very well together, and they had to be worked.  Overall, this was a project that took about five hours altogether, and turned out a very nice car.  Much nicer and prototypical than the Athearn car that it's coupled to.  I've since been able to find another of these, and it's on it's way.

I've also dabbled in older brass, particuarly for cabooses.  Below is a 1975 Westside Models release of a wood-sided WP caboose, which is the correct model for the Tidewater Southern.  Overland has put out some nicer versions of this caboose, but they generally go for 4-5 times the price.  The below model was obtained for $80, and there's nothing wrong with it.  I've since added window glazing with model aircraft canopy glue.  As you can see, I now roster two of the three TS cabooses active during my time frame.  Only one more to go!IMG_3110.jpg 

My next project, assuming I win the auction, will be to build a decent PFE R-40-26 out of an old Ulrich model.  It looks like it's mostly correct, but will need a new paint job.

Reply 0
Bernd

Three of mine

Here are two Corning hopper cars that would fit the 70's. They were done from copies of the prototype I took pictures of in Corning. These two hoppers were Ramax kit's. Anybody remember them?

A not so 70's car. This car is a Silver Streak kit.

 One of these days I'll be able to pose cars on a layout.

Bernd

New York, Vermont & Northern Rwy. - Route of the Black Diamonds - NCSWIC

Reply 0
wp8thsub

Ramax

Quote:
These two hoppers were Ramax kit's. Anybody remember them?

I have one hopper from the Ramax kit, and a couple more from the revised cars issued by Detail Associates.  The original was like a flat kit two-bay version of Athearn's center flow, as so many of the details looked similar.

Rob Spangler MRH Blog

Reply 0
ctxmf74

Old PC stuff

here's an old  50 foot PC car. It's a metal side and roof over a wood core type, some kind of continuation of the old Athearn metal car line..DaveB2120.jpg 

Reply 0
Tom Patterson

Count me in

Two subjects that are near and dear to my heart- 1970's freight car modeling and customizing old kits. As I look around the layout, at least half of the cars fit the bill. Here's a few of them.

First up, the Life Like car that everyone seems to have painted and lettered for a PC X72. I added new stirrup steps, cut levers, a Walthers cushion underframe, Athearn trucks and Kadee couplers and wheels. There's another one of these roaming the layout somewhere.

1%20(21).JPG 

Next up, an old Athearn 50' plug door boxcar that was heavily modified based upon an article by Jim Eager in RMC back in the early 1980's. The side reinforcements panels were cut out of .005 clear styrene and glued in place. A lot of the cast-on detail was removed, new parts were added and the car received a Cal Scale cushion underframe. Kadee couplers and wheels completed the modifications.

_0002(7).JPG 

The GM&O boxcar began life as an Athearn Blue Box 40' sliding door car. The side sill was removed an a new one was made from styrene. New door guides were made on the top and bottom and an Athearn Railbox door was added. I believe the stirrup steps on this car are staples, but they had the round cross section and not the nice flat cross section. The car was modeled after a black and white photo that appeared in an article on the Wellsville, Addison and Galeton Railroad in MR back in the early 1980's.

DSC_0030.JPG 

SCL 616026 is another car that started life as an Athearn 50' double door boxcar. All of the cast-on detail was removed and new doors and door tracks were added. The car also received new ladders and stirrup steps and cushion underframes were installed. The car was painted an lettered based upon a photo that I took of the prototype in Cincinnati in 1983.

_0016(3).JPG 

Here's the picture of the prototype.

230_0001.jpg 

SOU 508140 is an old Cannonball Car Shops kit (remember them?) that's been heavily modified. New side sills, door tracks and doors were added and sections cut from a ladder were used for the grab irons on the left hand side. This car also has the staple stirrup steps. I photographed this car in Southern's Gest Street yard in Cincinnati back in the early 1980's.

_0003(5).JPG 

Next, an old Athearn Blue Box reefer that was modified based upon an article in RMC in the early 1980's. The article described 40' boxcars used by the N&W and Wabash that were used in dedicated service to haul flour. I had a couple of the old reefer kits on hand, so a kit-bash of one of these cars for the home road was in order. The cast on detail for the ice hatches on the ends of the roof was removed and new panels were cut from .005 sheet styrene to cover the holes. New side sills and door were added along with other detail

5%283%29.JPG 

I still have a number of old kits and have purchased some more at recent train shows. With a little bit of work, they can make great looking cars. And it's always been a blast to take something out of the box and transform it into a freight car that no one else has, even if most people never notice. 

Rob- those are some great looking freight cars. I know we've traded comments before about similar cars that we're modeled, but it's always good to see more of your work. And thanks for starting this thread, Ted. Hopefully, we'll get some more people posting photos of their 1970's themed work or other cars that they've kit-bashed. It certainly is motivating, at least for me, to see what some of you have created.

Tom Patterson

Reply 0
JaredW

Silver Streak

Bernd, I have SO many of those cars it's unreal. I need to weather them up and add extra detail paint, and then post pictures.

Reply 0
wp8thsub

Re: Tom

Quote:

I know we've traded comments before about similar cars that we're modeled...

We seem to have a few.

We've noted this one before, as we both modeled this car from the same RMC article by Jim Eager.  BY the time I got around to mine, I could base it on a Front Range kit which provided an easier starting point due to the ends, doors and roof especially.  This is a better view than what I've shared before as at least I now have scenery for it to run through.

I also have one of those flour service cars built from an Athearn ice bunker reefer.  The MP version differed in some details from the NW/Wabash cars, but this was kitbashed from the same article as the CWE car in the previous post.  The roof uses parts from two different kits to add the extra ribs 

I think this is the only Front Range boxcar I ever built that retained factory paint.  I added some extra grabs and decals based on prototype photos of similar cars.

Rob Spangler MRH Blog

Reply 0
Bernd

Pre 70's cars

Jared,

Hey, get some of those cars done and we'll make a thread on Silver Streak cars. I have a few more myself that are done, but not weathered and few still in kit form.

Bernd

New York, Vermont & Northern Rwy. - Route of the Black Diamonds - NCSWIC

Reply 0
shoofly

Post 1971 ACF 5250m from Front Range

Tom & Rob - I think the x72 upgrade is a model railroader's right of passage they are so readily available at train shows and it's very simple to replace the underframe and other details.

Been working on a project that I thought I might give a sneak peek. A bit more info is here http://conta.cc/1992UIi

These FR 4650 ACF CenterFlow Hopper cars were otherwise "throw away" projects. As new models get more expensive ($45-$50+) I have found enjoyment in modeling with what I have on hand. I'm finding many kitbashes that are "2 out of 3" style where you start with 3 cheap plastic cars, modify them in a certain way where you end up with 2 truly unique freight cars that are not available yet as RTR. Even if they do produce them in RTR, are you prepared to shell out $50+ for them? I find many aren't, and this is a reasonable and fun alternative.

I'm 50% through rebuilding the end cages. The next time around I think I'll stay with stock FR end cages; keep it simple.


5250Roof.jpg 

derframe.jpg 

Chris Palomarez

Reply 0
Reply