Scarpia

A continuation to the story following my progress of the Central Vermont RR's Barre Branch layout's construction.

Modeling 22 Stories Up

Benchwork without ToolsBuilding the Barre Branch in PaperBuilding a BackdropThe Videos
Module 1 — Module 2Module 3Module 4Module 5Modules 6 & 7 — The End

The idea is to work up each module individually, putting down the roadbed, track, wiring, and turnout controls while the module rests in an easily workable state, and than join it to the next one once that is completed.

This module represents the process of rolling the construction of the layout around the room.

Section Plan


HO, early transition erahttp://www.garbo.org/MRRlocal time PST
On30, circa 1900  


Reply 0
Scarpia

Starting Module 1

Module 1 is the the far end of Montpelier Junction; there was no reason to work in one direction more than another, but I thought I'd start by the door.

First up after removing the paper template was putting down the foam insulation board I brought with me (yup, shipped 3 sheets).

 /></p><p>Next up was overlaying the template back on top of the insulation.</p><p><img rel=

and now you can see why I marked up the template in Crayon.  The river's edge of the foam was cut out.

Now to wait to ensure that takes.


HO, early transition erahttp://www.garbo.org/MRRlocal time PST
On30, circa 1900  


Reply 0
Rio Grande Dan

I have one of those yellow tool Boxes too

Thats my Fast Tracks Kit Box. I keep all my turnout fixtures in the bottom of mine as well as all kinds of solder, solder flux ,18" long pieces of rail, little wire brushes, a rail bending jig,  extra soldering tips, & the point form tool + all the Point filing tools in the upper tray.

In the botton I also have 6 bags of turnout ties 3 new Fast Tracks only crosscut Files and two Weller Soldering Irons about 400 PC Board Ties plus I keep the little Bill boards Fast Tracks sends with their fixtures.

My Box weighs close to 45 pounds so if you have as much stuff in your yellow tool box as me that should weigh down the foam top with no problem. I really like that tool box and wish I could find a couple more.

Now that the foam is glued down to the top of your table your rails and track are not far behind good luck and keep the photos coming.

If I were you I would make a step by step film as well as written discriptions and still photos of your progress to submit to Joe and the MRH crew for a MRH Magazine article or two on the whole construction process. Maybe it would be enough to make you a bundle of money to help finance the Railroad. you could call it 22 stories up and how to build a one room DCC model railroad in A High Rise. It would make a great book for model railroaders living in apartments.

Well keep going and have a great time in the sky.

Dan

Rio Grande Dan

Reply 0
Scarpia

If I were you I would make a

Quote:

If I were you I would make a step by step film as well as written discriptions and still photos of your progress to submit to Joe and the MRH crew for a MRH Magazine article or two on the whole construction process. Maybe it would be enough to make you a bundle of money to help finance the Railroad. you could call it 22 stories up and how to build a one room DCC model railroad in A High Rise. It would make a great book for model railroaders living in apartments.

I thought that's what I was doing - step by step descriptions and still photos of my progress.  While my main goal is to build myself a railroad, a side goal is to provide a guide (of sorts) to folks who are in a similar situation to myself.  Personally, as this is already a combination of articles and posts, I think we're on our way.


HO, early transition erahttp://www.garbo.org/MRRlocal time PST
On30, circa 1900  


Reply 0
Bob Carswell

Glueing Styrafoam

Scarpia - Have you tried PL Premium? I use it all the time gluing foam to plywood for modules. Never had a problem with it and it never lets go.

Reply 0
rfbranch

Benchwork

Hey Scarp-

I'm sure you mentioned in this in the past but I couldn't find it in any of your posts.  It looks like your benchwork is ripped plywood but for your joints are you just using wood glue and finish nails?  I'm curious because I'm thinking along those lines for my next layout and built a small test section with 1x3's to see if it would hold up but was curious to see how it's holding up for you.

~rb

----------------------------------------------------------------------------------------------------------------------------------------------

~Rich

20Banner.jpg 

Proto-Freelanced Carfloat Operation, Brooklyn, NY c.1974

Reply 0
Scarpia

Joints

Rich, the joints are exactly that - glue and nailgun butt joints (the construction is not in my posts but in the article). I was thinking of biscuit joining them, but that would have added a lot more time to the process than I had available to spend. I was also somewhat worried about the biscuits swelling, but that may have been a non-issue. As far as holding up, zero problems. Remember that these shipped in a large metal box, during the hottest part of the year, to what is one of the hottest places on the planet. Abu Dhabi isn't just hot, but humid too; 110-120 and 85% high humidity was common. Through all that, zero problems. I would hazard a guess that it wasn't the choice of joinery, but the choice of material that made the difference. 1/2 inch sanded ply is a stable medium, and clearly the lack of wood movement meant the joints weren't stressed in any fashion. The sanded ply was $35 a sheet, and it took me three sheets to build these 7 modules, well worth the cost based on the results.

HO, early transition erahttp://www.garbo.org/MRRlocal time PST
On30, circa 1900  


Reply 0
Scarpia

Dried Glue

With the foam board now firmly secured to the plywood, I can move forward with this module.

The paper template goes back on and aligned.

 /></p><p>And I carefully slid in the cork underlay where I wanted it to go.</p><p><img rel=

I marked the foam with a red pencil around the cork, so I'd know where to glue those pieces

 /></p>


HO, early transition erahttp://www.garbo.org/MRRlocal time PST
On30, circa 1900  


Reply 0
Scarpia

Dremel & Foam = Success with a Mess

I get frustrated more by small things, than by large obstacles. The fact that I didn't have a rasp, and that getting one locally isn't impossible, but a lot more involved than just running down to the local hardware/box store, was irritating me to no end.

I took a look at what I did bring, and I pulled out the Dremel. I wonder how this wire brush attachment will work...

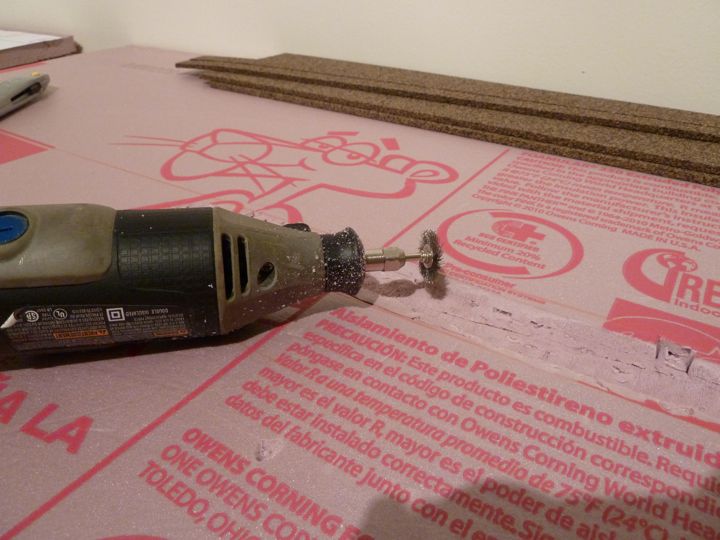
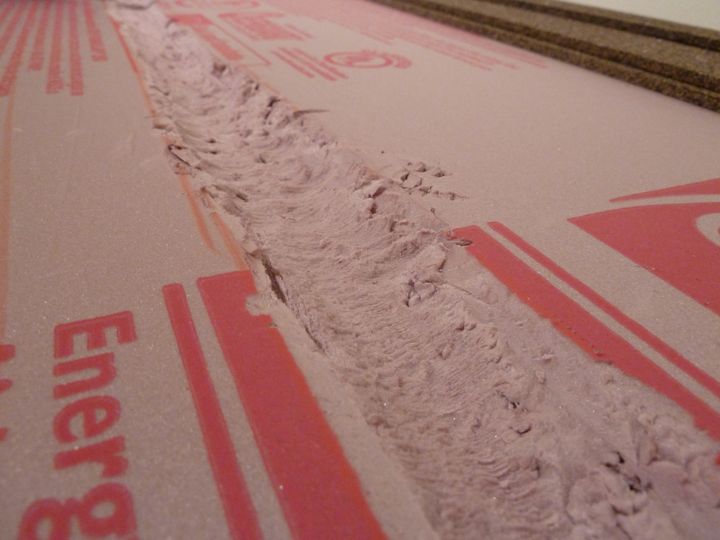
Really well, actually. It gave me a nice concave impression for the ditch (this is just a base cut, I will fill it with Spackle or whatever I can find that's close), but boy did it make a mess. I ended up with a vacuum hose running right behind it, and that still wasn't enough to catch the mess.

One thing about modeling in an apartment, is you really have to stay on top of keeping it clean. I can't let materials just fall to the floor like I did in my old basement to be picked up later, you need to clean constantly.

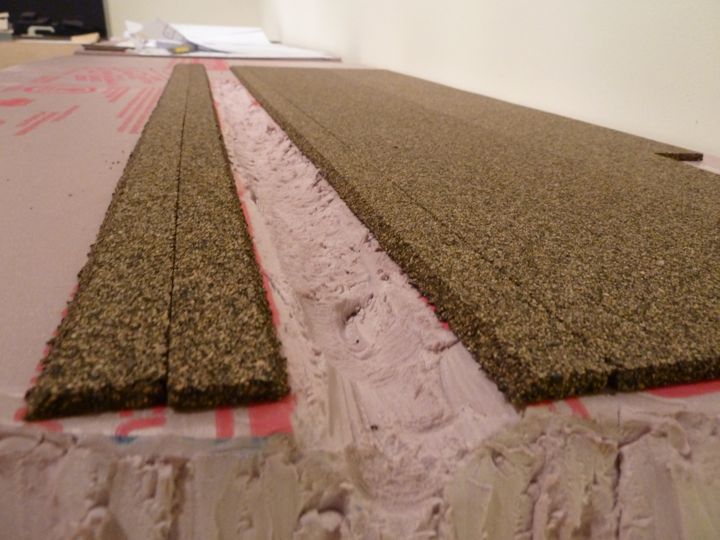
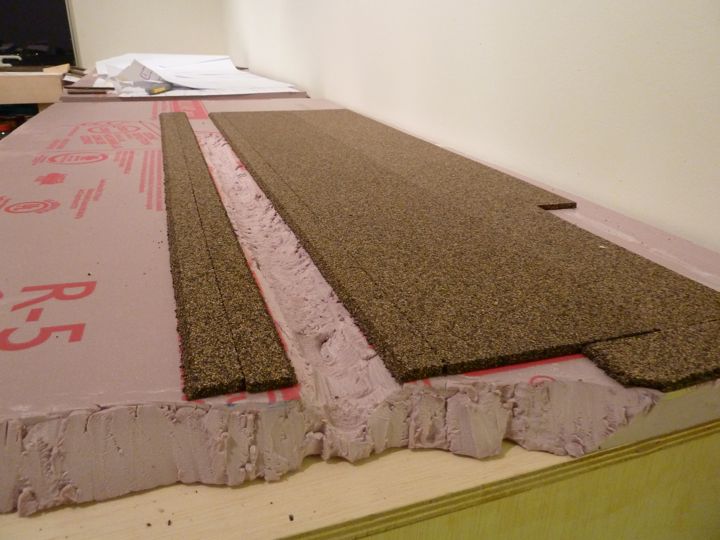
With the ditch now cut in, I went ahead, and put in the cork roadbed.

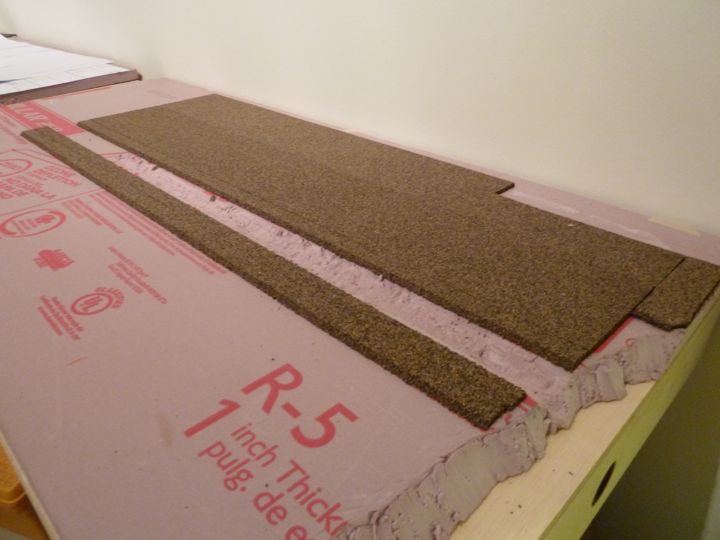
Running the beveled edges into the ditch should help enhance the slope.


HO, early transition erahttp://www.garbo.org/MRRlocal time PST
On30, circa 1900  


Reply 0
BlueHillsCPR

Foam EVERYWHERE!

Great stuff Scarp!

I also found wire bristles would carve foam really well and leave a nice rough texture behind that you wouldn't get with a hot wire etc.  I used a Dremel on foam too and found it worked very well for carving and shaping but just as you noted, man what a mess!

I worried a bit about how much foam dust my Dremel might be sucking in but it has not seemed to hurt it so far.  I imagine the vacuum cleaner would help in that regard.

I like the fact that you are doing a step by step how to in your blog!  It's instant gratification for me as I don't have to wait for the next issue to see what you are up to!  Blogs like yours are one of the great things about MRH!

Thanks for sharing!

Reply 0
Scarpia

Difference of opinion

Note that the step-by-steps are as much for me as anyone else, I've been doing this type of blog work for over a decade now, and find it a great way to take notes and identify problems.

I have a difference of opinon with you on one thing though  - what makes MRH great is that everyone, at all levels, are willing to share their experiences and knowledge with everyone else.


HO, early transition erahttp://www.garbo.org/MRRlocal time PST
On30, circa 1900  


Reply 0
BlueHillsCPR

Either way...

Regardless of why you are doing it, it's a great read and I thank-you for that.

If that's the only difference of opinion we have, I'd say we are getting on fabulously! [wink]

Your point is well taken though, the free exchange between modellers at all levels is a great thing!

Reply 0
Dave K skiloff

My only concern

The only concern that I have with the edge of the cork being right at the edge of the ditch is the ballast falling in and settling in the bottom of the ditch.  Do you think that will be a problem, or have you already thought of a solution?

Dave
Playing around in HO and N scale since 1976

Reply 0
Russ Bellinis

I think some masking tape would fix the ballast problem.

Scarp, in case you hadn't already thought of it, I think putting masking tape over the ditch before you ballast would keep ballast from staying in the ditch when you ballast.  Some will fall in, but once the ballast is set, just pull up the tape and the ballast in the ditch should come out with the tape.

Reply 0
Scarpia

ballast in the ditch

I honestly hadn't considered "ballast in the ditch" at all, for a couple of reasons:

  • The ditch will be shallower once I "line" it with spackle (or whatever I find)
  • These are yard tracks and a siding, so the ballast won't be curbed like on the main. I intend on making the shoulder of the cork part of the slope, and at this time, grassed.
  • If a little gets in, well, that's prototypical!

Still, a little masking tape while ballasting the flat portions may be a good idea, thanks for bringing to my attention now. Ballast is one of the things I'm worried about running out of, as I had no good way to estimate what I really needed.


HO, early transition erahttp://www.garbo.org/MRRlocal time PST
On30, circa 1900  


Reply 0
Russ Bellinis

What color ballast are you going to use?

If it is buff, I wonder if you could dig up some local sand that would be close enough?  Just run a magnet through it to make sure there are no metal particles in it and the price should be right.

Reply 0
Scarpia

Cinder

Cinders here in the yard....but the truth is I will be returning to the US on occasion, and will probably be taking an empty suitcase there, but full on the way back.


HO, early transition erahttp://www.garbo.org/MRRlocal time PST
On30, circa 1900  


Reply 0
Scarpia

With that cork down, I

With that cork down, I finished off the module. Extending the main line ad track yard areas was easy, just measure and cut.

For the freight house lead, this module has a switch on the end. Using the paper template I punched through along the track center, and transferred the line to the pink foam.

 /></p><p>I cut the single roadbed strips to match the outside of the turnout shape (based on the center line), and than filled the center with extra cork (left overs from the large yard pads).  You'll notice a couple of screws; I've used toothpicks to hold cork in place while drying on foam board, but I didn't have any. The screws actually held well in this denser foam, and help keep the curve.</p><p><img rel=

I was also able to mark the throw-bar position and add a pad on the side. I wonder though, would the prototype have put it here, or on the outside of the track?


HO, early transition erahttp://www.garbo.org/MRRlocal time PST
On30, circa 1900  


Reply 0
ocalicreek

Support shelving

Your support legs and shelves look very much like an Ikea product.  Did you make them yourself, purchase them here and ship them, or purchase them there?  My apologies if you mentioned this in the article, I only read through it recently and may have missed it.

Thanks,

Galen

Visit my blog, Gallimore Railroading, at ocalicreek.blogspot.com

Reply 0
Scarpia

Supports

Galen,

Thanks for your question - the support legs were purchased locally.

I'll have a chance to address that in more detail a bit further down the road - stay tuned!


HO, early transition erahttp://www.garbo.org/MRRlocal time PST
On30, circa 1900  


Reply 0
Russ Bellinis

I think the prototype would always mount switch stands to

the outside of the track away from neighboring tracks.  I'm not sure about steam era railroads unless the switches could be thrown from the interlocking tower, but in a modern yard, if they can't put the stand in a safe location they will use remote switches.  It seems to me if I remember correctly at the industry yard for the U.P. (ex S.P. yard) they had a few remote control switches that were broken so that they could not be controled from the tower.  The yard crews were still able to control them remotely on site.  That is they could control a switch three or four tracks over from where the switchman was standing clear of the ladder.  It is just too dangerous to operate a switch stand where the switchman might slip and fall onto a neighboring track.

Reply 0
Scarpia

thanks Russ

Thanks Russ, that's a good rule of thumb. I will move the pag to the other side.

HO, early transition erahttp://www.garbo.org/MRRlocal time PST
On30, circa 1900  


Reply 0
Scarpia

Form and Sandpaper

I picked up (finally) some sandpaper and a rasp(ish) style tool. That allowed me to work the edges of the foam, and the edges of the cork roadbed to a smoother, rounder shape.

 /></p><p><img rel=

With that done, and the throwbar pad moved (thanks Russ), I than cut a piece of extra foam board to level out the ground around the freight house. Another advantage of having the mock-up building.


HO, early transition erahttp://www.garbo.org/MRRlocal time PST
On30, circa 1900  


Reply 0
ocalicreek

watch out for warping

I doubt humidity is something you have to worry with in Abu Dhabi (just guessing...I could be totally wrong).  But even so, once you wet the top surface of that foam core, watch out for warping.  Even the best contact cement might stretch and pull away from the foam or pull the foam with it.  Homasote does not warp, but foam core sure does!  I have heard Gatorboard will not, however...

Galen

Visit my blog, Gallimore Railroading, at ocalicreek.blogspot.com

Reply 0
Benny

I find the best glue for this

I find the best glue for this job is simple elmers woodglue, or white glue...

--------------------------------------------------------

Benny's Index or Somewhere Chasing Rabbits

Reply 0
Reply