Progress on "Chainsaw II"

Scarpia's picture

With testing on the benchwork, roadbed, Fast Track turnouts and hand layed track behind me, it's now time to begin putting some of this into practice. As I've noted in other posts, I've already made a Code 83 No. 6 crossover and now all of my Code 83's,  which leaves me with 2 left, 4 right, and a crossover in Code 70 (No. 5), and one left Code 70. No. 6.for the yard area.

I had originally planned on  just No. 5 turnouts; but as I got a No. 6 jig on eBay, I've converted the mainline turnouts to 6's (not reflected on these plans.)

Here's the plan for the area. note the color coded rail sections indicate the code rail. Blue is Code 83, Purple 70, and Pink 55.

I decided to remove the raised mainline; I was having issues with the transition to the yard with this layout. I'm hoping that the closer set ties, thicker rail, and different ballast will be enough to set it off. I'm going to pursue the raised mainline at a later date and stage.

Onwards!

Comments

Scarpia's picture

First up was connecting a

First up was connecting a code 83 No. 6 crossover, and a code 83 No. 6 right hand turnout. Ties are glued to the homasote.

The cross over anchors one end of the yard. The main line is on the bottom, the top leads to the arrival track and yard (both to be code 70) to the right, and the switching lead to the left.

The wood ties were left purposely long at this stage.

I marked out lines on the ties with pencil, and than trimmed them with a sharp blade.

With these in place, I can finish placing the ties in this section.

After assembling another couple of turnouts, I than ran the ties along the main that join them. As I have the quicksticks, I'll use them on the next couple of turnouts and just leave two aside for measuring and patterns.

All of the No. 6 code 83's are done, and spaced out. I've begun drilling holes, and continuing to lay more ties along the main line - here is the first curve, behind the turntable pit.

These are the quick sticks under the turnout - I chose to modify the Fast Tracks process for my application, as the turnout is not glued to them at this time, but the ties are glued to the roadbed. This became quite tricky to do, but worked out as long as I was careful with the application of glue. You can also see in this shot that the mainline is complete all the way down. (well the ties are down at least.

And a view from the other end.

ChrisNH's picture

Good stuff.. Are you planning

Good stuff..

Are you planning to put up a backdrop? Easier now then later.

Chris

“If you carry your childhood with you, you never become older.”           My modest progress Blog

dfandrews's picture

Great work

Scarpia,

Great work.  And lots of photos.  Thanks.  This is all a tremendous encouragement to me; I tend to slump down in a chair when I get home from work.  Your posts are a good reminder that I can do little stuff and subassemblies that add up to a big whole.  Keep it up.  Thanks again.

Question:  in the last photo it appears that the lighting wiring is romex running through holes in the metal framing.  If so, by all means, protect the romex.  There are plastic bushings available that snap in, and will protect the romex sheath from abrasion (and potential short:  2000 +/- watts of energy can do lots of damage.)

Don

Rincon Pacific Rwy, 1960.  HO scale std. gauge - interchange with SP.

DCC-NCE, CMRI, JMRI

Scarpia's picture

Backdrop and Power

Chris, I'm not sure on a backdrop at this time, due to it's chainsaw nature. I probably should though, just to do it.

Don, thanks for the heads up. The Romex carries power for the internal lighting; I'm careful with electric, but I was under the impression that between the internal and external insultion of the wires it woud be fine. I'll look into the grommets.

Per the small work, this method kind of requires it - I've found it better to work on both ends at once, at least as far as laying ties goes, to allow the glue to dry sufficiently. It takes me about a half hour to load up two of the tie template sets (each about 2 feet long) and put them down, as I almost always have to wrangle one or two into position. By the weekend, I'm hoping to be able to begin staining this part of the mainline.

Don, thanks for the heads

Don, thanks for the heads up. The Romex carries power for the internal lighting; I'm careful with electric, but I was under the impression that between the internal and external insultion of the wires it woud be fine. I'll look into the grommets.

Absolutely not!  Don is quite right.  Get the insulators for the studs or use armoured cable to wire in metal studs.

Scarpia's picture

Stymied

Work on the layout this weekend was stymied as my rail order arrived, incorrect. A simple picking error led to me getting weathered instead of un-weathered rail, not great for soldering turnouts.

While I wait for the correct rail to arrive, I installed the two TCS T1 decoders into a pair of life like proto 1000 RS-11s.

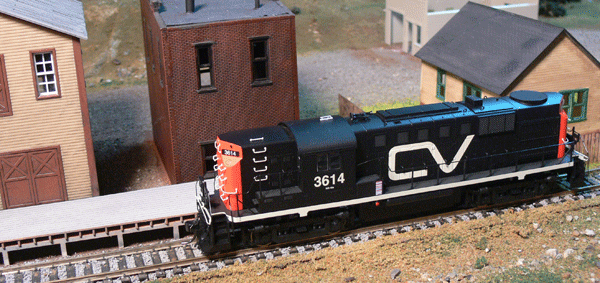
Fortunately for me, they had a great link of model specific installation photos. The installation was a snap; everything worked the first time. That was truly a first for me, and I was pretty excited. The soldering experience I've picked up from the Fast Tracks switches is really paying off! These locos run very well, very smooth (even at low speed), and have a lot of pulling power. Once weathered, and the plastic sheen turned down, they should be real work horses. I was able to consist and run them easily.

I also assembled three packages of Sergent couplers and only managed to lose about 4 springs and no ball bearings. These too are getting easier to put together with added experience. With those put together, I was able to not only Sergent equip these RS-11s, but another 8 cars in my fleet (I'm replacing hork hooks first, than going back over the Kadee compatibles).

I switched a couple of small trains last evening just for kicks, and there are a couple of things I've noticed now with the Sergents that I have them and have begun to use them.

The first thing is I love how they uncouple. I find that I am NOT fighting with the uncoupling process, simply reach in, hold the wand on top of the coupler, and reverse the loco, and voila. And right where I want the car.

The second thing I love about them is how they don't uncouple. Once they are mated, they stay hooked, no accidental disconnects over delayed magnets, etc.

The third thing is they way they look. Not only do they look better, but they make trains look better, as the coupler gap is smaller, and this is not a problem even over short turnouts and the one piece of 18" radius sectional track on my test layout, on locos like the RS11s and 50" cars.

The fourth thing I like is how they install, other than fighting with the spring (but you get better with experience), installation on almost anything is easier than with Kadees, as the height is not as vital.

The one drawback is coupling; the couplers do have to be aligned to couple successfully. This requires a bit of experience (and I'm getting better, so it's becoming less of a problem). Kadees couple easily most of the time, the Sergents do as well only if they're aligned, but will do so on tight curves. This became more apparent and more work when making new connections, ie a different locomotive or car connecting than what was there previously, which requires alignment. On my test layout the yard is in the middle of a 4x8, so reaching in to align things wasn't the easiest, but you do get better as you go. With a more shelf like (narrower) layout that I'm building, this will be much less of an issue.

Besides the Sergents, I also upgraded the wheel sets on any car that didn't have metal wheels. I've used the Intermountain metal wheels, and I like them.

Well, that's it for now. Cheers!

ChrisNH's picture

Some of the layouts I operate

Some of the layouts I operate on have remote locations where not being able to couple reliably could be a problem.

Is the coupling issue a problem on straight track? I am thinking of a few industries in particular where I pull the cars out.. then push them back using delayed uncoupling so I don't have to reach in..

Chris

“If you carry your childhood with you, you never become older.”           My modest progress Blog

Scarpia's picture

Problem may be the wrong word

Problem may be the wrong word - it's just the way they work. To answer your question, it's not relevant if the cars are on a curve or a straight as the couplers don't self center, and they stay in the aspect they were in. If they were to the right on a curve, they will be to the right on a straight section. If they're centered for connecting on a curve, they will not be aligned correctly for a straight.  So you still have to verify that the couples are aligned, just like the real guys.

Your consideration on the inside of the industry is a good one, and I could see that as being a real pain in the behind. This maybe in a large part because layouts are designed to take advantage of the Kadee systems; retrofitting Sergents may cause a lot of operational headaches.

On my own test layout, I have delayed under track magnets so I can set out cars at the coal dealer from across the table; now I need to be on site.

Naturally in designing a new layout, you can work around those issues from a design standpoint, such as having a removable roof for the industry.

On the American  Flyer layout that I operate on, we have to do the same thing - make sure cars are aligned, and the knuckle is open - so it maybe less of an issue from my perspective.

joef's picture

First Look on Sergent couplers coming in Issue 3

As part of the testing we've been doing with Sergent couplers, you notice that the couplers are not self-centering the way Kadees and clones are.

As far as doing a delayed action uncoupling by hand, the process is the same. You uncouple the cars, then you move one coupler off-center so the two coupler faces no longer mate - the "thumb" of one coupler pushes on the "palm" of the other coupler. Then you just push the car in place and pull away - just like you do with Kadees.

Joe Fugate
Publisher, Model Railroad Hobbyist magazine

Joe Fugate's HO Siskiyou Line

Scarpia's picture

Looking forward to that article

I'm looking forward to that article, Joe.  

One other comment pertaining to the Sergents is car weight, I have a lot of underweight cars (a scale and weights is rapidly climbing on my to get list), and with metal wheelsets, the couplers don't set even when aligned due to lack of resistance of the car. Its clearly a weight issue, as if the same car is in a block it hooks up fine.

I know car weight is important for operational reliability, this is just reinforcing that  fact.


>> Posts index

User login