Scarpia

After a much longer return trip than planned, we arrived back in the Middle East, with a bag full of model railroad goodies thanks to Walthers, CMT, and a local Vermont hobby shop.

contact wipers, a couple of new Accurail Rutland car kits, light bulbs, scenery accessories....

...chain link fencing, half a dozen CNR boxcars, canopy cement, and yes, flex track.

Don't everybody scream at once, I decided to do the remainder of the staging with flextrack instead of hand laying, as it will be invisible. I went with ME as that way the rail height is the same as the hand laid areas.

The flex took some damage in the luggage as you can see, a good couple of inches on this one end will need to be trimmed, and that's despite taping them to a yard stick and putter for protection.

The Trueline CNR box cars were a surprise, I had had them on pre-order with CMT for the past 6-8 months or so, the fact that they could ship to my stateside address while I was there was great!  Each boxcar in the set has a different road number, and with varying graphics.  Fortunately they survived the trip.

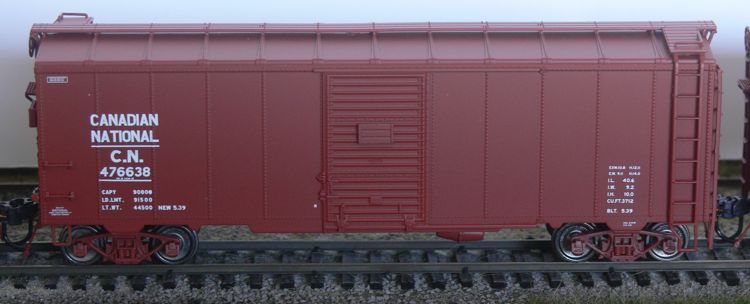
now to pull those ugly couplers, and weather these guys up!  They really do have nice detail to them, which at the height of my layout, really shows.

It was great being stateside for a while, but I'm looking forward to getting back to work!

Now I just don't know where to start.


HO, early transition erahttp://www.garbo.org/MRRlocal time PST
On30, circa 1900  


Reply 0
Joe Brugger

Thanks

Thanks for putting up photos of the True-Line Trains Canadian cars; some of the smaller companies don't get a lot of attention and aren't well distributed so it's nice to see the product in a clear photo.

For flextrack, next time, try a meter-long PVC pipe with caps, if that will fit in the luggage.


Reply 0
Scarpia

Track protection & couplers

Joe,

Walthers was kind enough to pack the track in a nice, solid tube - but as you may expect it wouldn't fit in my luggage (duffel). Three feet is longer than you think! I was thinking of putting it through as a second piece of check in, but I wasn't confident that it would arrive.....

Back to the cars. I replaced the couplers on a couple today - to me, it makes a difference!

Left, Sergent, Right, Kadee

The Sergents do provide a nice tighter spacing.


HO, early transition erahttp://www.garbo.org/MRRlocal time PST
On30, circa 1900  


Reply 0
Scarpia

Weathering has begun

I started the weathering process on this "fleet" by hitting the cars with a simple alcohol/india ink wash as a base coat. Even this on it's own does a ton to reduce the new model shine.

These two TrueLine cars are identical other than road number, the one one the right not having had the ink treatment.


HO, early transition erahttp://www.garbo.org/MRRlocal time PST
On30, circa 1900  


Reply 0
jbaakko

Very nice work!  I know how

Very nice work!  I know how traveling with trains can be.  Try returning from a show, with out checked bags, and still transporting trains!  Makes for a weird process, two carry ons, one being a small canvas shopping bag stuffed with train stuff...

Reply 0
Joe Brugger

That's the one situation in

That's the one situation in which I can see something like the A-Line cardboard box and cordura bag system being effective. There are two or three companies selling them. They actually holds items safely and don't make you look like a hobby store refugee or something. Still wouldn't keep flex-track from being bent.

Plano makes a couple of plastic boxes with a height and dividers that suit HO equipment pretty well and I've seen others that would probably work for N scale. You'd have to improvise padding.


Reply 0
Scarpia

weathering continued

I've been slowly working on the cars, adding my weathering in steps. Despite the great articles that have been published in MRH and elsewhere, I'm kinda doing this my way, based on the fact that I pre-packed X,Y, & Z before I moved, so I'm going to use them.

Once the alcohol and ink dried (overnight, but was still a touch tacky), I hit the lower 2/3rds of the car sides with an earthy colored powder (from AHM). Again, the car on the right is the out-of-box model.

and than a dusty yellow color along the lower 1/3rd. The roof also got a soot black dusting.

and than a highlight white along the ladders, grab irons, and under the white painted areas.

I've done these layers heavier than I want on purpose, as the dullcoate softens it all a significant amount (as you can see below).

This gives me the look I'm want, that the cars are used, but not decrepit. Weathered, not relics. I lost a little of the white I wanted under the paint, so I may go back over those areas again.

Next up on the model though, are the wheels and trucks.

I always find it amazing though, how just a few simple steps like this (ink wash, weathering powders, and dullcoate) can alter the color and look of a model so much.


HO, early transition erahttp://www.garbo.org/MRRlocal time PST
On30, circa 1900  


Reply 0
Geared

Looking good

Looking good, Scarpia. Nice attention to the detail of the weathering. Used, not abused.

Roy

Roy

Geared is the way to tight radii and steep grades. Ghost River Rwy. "The Wet Coast Loggers"


Reply 0
rfbranch

Color Application Order

Scarp-

A really nice looking car.  As you said, weathered but not ridiculous.  I do have one suggestion to try with your powders that gave me better results.  Try starting with your white highlights first followed by increasingly darker colors.  I was going in the same order as you until I read the instructions (imagine that!) in my powder supplies which suggested going light to dark.

I think you'll find the highlights will blend a lot better and you won't have any stark contrasts that throw off believability.  Also, you will find yourself using far less black (excepting cinder ash on rooftops of course) as the layering of gradually darker colors will produce that dark brown grime effect that our eyes perceive as actually being black.  I think the color is far more convincing than just applying black as i have in the past. 

Great to see your progress!


~rb

----------------------------------------------------------------------------------------------------------------------------------------------

~Rich

20Banner.jpg 

Proto-Freelanced Carfloat Operation, Brooklyn, NY c.1974

Reply 0
Scarpia

I'll try that

I'll try that on the next one, Rich! Who would have thought to read the instructions!


HO, early transition erahttp://www.garbo.org/MRRlocal time PST
On30, circa 1900  


Reply 0
Scarpia

wheels and trucks

The wheels and trucks went quickly, thanks to the Floquil rust paint pen.  A quick touch of the air cables with a black sharpie, and this car is finally ready to run. Not a shabby looking car.....

so I'll bore you with just two more pictures, I'm not seeing a need to continue drowning you, the gentle reader, with continued imagery.  486853 was done in reverse as Rich suggested, but I'm not sure if it makes a difference. For the record, I did not miss the one wheel, I wanted it looking like it was newly replaced.


HO, early transition erahttp://www.garbo.org/MRRlocal time PST
On30, circa 1900  


Reply 0
Jurgen Kleylein

The bearings have some bearing

One thing for steam era modellers to keep in mind is that the wheels on freight cars back then tended to look darker than today because they used plain bearings and a lot of grease was thrown onto the wheels from the bearings.  Cars today have dry and lighter coloured wheels because of the roller bearings in universal use.

The other thing to realize is a brand new wheel would be a rusty red colour, with only the wheel tread highly polished from turning.

Nice job on the weathering.  I like the look of those Sergents

Jurgen

HO Deutsche Bundesbahn circa 1970

Visit the HO Sudbury Division at http://sudburydivision.ca/

The preceding message may not conform to NMRA recommended practices.

Reply 0
Scarpia

Ok...

Blacker wheels. Makes sense, thanks for that. I'll darken them up, and rust the new one.

HO, early transition erahttp://www.garbo.org/MRRlocal time PST
On30, circa 1900  


Reply 0
numbersmgr

Never bored

Scarpia

I'm never bored looking at pictures of your modeling - I have learned a lot watching your work.

Thanks for sharing both your triumphs and pitfalls.  I always told my kids that learning what doesn't work is probably more important than learning what does work.

Jim Dixon    MRM 1040

A great pleasure in life is doing what others said you were not capable of doing!   

Reply 0
Scarpia

Pitfalls

Jim, thanks for your kind words. I'm thinking that we learn from pitfalls and screw ups, than I should be the smartest person in the world by this point, but clearly I got that wrong as well.....

Jurgen, take a look at this car. Are the wheels looking better? I used black grimy powder over a rust base instead of rust over a rust base


HO, early transition erahttp://www.garbo.org/MRRlocal time PST
On30, circa 1900  


Reply 0
skiwiggy

Weathering and some history!

Hello Scarpia,

  The weathering job looks nice.  When I first looked at the photo I thought you had removed the Rutland lettering.   It must be the lighting that makes the car look undecorated.   

I have this same car running around on my layout however I had to change the car number to 7999 instead of the Accurails 7994 which is a number pulled out of thin air.   The model is of the one and only outside braced boxcar that the Rutland owned.  The car was purchased from CNR in 1922 after some type of mishap at Larrabee's Point that left the car sitting in Lake Champlain for over 3 years. 


Nice work with all the cars I especially like the rust color on this ones outside braces towards the bottom of the car.


Greg

Reply 0
Jurgen Kleylein

Maybe a little darker and more even

The wheels still look a little shiny, I think.  I would mix up some roof brown and black, put the car on its side and hold a brush against the the side of the wheel as you turn it with your finger.  Try not to get any on the sideframe.  You want it pretty coated with flat paint.  Cars' wheels usually get dirty while they are spinning, so they get coated with dirt pretty evenly (there are exceptions, of course.)

Jurgen

HO Deutsche Bundesbahn circa 1970

Visit the HO Sudbury Division at http://sudburydivision.ca/

The preceding message may not conform to NMRA recommended practices.

Reply 0
wp8thsub

Wheels

By my era, I have relatively few cars with solid bearings.  For most of them, I have just been painting the wheel faces an even blackish color, with no attempt at variation.  I've found an example on George Elwood's RR-Fallenflags site for reference.


For more see http://www.rr-fallenflags.org/ (click the photo for the direct URL for that particular image).

The typical look is just a solid grimy/oily black, maybe with some dust, but that's pretty evenly distributed too.

Rob Spangler MRH Blog

Reply 0
Scarpia

Marks and Wheels

Greg, thanks for that history - but I'm not renumbering it now. the dullcoate is already dry. Maybe I'll see if I can get a second car later on. That's what I get for trusting in the manufacturer.

Rob, thanks tons for that picture. I really had no idea they were that black; I was of the mindset they'd be rusted like ones you see on modern trains. The reasons why make perfect sense (thanks again Jurgen), I'll re-adjust my wheel processing. 

I've been using pens for a lot of this, (the Floquil rust pen is perfect for wheels) would a sharpie work fine to blacken the wheels, or do you think the results may be too shiny?


HO, early transition erahttp://www.garbo.org/MRRlocal time PST
On30, circa 1900  


Reply 0
rfbranch

Black Wheels

Scarp-


Just my $.02 but I think the Sharpie will make it a little too stark.  While I am modeling the 70's so the grease caked wheels aren't as prevalent I do think wheels should be more grimy than rusty.  Here is what I've done that I like.

Paint the wheel face with the Rail Brown Paint pen and give it 15 minutes to dry to the touch.

Take a black weathering powder and rub it into the face until you get the color you are looking for.  Here are a couple of shots of my rolling stock.  You'll note the 2nd car was some rust on the face of the wheels I applied between the rail brown and grimy black layers.  If you just paint the wheels black that is what they look like:  wheels painted black.  But if you build it up in layers as happens in real life the texture really sells the effect you are after.


dh28124.jpg 

dh28026.jpg 

----------------------------------------------------------------------------------------------------------------------------------------------

~Rich

20Banner.jpg 

Proto-Freelanced Carfloat Operation, Brooklyn, NY c.1974

Reply 0
wp8thsub

Sharpie, Paint Pen, or...

Quote:

I've been using pens for a lot of this, (the Floquil rust pen is perfect for wheels) would a sharpie work fine to blacken the wheels, or do you think the results may be too shiny?

A sharpie might work, but beware of shine.  I've just been using flat black for a base and allowing some dust to accumulate when I weather the underbody.  That seems to approximate the look from the photos I've been using for reference.

Rob Spangler MRH Blog

Reply 0
joef

Journal boxes vs roller bearings

One of the things to notice is how wheel weathering differs for trucks with journal boxes versus roller bearings.

Journal boxes are basically boxes filled with grease-soaked rags, and when they get too dry they get hot and begin to smolder - and you have a hot-box.

Roller bearings basically create a low-friction set of bearings on the axle end, removing the need for heavy greasing.

As to weathering, this means the wheels in journal box trucks will tend to be dark greasy colors mixed with road grime as the journal box grease gets flung off down onto the wheel face, which then picks up more grime and dirt. For roller-bearing trucks, this means the wheels will be some shade of dry rust color since there's nothing getting flung onto the wheel face.

Regulations say that the wheels must be unpainted so it's easy to spot defects, and this bit of insight in how to weather the wheels based on the type of journals will help you do a more realistic weathering job for your rolling stock.

Joe Fugate​
Publisher, Model Railroad Hobbyist magazine

[siskiyouBtn]

Read my blog

Reply 0
numbersmgr

Joe Would this weathering

Joe

Would this weathering scheme hold true for the rail and roadbed also.  I hiope to be able to model the 1920-1930 era when I think journal boxes would have been prevaient (arch bar and andrews - please correct if wrong), so should I plan to weather the rail, etc a grimy black also??  

Thanks

Jim Dixon    MRM 1040

A great pleasure in life is doing what others said you were not capable of doing!   

Reply 0
joef

I would say yes

Jim:

I would say yes, this likely also applies to rail. I recall walking the tracks in the early 1960s when journal boxes were common and I remember thinking how greasy the track always was.

In walking those same tracks today, the rail is now welded and not nearly as greasy as I recall it being as a kid.

Joe Fugate​
Publisher, Model Railroad Hobbyist magazine

[siskiyouBtn]

Read my blog

Reply 0
Scarpia

Thanks Joe

Thanks Joe, Jurgen had basically outlined the same thing concerning the journals, but it's nice to have it explained further.

Now, I just need to figure out which truck is which! I will pass up on the Sharpies, and Rich, your method is exactly what I did, but I didn't build up the black powder as evenly as I should. I'll remedy that on the next one.

On the track, I would presume the amount of grease the built up would be directly related to the traffic volume on said track. I would guess that a < 10 mph siding that sees a car a week would not be as black as the main, and might be as rusty as they are today? Your thoughts?


HO, early transition erahttp://www.garbo.org/MRRlocal time PST
On30, circa 1900  


Reply 0
Reply