pby_fr
 
A more recent photo.
 
 
Header history:
 
Original header:
 
urntable.png 

You may know the TOMA - The One Module Approach. Having not the place yet for a second module, I will make a micro TOMA: it's like a diorama, but in time it will placed inside a normal size module.

Expect for my first layout, when I was a kid, I have always made only modular layout, even if they were not finished. Therefore TOMA isn't anything new for me. I started the current layout a long time ago, with a 10 year hiatus. So I still just have one module for the moment (see photo below).

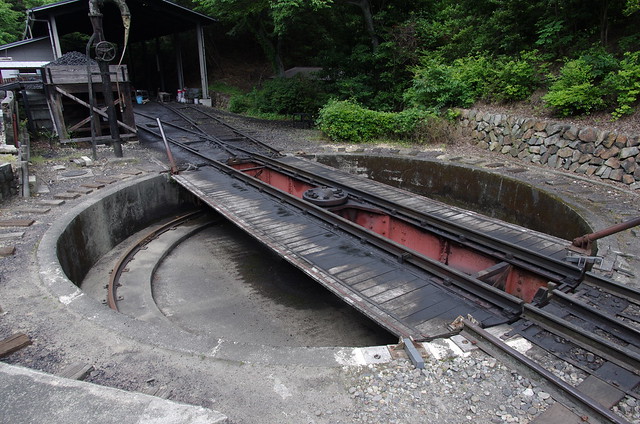
Now I just need to do some details on it, but I would like to build some structure (I'm a maker not an operator). I then had the idea to build a bigger engine shed, to store the many locomotives I build. Which made me think of the SL Tokyo Station at MEIJI-MURA museum of Inuyama: a small turntable in front of a double track engine shed. The turntable will permit me to turn my two steam engines, like in this video:


By the way, if you are visiting Japan and especially the Nagoya region, don't miss the MEIJI-MURA museum, it has many old buildings (1868-1912), and you can ride a steam train and a very old tramway.

Back to the micro TOMA concept: as I don't have yet the place for a second module (or more exactly I don't want to move everything now for this second module), I will build a diorama like which can later be integrated in a full size module. As I build my layout with foam (the module has rigid MDF sides), I plan to make the diorama base with two layers of foam, the top a bit bigger. Therefore, it can then be easily integrated in the future module. But the micro TOMA will allow me to concentrate on the structures I want now to build, and not the whole module. If I see more or less how this new part will be connected to the existing module, I don't need to plan the whole new module now. Also, with a very small size (around 60x30 cm), I can easily have it on the workbench, something not possible for me with a whole module (150x60 cm).

While I'm designing the engine shed with CAD (Fusion 360), I have started to build the turntable following the photos I have of the prototype. I will not reproduce it to scale, but an adaptation for my industrial narrow gauge theme. 

I will use a axial bearing on top of slip ring for track feeding. I will not motorize the turntable, it would be manual like the prototype.


After a quick CAD design, I already started to cut the plastic:

More to follow, but don't expect a quick pace, I work slowly.

pby_fr's blog index

Reply 1
brockpaine

I love it!

That turntable is fantastic!

And I enjoy your current module, too.  It has an enjoyable backwoods feel to it...

r%281%29.png 

Reply 0
pby_fr

Thanks

I have some more photos of the module on Flickr

When I was visiting the museum, I just took some reference photos because I found the turntable cool, but I didn't think at the time to model. But when the idea to build an engine shed came, I directly knew what I wanted in front of it. And seeing the turntable turned in real life made it even more desirable.


Below is a quick sketch I made before starting to work on the scene. At the time, I didn't noted that the prototype has a frog just outside of the turntable, but I will duplicated it because it is a nice detail and it will also reduce the radius of the second track.


scan_r.jpg 

Reply 0
pby_fr

Some progress

I made the central part, and was able to blank assemble it. I still need to add a lot of details.

As I'm building it in styrene, the used tools are very classic. I just bought this T ruler, it is perfect for such job.


Reply 0
pby_fr

More progress today

I started to assemble the turntable bridge. I first put some nice nuts detail in the central part.

Then  I put together all these parts. And started to add some Archer decal rivets.

It is starting to look like the prototype, but I still need to add a lot of rivets and the outside nuts, before adding the horizontal strip to have I beams.

Reply 0
dapenguin

Lots and lots and lots and.........

of rivets.  All exposed.  Good job on an excellent idea


TC Carr
Malheur, Kopperton & Tejas * Sn3½ in 1923
(the I don't know yet) * Sn2 "Gilpin in Idaho"
​Anaconda, Oregon & Pacific * S Scale Heavy Electric
My Blog Index

Reply 0
pby_fr

Even more rivets

I finished the main part of the bridge, adding a lot of rivets. These Archer rivets are quite simple to use, I just destroyed one double row while brushing MicroSol on it (the brush griped on it).


Reply 0
pby_fr

Engine shed

I have also advanced a big on the engine shed design, here a rendering from Fusion 360:

uble_v25.png 

Reply 0
pby_fr

Slow progress

When things aren't clear, I need more time to figure out what to do. I took a lot of time to have one of the four side wheel, and it is still not fixed.

On the other hand, I made the side walkway, which give at least a similar look than the prototype.


Reply 0
pby_fr

Not much more

Replicating the side wheels wasn't easy, therefore it took some time.

Upside down:

Now, I just need to add the flanges of the big beams, some more rivets, and the rails. But the big job would be to make the pit.

Reply 0
pby_fr

Going slowly

I didn't progress a lot lately, I formed the circular rail, and put the flanges on the bridges (I need to add rivets on them). The rails still need to be fixed.


Reply 0
pby_fr

Added all remaining rivets

It took me the whole morning to add all the remaining rivets, on the I beam's flanges. I only put these facing upside, as the other would not be visible at all.

All theses rivets took a lot of time, even with decals, but I think that it makes the model in this case.


Reply 0
pby_fr

Added the arms


Reply 0
brockpaine

Very nice!

Looks like it's shaping up nicely!  Can't wait to see the final product.  What comes next?

r%281%29.png 

Reply 0
pby_fr

Thanks

I just need to finish the six small position locks, and fix them.

I plan to paint the whole turntable bridge, before fixing the rails.

After that, I will make the turntable pit with plaster.

Reply 0
Bernd

Beautiful!

A work of excellence Prof. I lost count of the rivets at 259.  They do look nice. O scale?

Bernd

New York, Vermont & Northern Rwy. - Route of the Black Diamonds - NCSWIC

Reply 0
pby_fr

On30

Thanks. Yes it is O scale, narrow gauge. More exactly 0e, similar to On30 but with a scale of 1/43.5 (French/British O scale).

I like O scale especially for the level of detail I can build on the model. I never was able to something like that in HO.

I don't know how many rivets I put on it, at first I just wanted to buy one sheet of Archer decals rivets, but hopefully I bought two, and as I used just one of the size available on the sheet, I needed to use the second also.

Reply 0
pby_fr

Primer done

I primed the turntable bridge this morning. I used a simple plastic primer with a dark brown color, to have a correct base for the rust and wood colors. The decal rivets are hopefully still well visible (more than on the photos), but I would anyway do some dry-brushing at the end to make them more visible.


Reply 0
pby_fr

Casting of the turntable base

For modeling concrete, I like to use plaster. I carefully created a carton mold.

Unfortunately, I made the plaster too thick, it hardened quickly, not filling the whole mold. And Murphy law stroke again, even this bad casting show clearly the small defect of the mold (concrete "step" made with two layer of cartoon).

I hope to correct most issues with some more plaster, but I doubt that a similar mold would allow me to cast the vertical wall of the pit.

Reply 0
pby_fr

Things don't always go well

I cased the wall of the pit, but the result isn't great, the mold wasn't strong enough to keep the correct shape, and the ring is a bit too big for the turntable.

But yesterday I was able to correct the base part, it isn't too bad now.

I also painted the aged wood on the walkways, just several shade of gray I had. With some wash, it should look good.


Reply 0
pby_fr

Finish base paint

In parallel to the pit construction, I finished the basic paint, with already a faded color. I needed the hide the wood part.

As I used a chipping fluid before applying the red, I could remove some of it to simulate some rust.

It still need weathering.

Reply 0
Bernd

Nice...

looking turntable.

To bad you didn't have good luck with the plaster. With a little patching of those voids I think it would make it look like a well used turntable in need of some wall repair.

Bernd

New York, Vermont & Northern Rwy. - Route of the Black Diamonds - NCSWIC

Reply 0
pby_fr

Thanks

I made a second casting, it was a bit better, but I still need to rework it.

Reply 0
dark2star

Impressive

Hi,

wow, this is some very nice turntable!

Have fun!

Reply 0
pby_fr

One more time

I made for the 3rd time a mold for the pit wall, and then the casting. Doing it in hard wood made it more precise, but unmolding wasn't easy. Also, using brand new plaster made a cast of well better quality.

I was able to adjust the wall to have the correct height, and to fix it on the base. It seems correct now.

Reply 0
Reply