MRH

-12-p_57.jpg 


Read this issue!


Please post any comments or questions you have here.

Reply 2
Russ Bellinis

Great article, but I have one question.

One page 5 it says "warm" white fluorescent tube as 3500k while "cool" white is 4200k.  Is that correct?  Logic says that is reversed and cool white should be 3500k while warm white should be 4200k.

Reply 0
joef

Warm vs cool colors

Quote:

One page 5 it says "warm" white fluorescent tube as 3500k while "cool" white is 4200k. Is that correct? Logic says that is reversed and cool white should be 3500k while warm white should be 4200k.

Actually ... red hot, orange hot, yellow hot are called "warmer colors" because of their relationship to fire. Pure white hot or blue hot are called "cooler colors" because of their association to snow and ice. Has nothing to do with the actual temperatures themselves.

See these charts.

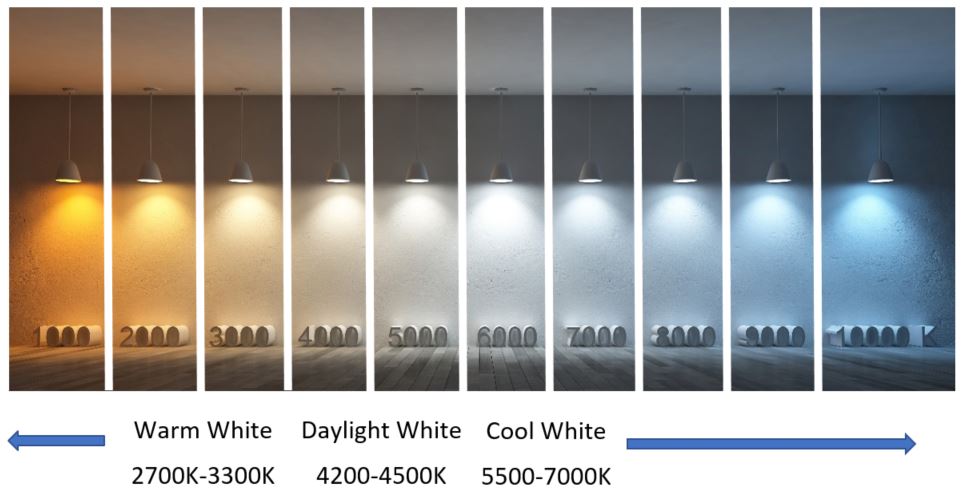
And yes, "logically" it sounds backwards, but that's how it works.

Quote:

Color temperatures over 5000 K are called "cool colors" (bluish), while lower color temperatures (2700–3000 K) are called "warm colors" (yellowish). The fact that "warm" lighting in this sense actually has a "cooler" color temperature often leads to confusion. 

- Wikipedia

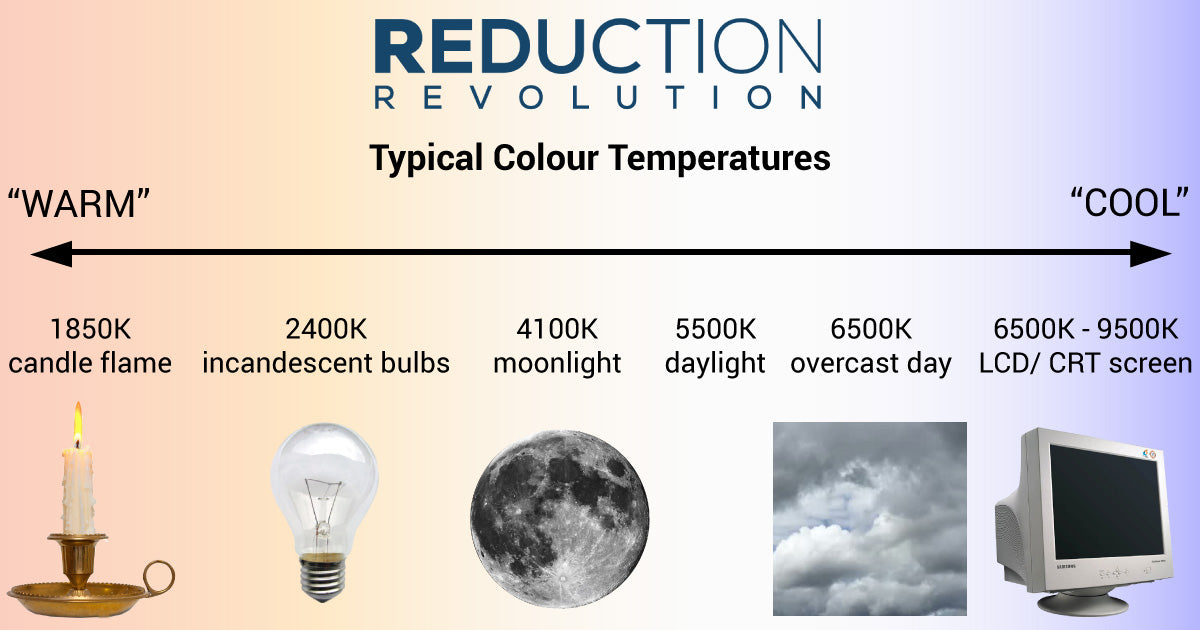
And also this ... from "Color temperature seems backwards" ...

Quote:

On the Kelvin scale, the colors we describe as “warm” have a lower temperature, and the colors we describe as “cool” have a higher temperature. That is because the Kelvin scale relates to science, not to the psychological attributes we have assigned to colors.

http://asktimgrey.com/2020/05/08/color-temperature-seems-backwards/

Joe Fugate​
Publisher, Model Railroad Hobbyist magazine

[siskiyouBtn]

Read my blog

Reply 0
Russ Bellinis

Thanks Joe.

Great explanation to what seemed confusing.

Reply 0
MannsCreekRR

Three strips at an angle works for me

On my layout I found that running one strip of 3000K and one strip of 6000K (SMD2835) gives me a nice color.  I also decided to add a third strip of the color changing LEDs for some fun effects.  The two "white" strips are run through a cheap dimmer boxes that I disassembled and mounted in the fascia, the color changing came with a controller.  For me I thought the strips looked best when mounted as close to the front as possible and at an angle (about 30°).  The strips also stick better on a smooth surface, so to get the smooth surface and have it at an angle I used window flashing from Home Depot that I pressed down with a piece of 2x4 to "open up" the 90° bend it comes with.  I used a bending tool (used in HVAC duct construction) to bend the small lip to a sharper angle.  I apply the strips to the flashing before I install it on the layout (way easier) and the screw it to valance, or bottom of upper level, with self taping sheet metal screws.  The triangle an short lip make a great wire chase that can be accessed by removing valance screws.

lights-6.jpg lights-1.jpg lights-2.jpg lights-3.jpg lights-4.jpg lights-5.jpg 

Jeff Kraker

Read My Blog

Reply 0
z4driver

Digikeijs DR4050

Has anyone any experience of the Digikeijs DR4050 LED controller which is designed for model railraods and comes with RGB and White strips?

Lee

Reply 0
Rick Sutton

@ MannsCreekRR

That is the best installation of LED lighting I've seen on a layout. Kudos! Thanks for that very clear explanation.

Reply 0
YoHo

The standard I've been

The standard I've been starting to move toward is 2835 Warm White combined with 5050 RGB and dimmer/controller. This gives you a nice warm sunlight color as well as noon time full sun with the flexibility to go to a more cloudy look, dusk or night time.

I first started flirteing with color temp in salt water fish/reef keeping and one thing you learn is that water and Salt Water specifically skew the observed color to a more yellow spectrum. It has taken a lot of work to break myself of the mental shortcut that 6500K is "yellow." Because, in fact, it is if viewing underwater. 

Reply 0
DavidColin

Lighting

Thanks for this - very timely for me. Maybe a bit late, actually :^(>
I bought some RGB strip lighting to set into a valence, hoping to simulate times of day. Unfortunately, the "white" setting on the lighting is actually very blue. We've decided to replace it with a just-white strip, and now we have some way to calculate the brightness, thanks to this article. I'm not sure if we''ll be able to fit the white and RGB together, but it's an idea we'll look into.

Reply 0
LehighBob1

Reliability?

I've heard that some of the LED strip lighting options can be less than reliable, with multiple LED failures occurring in just a few hundred hours use.  I'd guess different manufacturers do better than others and "you get what you pay for" applies. 

 Does anyone have real data to confirm or deny? Do LED strip light manufacturers list typical expected life of their priducts?

- Bob

Reply 0
MannsCreekRR

Reliability

I mounted several of the same strips I used on my layout under some cabinets that never get turned off, they have been running for three years, 24 hours a day, every day and not one issue.  I am pretty convinced these things will last on a layout for many many years

Jeff Kraker

Read My Blog

Reply 0
Prof_Klyzlr

"Binning"

Dear Lehigh Bob,

Google "LED Binning Explained",
then consider which "bin" the cheapest-LED-strips you might find on eBay came from...

Hint: I've been bitten once, now I'm exclusively sourcing (for only a few cents extra per metre),
from:

http://www.ledsales.com.au

or

http://www.satisled.com

Happy Modelling,
Aim to Improve,
Prof Klyzlr

Reply 0
Nick Santo amsnick

Quantity not quality.

I appreciated your musings this month Joe and appreciated comments as well.  
 

As I get older it is the amount of light that matters more than the quality or tone.  Adding another strip will work well.  
 

One thing I realized a while ago is that low voltage circuits require better contacts.  In the laboratory there was a B and L Spec 20 spectrophotometer.  It had an automotive incandescent lamp that shown light through a sample.  The lead on the contacts would oxidize and not conduct electricity.  This always happened when time critical measurements were to be made.  Cleaning the contacts on the 12 volt bulb had to become a quick procedure......  When I put the 12 volt LED strips in the cellar I put switches inline to turn them on and off.  I also used some dimmers in different lines.  The dimmers have good screw terminals and good, constant electrical contact.  The switches however were cheap outdoor rated switches with spade connectors.  I trusted the LED strips and quickly found the problem in the spade connectors on the switches were the major problem and the switches were a minor problem.

I have enjoyed the light from the LED strips.  They are light in weight and big in illumination and best of all they are small in a relatively low ceiling cellar.

257EA8C.jpeg 

Nick

https://nixtrainz.com/ Home of the Decoder Buddy

Full disclosure: I am the inventor of the Decoder Buddy and I sell it via the link above.

Reply 0
lineswestfan

2700k Lights for Older Eras?

If you are modeling older eras, say pre-Depression or earlier, would you consider going with lower Kelvin lights?  Those old photos often have a sepia tint to them so making the light warner should give the layout that "old-timey" cast. 

Thoughts?

Richard Kurschner
Superintendent, Lynnsport & Eastern

Reply 0
Russ Bellinis

Is it that the older era was darker, or is it the old photograph

technology not capablle of showing true color balance in the greys?  I suspect that some that had a lot of steam traffic might have had a lot of smoke in the  atmosphere that would affect how things looked, but how common was this sort of air polution out in the country or small towns?

Reply 0
jimcubie1

Thanks, Joe

I just read your article on led’s — like the great work you have done with track cleaning — it is a real service to the hobby. YOur info is smart without being preachy or bragging about how smart you are. BTW — they did not teach lux or lumens in my high school physics. Or maybe I just forgot — most likely.
Reply 0
joef

You're welcome Jim

You're welcome, Jim. Glad you found the info useful ... that's why I do this, to help out my fellow modelers. The lux calculation takes lumens and turns them into brightness for a given layout lighting situation. Most lumen figures assume the lights on an 8 foot ceiling and a typical table height of 30 inches -- and they assume ~500 lux for that amount of lumens. Obviously, if you're doing a shadowbox layout approach like I'm doing, you don't need nearly as many lumens as you do to light a table 30" off the floor from an 8 foot ceiling. Most layouts will be another 18" higher and the lights will be behind a valance, often closer to the layout than when ceiling mounted. The lux computation levels the playing field, and it's a big help.

Joe Fugate​
Publisher, Model Railroad Hobbyist magazine

[siskiyouBtn]

Read my blog

Reply 0
RDUhlenkott MMR275

Sepia toning

Quote:

Is it that the older era was darker, or is it the old photograph

Wed, 2020-12-16 12:48 —  Russ Bellinis

technology not capablle of showing true color balance in the greys?...

Sepia toning was a common practice back then.

Rick

Reply 0
Russ Bellinis

I think my point was that if we are trying to model something

from the real world, sepia toning was a photographic process, and not waht you would see if you were standing trackside watching the trains going by.  We see the world in color and probably most model in color.  A sepia tone might be something that we would do in a photograph of a model railroad, but I don't know that anyone would attempt to model a world color in sepia tones.

Reply 0
Douglas Meyer

Keep in mind that LEDs have

Keep in mind that LEDs have issues with being turned on and off.  Often an LED that would last for decades dies early because it is switched on and off a lot,  

The other issue with modern LEDs and other modern lights is they are not easily replaceable,  like the old Edison based bulbs were.

-Doug M

Reply 0
Will_Annand

16' strips need feeders

It has been my experience that the 16' strips of LEDs need to be treated like track. They need power feeders every 4' to prevent burnout.

Also, the adhesive that comes on the back of the strips in not the best, be prepared to have to touch up spots with glue. I use any CA glue and a small plastic clamp or wooden clothes pin to secure the strip while the glue cures.


Reply 0
Pennsy_Nut

Makes me wonder

I'm glad some of the draw backs are being aired. I had doubts about how well they would stick to a ceiling. And how do you clamp anything to a ceiling? A fast drying CA is what must be used, and a steady hand to hold it for a few seconds till the CA sets. As for power feeders? This sounds like almost impossible when installing LED's on the ceiling, which is where I need to put them. Maybe on the wall? And feeders? They would be ugly and intrude on the wall. And how do you get them from the ceiling to the ? buss? And where do you run the buss? All this makes me wonder how feasible this is if it's true about needing feeders. And a lot of work! How about stringing Xmas lights. Plain white, non-blinking?

Morgan Bilbo, DCS50, UR93, UT4D, SPROG IIv4, JMRI. PRR 1952.

Reply 0
scenicsRme

rail sparkle?

I just read the Fidalgo Island RR post about led strip lighting issues before this one (see posts sidebar), and wondered if the rest of you gets rail sparkle like he did from the strip lights and if so how you handle it? Also seems that still water (flat) scenes would have similar reflection problems?

Reply 0
Douglas Meyer

A friend has added some of

A friend has added some of the LED strips.  Without diffusers and the reflection of hundreds of individual LEDs on the rails gives me fits.  So that can be an issue.  He says he doesn’t see it.  But he is a lot shorter then me.

-Doug M

Reply 0
Brent Ciccone Brentglen

Sparkle and Glue

I haven’t noticed the sparkle issue on the rails, maybe because I mounted the LEDs at a 45 degree angle.

As to the adhesive, I used some supposedly good quality 3m double sided tape, but it has started to come loose, fortunately I also used hot melt glue and a few screws in strategic spots, placed so the head of the screw overlaps the tape, not through the led tape. I suspect that the heat from the leds causes the tape to give way, could also be that it just doesn’t stick to the aluminium of the tape very well.

Brent Ciccone

Calgary

Reply 0
Reply