alcoted

After many years of lingering here on the MHR forums, I thought the time was well overdue to start to contribute something to the community and start a blog. The focus will be on my trials and tribulations towards period modelling of the 1970’s decade. Ya, the decade most railfans would like to forget. It wasn’t the disco balls and bell-bottom jeans, so much, as the declining state of the railway industry that tend to make people turn their noses at the decade. That and, well, the lack of steam engines means the transition era will always be more popular among hobbyists.

But there’s one big attraction to modelling the 70’s, the variety of road names and colourful paint schemes is almost unmatched when compared with any other decade. Fallen flags like the NYC, PRR, Wabash or Nickel Plate only got merged out a decade earlier, and their rolling stock was still plentiful in interchange service. And then there’s the roads that were still around, like the Lehigh Valley, with an almost uncountable number of paint schemes that adorned their locos and rolling stock. For those who model the 70’s, there’s a certain “coolness” in all that colour on the rails.

And speaking of colours, what better way for me to start than with ageing and weathering a jade green boxcar. Aside from the 60’s and 70’s, in what other decade did the railways paint their cars jade? And for good reason it turns out, jade green seems to really bring out rust and grime worse than any other paint, even white (SOO proved white could work). However for a few wonderful years; NYC, Great Northern, Penn Central and Ontario Northland painted their boxcars jade.

Ontario Northland? Yes, in 1958 the ONR decided to switch their boxcar scheme from typical boxcar red, to jade. The period only lasted 4 years, as the ONR changed their image again to their more memorable “Progressive Green” (a darker hunter green) scheme with the stylized ON logo.

To start the project, I begin with this wonderful ONR jade painted car produced by True Line Trains. This is a great model of the ONR’s distinctive 10’0” interior height 40-footers, all of which were built by National Steel Car (Hamilton Ont) with their distinctive “waffle pattern” NSC-2 boxcar ends.

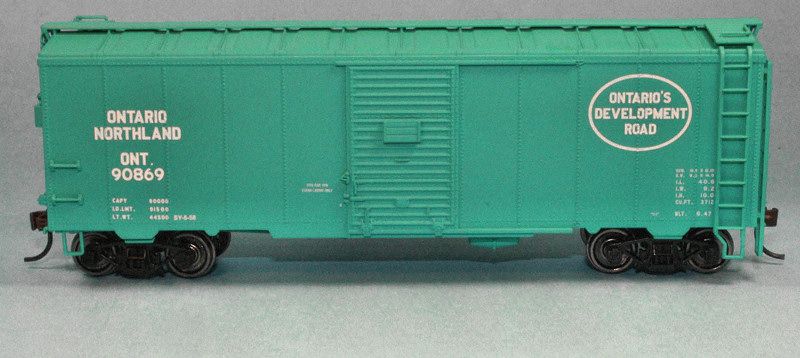
The problem with jade green cars is, well, you almost need sun glasses when you pull them out of the box. Great model, but boy that’s bright when you put in on your layout. We need to age this one 20 years pronto!

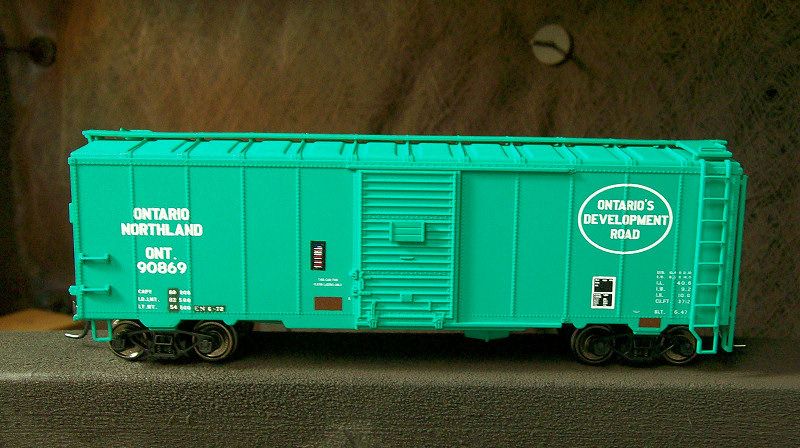
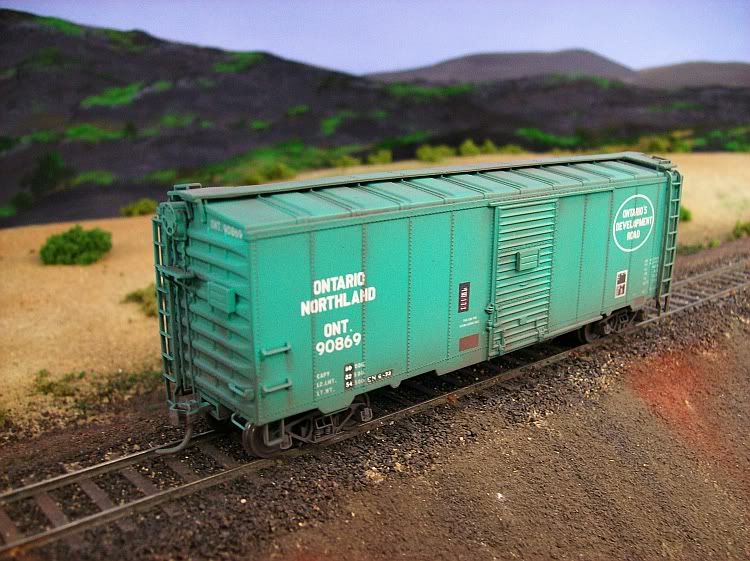
First step to bring it into the 1970’s era is to add lube plate (those black rectangles with white borders) and ACI label (the multi-colour ‘bar-code’ by the door) decals. I’ve also added a few brown paint patches using boxcar red decal paper (available from Microscale). The final bit of realism was to patch out the weight-date information and re-stencil the data, done in darker “Progressive Green” paint, and stencilled from the ONR’s Englehart yard weight scale. I used a spare dry transfer set I had lying around for the re-stencilling.


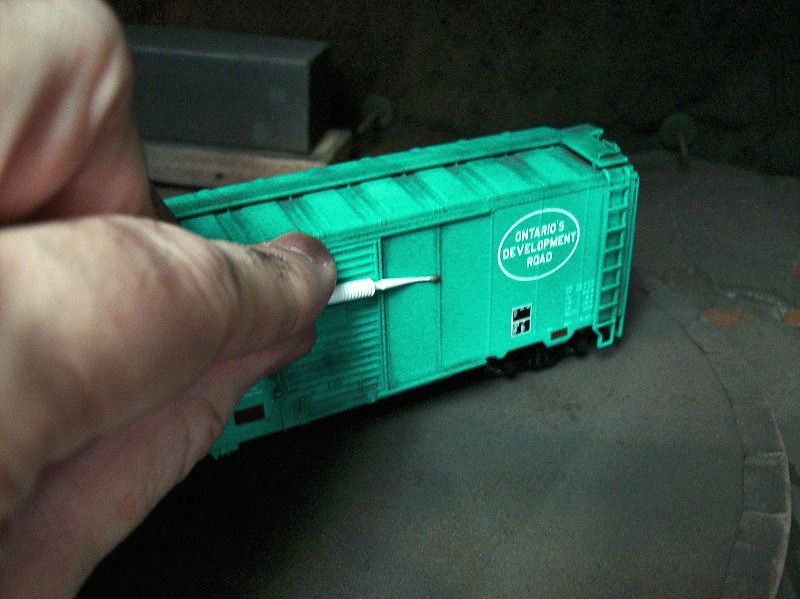
Next, we start making the boxcar dirty. Weathering can be personal, in that everyone seems to have their own favourite methods, so please don’t take away that my method is the only one. However I do highly recommend that potential weather’ers out there look at some prototype photos beforehand. The internet is great for this. You’ll soon notice there are definite patterns to where the dirt collects on any car type. For boxcars the grime collects in between the side panels, behind the ladders and grab irons, streaking down from the roofline, and of course the road dirt that collects along the bottom of the car. Turning to the roof, any raised panels usually stay relatively clean, with all the dirt collecting in between panels.

Armed with this knowledge, I attack the boxcar with various coloured rust chalks applied with a microbrush to the appropriate locations. The beauty of these chalks is they can be cleaned off again if you’ve overdone things.

Satisfied with my finer dirt applications, the next step is to apply road grime and general grunge with an airbrush. Primary focus is the underbody and a bit more to the roof. And weather those trucks! Shiny black plastic is not an appropriate look for rolling stock trucks. My “grunge” formula is a highly scientific mixture of any flat black, rust, dust, or dirty paint colours I find hanging around the spray booth, mixed in whatever combinations until the resulting concoction looks, well, grungy.

Like I said, highly scientific.

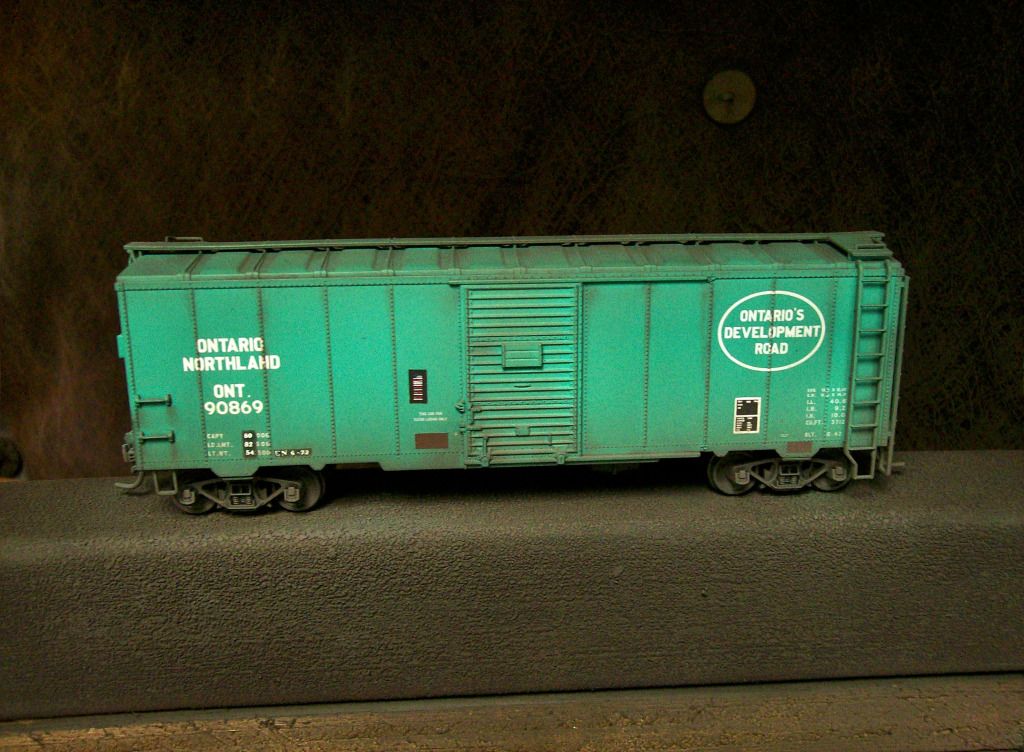
Well it looks good to me here in the spray booth, so lets see what this looks like on the layout…


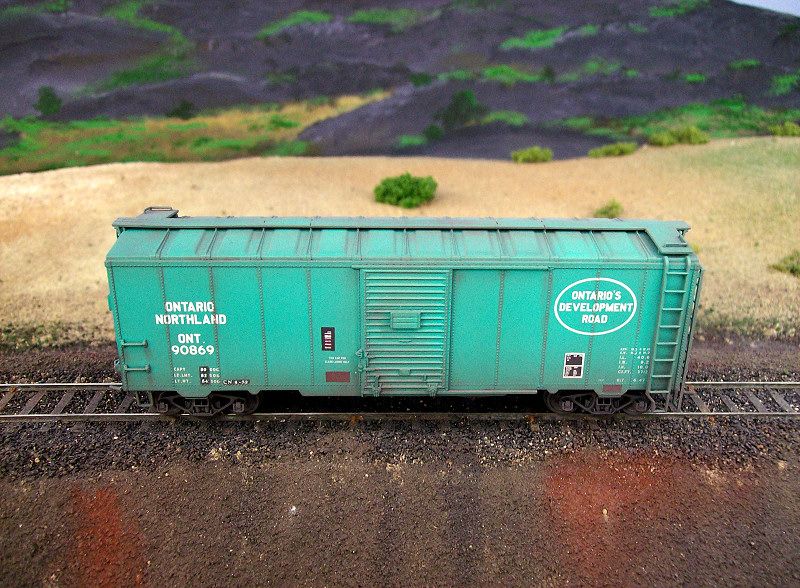
Mission accomplished. The car looks used but definitely not abused after it’s last visit in the ONR’s paint shop some 20 years prior. And most importantly, I can put away the sun glasses now when I see this gem rolling along in a freight.

CP Sudbury Division Modellers: http://www.wrmrc.ca

nnerr800.jpg 


0-550x83.jpg 

Reply 0
wp8thsub

I like it

That's an appropriate looking 70s car.

Rob Spangler MRH Blog

Reply 0
David Calhoun

Weathering

I, too, like it. Although I'm an NKP transition guy, you've managed to give me a few tips I can use to "detail" my own cars. Was there a "how to" on chalks and weathering posted anywhere? I'm looking for a step-by-step type article. General info and the usual word filler articles don't do it for me. 

Great job - and thanks for the visual tips.

Chief Operating Officer

The Greater Nickel Plate

Reply 0
alcoted

Dept of Corrections and Additions

Well it seems I need to correct myself already. I mistakenly called the powders rust chalks, they are properly called weathering powders.

David, I tried Google-ing for more descriptive pictorial how-too articles, and none fell into my lap. That said, it's actually quite easy if you have the right equipment, you just have to try it yourself and experiment.

The weathering powders are from Bragdon Enterprises. Website here: http://www.bragdonent.com/weather.htm

These are the microbrushes: http://www.microbrush.com/hobby/products/categories.asp?categID=8

They are used for precise applications of the weathering powders, and I use normal paint brushes to cover larger areas.

Any airbrush works for misting the road grime, even the least expensive single-action ones are great for basic weathering.

Last thing I missed, after the weathering was completed I airbrushed the car with satin finish to protect my ageing efforts.

Hope that extra info helps you.


0-550x83.jpg 

Reply 0
Dave K skiloff

Another 70s fan

I'm another 70s modeler, so I look forward to any of your posts on the era.

Dave
Playing around in HO and N scale since 1976

Reply 0
bond007

The makings of an article here

I model a freelanced modern-day shortline, but I certainly appreciate your rolling stock ageing efforts here. Really this sort of thing applies to anyone regardless of era.

By the way, I think this topic could have made a nice MRH article. You should consider it in the future.

Reply 0
alcoted

The decals set the era

Thanks for the compliments. My weathering really is not groundbreaking, and there have been many weathering articles published over the years showcasing the different methods. The only wrinkles here are studying photographs to see where the dirt generally sticks, the combinations of different weathering methods plus application of multiple dirt/rust/grundge colours, and the paint patching and re-stenciling efforts prior to weathering. 

On that last point, I have actually had a multi-part article published in Canadian Railway Modeller over ten years ago. Each was short, explained what the various extra decalling details were, and contained a few photos for reference on where to apply them on your rolling stock. For example there are 5 styles of lube plates (more accurately a COTS stencil) and different time periods for when they were applied. For 1970's modellers, this type of information is important for ageing your rolling stock fleet appropriately, especially for those who set their layout era at a specific point in time. 

If there is some interest displayed, I could speak to the publisher and see if I can re-write the article and start a new blog post here at MRH.


0-550x83.jpg 

Reply 0
jhively56

Would definitely make a good article

Well-done car, and your explanation is top-notch. Would like to see it expanded into an article.

2 questions:  have you tried using powdered pastels for weathering? And could you point me to the COTS info? I intend on modeling the 1991-1992 era.

Thanks for sharing your work!

John

Reply 0
Jurgen Kleylein

Just one COTS since the 1980s

John, for your time period you just have one choice for COTS stencil, the modern 3 panel arrangement still in use today such as shown on this CP auto parts car:

p42804_2.jpg 

The Consolidated Stencils were first introduced in 1970 as a standard on new equipment.  Soon after they began to be applied to older rolling stock, but in a more simplified form with just one big black panel.  This gave way to the two panel stencil, then a couple of short-lived 4 panel arrangements, and then around 1980 these all gave way to the now familiar 3 panel COTS in use to this day.  So, all you need to do is look at modern stencils to see what they were using around 1991.

The 1970s, on the other hand, is where the stencils changed often, and by picking the right (or wrong) stencil, along with ACI labels and U-1 dots, you can shift the era of your car from one end of the decade to the other.  Hopefully Ted will put together the information in a handy article for those concerned with getting it right in the 1970s.

Jurgen

HO Deutsche Bundesbahn circa 1970

Visit the HO Sudbury Division at http://sudburydivision.ca/

The preceding message may not conform to NMRA recommended practices.

Reply 0
wp8thsub

Survivors

Quote:

John, for your time period you just have one choice for COTS stencil, the modern 3 panel arrangement still in use today such as shown on this CP auto parts car:

True enough for cars with stencils applied after the phase-in for the 3 panel style (supposedly 1982 but present on some cars before then).  Older consolidated stencils survived on earlier cars, and can sometimes still be seen today, so John should have a mixture of styles appropriate for shopping dates for various rolling stock.

Rob Spangler MRH Blog

Reply 0
Jurgen Kleylein

granted

Quote:

Older consolidated stencils survived on earlier cars, and can sometimes still be seen today, so John should have a mixture of styles appropriate for shopping dates for various rolling stock.

Yeah, you're right.  You could find older cars with any of the previous designs in declining quantities over the course of the years.  Any car built after the early 80s and any repaints or repatches would have the new ones.  It tended to be cars on their last legs that kept the old ones longest.  Photos will always be your best reference.

Jurgen

HO Deutsche Bundesbahn circa 1970

Visit the HO Sudbury Division at http://sudburydivision.ca/

The preceding message may not conform to NMRA recommended practices.

Reply 0
alcoted

COTS stencils

Hey, I found my artwork from those old articles I mentioned! That's a big deal considering the years and several computers I've gone through since then.


As mentioned in the preceding posts, anyone modelling the the 1990's to present day needs to stock up on those Tri-panel COTS stencils. And there are some cars that still wear older stencils, the dual-panel varieties being the most common of the older variations due the length of time they were in use.

However any 1970's and early 1980's modellers need to be careful of the timeframes of all these stencils. As Jurgen wrote your choice of COTS stencil can shift the era of your car from one end of the decade to the other.

For example, my choice of a dual-panel on this jade ONR boxcar sets the car sometime in the mid-70's. I could operate it in a 1980's-set era (with more weathering), but the appearance would be wrong for modelling anytime prior to 1974.


0-550x83.jpg 

Reply 0
bond007

Nice guide

Thanks for the guide. I knew about the current lubeplates and the old 2-panel ones from the 70's, but didn't know there were other versions too. Looking forward to more of these 1970's posts.

Reply 0
JohnnyUBoat

Great bit of info

This is an area that is quite commonly overlooked and, as others have said, I believe this would make an informative article for others to reference.  This applies every modeler out there!

Great work on the car and thanks for sharing your knowledge!

-Johnny

-Johnny

Freelancing the Plainville, Pequabuck and North Litchfield Railroad


Reply 0
alcoted

A few more...

Thought I'd present a few more examples of the variety that the 1970's provides to railway modellers of that decade.

This was an old Intermountain kit of a 1951-built MEC PS-1 boxcar that I've had lying around for well over 10 years now. You know it's old because who sells kits like this anymore? I elected to build this without a roofwalk, as after 1967 the AAR mandated their removal, thus making this a definite 1970's boxcar. After assembly, I attacked it with the usual paint patching, data re-stenciling, COTS plates and ACI labels. I also decided to have a little more fun with this car by patching out the old weight data with MEC Pine Tree Green, because the Maine Central had switched to green & yellow for their boxcar scheme by the early 1960's.

MEC fans may notice I even went to the trouble of lettering the weight data re-stencils for their Waterville Shops (WS 4-69). So aside from studying photographs, knowing a little railway history will also help you to create very realistic railway models.

And here is the final product after weathering was completed (using my same method of weathering powders and airbrushing)...

I don't think that model leaves any doubt that this is a 1950's era boxcar operating in the 1970's.

And one more example of an older era car that's been detailed and weathered for the 1970's, and it's jade green too...

A couple of things to note here, the first of which is that this car does not have a COTS stencil, at least not an "official" one. Not all freight cars received a full COTS plate, some only received a smaller patch of black paint with the wheel lube repacking and ABD brake test data displayed, which is what I had done here. Also I did the weight data re-stencil patch in Penn Central green, a very different colour of jade than the older NYC Century green. The shop location was also lettered for Buffalo NY, an old railfanning 'stomping ground' for me from years past.

I based my weathering on this car from a couple of different photos, but mainly from this one...

If you can believe it I photographed this car on 11 August 1990, in Conrail's Frontier Yard in Buffalo NY. That's amazing when you consider how fast Conrail was to patch out all their predecessors' equipment. The old Peoria & Eastern boxcar obviously fell through the cracks somehow. In terms of weathering tips, I decided to copy the frame rust-out pattern and door scratches on my model. Again, another example of how the use of photographs can help you to create very realistic models.


0-550x83.jpg 

Reply 0
jhively56

Thank you!

Thank you, Jurgen and Ted for the info. That really helps me be accurate in my detailing. Ted, hopefully my efforts will someday approach yours in quality.

Reply 0
bond007

Wheel Dots

Didn't freight cars get black squares with small yellow dots painted on them in the 1970's? I remember it had something to do with wheel inspections. Just curious why none of the car models you've shown have these wheel dots, even though that real NYC car has one. BTW - great weathering jobs you're doing, you should post some of your work on that weathering thread.

Reply 0
wp8thsub

U-1 inspection symbols

The inspection program that led to the yellow (or white) inspection dots was instituted in 1978.  Although the program was supposed to have been completed by the end of that year, some cars continued to receive the symbols after that.  Certain new cars built after 12/31/1978, and others that were repainted, could still have them.  The WP repainted cars well into 1979 that received such inspection symbols, and there were others.

Rob Spangler MRH Blog

Reply 0
alcoted

Love these newfangled intertoobs

Ah these intertoobs just saved me a whole lot of typing.

Here is a nice website that explains all the 1970's details on rolling stock; ACI labels, COTS plates, U-1 wheel dots, and lots of other stuff: http://www.hosam.com/mod/rsdet.html

My models are "generic" 1970's, so the lack of picking an exact year means my models are all over the place in terms of these little details. Once I place a U-1 wheel dot on rolling stock, then it definitely sets the year for 1978 or later. I generally apply any U-1 dots on "newer" equipment from the 1978 period (if that makes sense?) or if I'm trying to duplicate a car which specifically wears the dot.

Incidentally Rob, the WP wasn't the only one to do goofy things with those U-1 wheel dots. CP, obviously being a Canadian railway, never purchased any U-1 wheels. But by AAR rules they still had to apply the inspection dots to any cars they had in interchange service that could potentially run into the United States. They ended up being over-zealous in many applications. The U-1 wheels were 33in diameter, but that didn't stop CP from applying U-1 dots to some covered hoppers with 36in wheels. Also some really old cars in MOW service got them too, stuff that would never leave home rails let alone manage to cross an international border.

Backing up a bit, someone asked if I had ever used powdered pastels. Not sure if you mean chalks, but yes I do have some experiences with ground chalk as a weathering agent many, many years ago. I didn't like them much. Reason was because when you airbrush the car with satin finish to protect the weathering, about half the chalk blew off. I ended up having to really cake on the chalk to get the effect I was after, which led me to think I was over-doing the weathering until the satin coat was applied. I prefer seeing what the weathering will look like before spraying any transparent finish, which weathering powders do.


0-550x83.jpg 

Reply 0
nbeveridge

Bragdon Weathering Powders

I am pleased that you mentioned the Bragdon weathering powders.  I have been using these for more than ten years, and I like them so much that I rarely use an air brush for weathering any more.  They work equally well on structures as on rolling stock.

With these color pigments, a little bit goes a long way.  I find that they are held in place quite nicely by the binder in the powder mix, and, unlike chalks, no fixative is generally needed.

Norman

Reply 0
bond007

Ditto on weathering powders

I second that statement. I just bought the Bragdon basic starter 4-color rusty pack a little over a year ago, and am still working from them after weathering about 20 cars so far. I don't own an airbrush either, so its the only method I use. I will need to buy a big box of the darkest stuff at some point though, because I seem to use it the most. But the stuff works great and a little does go a long way.

Reply 0
Deemiorgos

About two and a half years

About two and a half years ago, I decided to start collecting for the era of 1974, which I remember fondly though I model another era.

Here is some of the collection:

IMG_3475.jpg 

IMG_0014.jpg 

IMG_0016.jpg 

_0011(3).jpg 

IMG_3415.jpg 

IMG_3419.jpg 


Reply 0
Joe Valentine

!970s track maintenence

You did a great job explaining your car weathering techniques...bravo, I enjoyed them and am willing to give them a go...The 1970s lack of track maintenance is also apparent in the ballast wash out...hope there's a 5 mph speed restriction on that track. That track and embankment scream deferred maintenance...Joe

Reply 0
jimfitch

I have backdated to the late

I have backdated to the late 1970's thru early 1980's in the last few years and just stumbled onto this blog topic.

I've been going through my collection with my shift in time frame; I used to collect rolling stock good through end of the 1980's but now am trying to only buy rolling stock good through about 1980 or 1981 at latest.

Reviewing my collection of rolling in the past 4 or 5 years I've already eliminated most of the late 1980's stuff and sold it.  Interestingly, I've got some freight cars with build dates of 1978 or so and they came with 3 panel COTS labels.  Based on the information about those labels, that means they are 1982 or later.

I've wondered why manufacturers chose to put 3 panel COTS on cars built and apparently decorated for 1970's time frame.  I have an Athearn 50' Burlington Northern PC&F Genesis box car with a build date in the mid-1970's and yet a 3 panel COTS.  Perhaps it was built in the mid-1970's but for one of the predecessor RR's and was repainted in the early 1980's when the 3 panel COTS were being applied?

So as I am looking over my 3-panel COTS models, I'm wondering if I can back-date some of them to 2-panel for late 1970's, or are they all really early 1980's and later as decorated because of re-painting or shopping, even if built in the 1970's.

I can still use some early 1980's models as I plan on running some freight trains through about 1983ish or so, so those could be included.

.

Jim Fitch
northern VA

Reply 0
dssa1051

40 ft boxcars

One can still have a fleet of 40 ft boxcars in the 1970's since the Canadian roads used them in grain service and in the US the Southern rebuilt a lot of their 40' cars with larger doors and lots of lettering.  Kadee is going to do a Southern modernized PS-1 later this year, unfortunately just one number.

Great looking cars!

Robert

Reply 0
Reply