Benny

And so it was the summer of 2006, and I had just got home from Geology field camp to face the prospects of moving out of my apartment and into my uncle's house on the other side of town.  My lease was up at the end of July, and so I spent the week or so that I had removing stuff; it took a load in my Fairlane, a load in my Uncle's one ton van, and then a load in his 72 F-100 to get everything out.

The layout was supposed to be sectional.  It was not, as i discovered as soon as i moved the 3x7 towards the door.  It would not make it even as a flat piece, and in a matter of minutes I had it dismantled back into spare lumber. Do not cry so hard, though, for in all honesty this structure had been haphazardly built in odd sections, and when I finally had it all taken apart I was amused at how ridiculously built the structure was.  I noted this and planned to build real benchwork on my next attempt - which would be soon.

As soon as I was settled into my uncles, he decided to let me have at it in his library.  And so I set out on what would become my fourth layout.

I am as of yet unable to find the old plan, and I bet it was part of what got fried when harddrive too the leap to no return one summer day while i was playint Railraod Tycoon Platinum II.  A train crashed and it blew up.  The end.  If I ever get $10,000 or so that it takes to recover such data, I will get the operation performed, solely because i have four Gb of Field camp photos in with that lost data!  I'm betting it's a head crash, and hopefully once the platter is remounted, it will be easy enough to rescue the data...sigh...

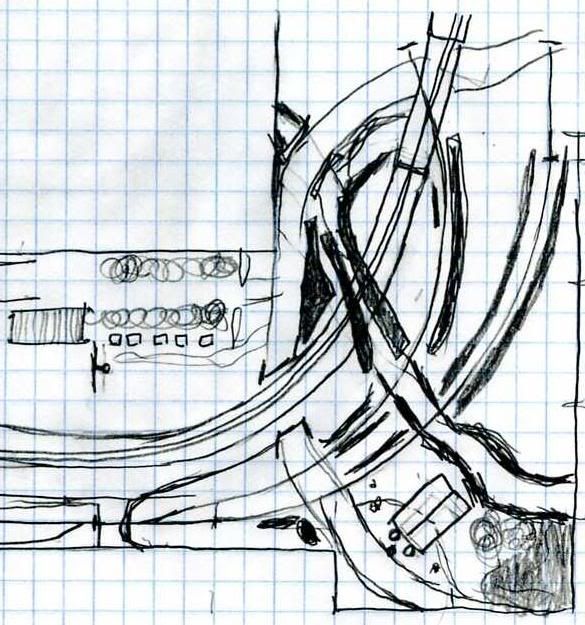
Here follows the layout plan, by way of the Upstairs plan.

Essentially I devised this corner module where a two track bridge on an upper mainline crossed a lower level single track mainline.  The lower level track had a connector along the backside of the layout to raise it up to the upper track level for interchange potential.

The layout was 8.5 feet long by 5.5 feet wide, 30" wide, and about 50" tall. This plan shows only the portion in the corner;  the rest of the layout essentially retained the original Congress station module, much revised, and an upper level spur track.

 And so we shall embark on another layout adventure...this one not so vertically inclined as the last!

--------------------------------------------------------

Benny's Index or Somewhere Chasing Rabbits

Reply 0
Benny

September 5, 2006

This date is the earliest data that i can find form this layout.  By this time, the benchwork was done and bay and large all the major construction was done as well.  All that was left would be scenery work...

One thing I would like to note is that this room has much better lighting.  I also purchased a nice new camera when I went to field camp [it was HIGHLY recommended on the checklist, so I got one - a DSLR to boot, the Canon Rebel XT.  I filled up the micro drive at least twice before I moved to a new drive...good times.

Looking back on these pictures, I realize this was a rather nicely conceived railroad - and it would have been fun to play on if I had ever added to a larger system... which, incidentally enough, is what I eventually did.

It may be strange how I laid out these tracks, but they're done so out of necessity.  The track closest to the rock face is a siding.  The Middle track is the mainline, and then there's the spur servicing the Freighthouse.

Here I have suspended two tracks where the bridge will go. 

--------------------------------------------------------

Benny's Index or Somewhere Chasing Rabbits

Reply 0
Benny

December 16, 2006

We come back a few months later in the progress of this layout to find progress has been slow.

I'm also still experimenting with the settings on the camera.  You can really change the character of the photo with the flash - and often times, not in a way I like.  I have since learned how to turn down the flash temperature, but it was a learning curve up to that point.

The bridge may look like it's set, but in all reality, it's floating.

What is evident here is the fact that the hill has been blended between the orchard and the mainline.  The roads have been cleaned up a bit, and the underpasses each framed.  And you may also notice I added a road bridge made out of a Rix Overpass kit.

--------------------------------------------------------

Benny's Index or Somewhere Chasing Rabbits

Reply 0
Benny

My Workbench

There was one major flaw to my library layout, aside from the fact that everyone who walked through the front door could see my work, or lack thereof.  This is the fact that my workbench was upstairs, in my bedroom.  If I wanted to do anything, I had to run down stairs.  And then if I forgot a tool, I had to run back upstairs again.  It was not fun.

I will say, though that in this setting I really maxed out the carrying capacity of my room - it was fun, but my, was it cramped!!

On this windowsill you might notice my alarm cock, my nokia cell phone with "we wish you a merry Christmas" ringotn [and I NEVER changed it!! ] on it's charger, my Camera battery charger [which I haven't been able to locate in a couple years], A Boley truck I intended to build into a cable puller, an Imex Peterbilt cab on an Athearn frame along with a scratchbuilt dump bed, an Imex cab appended to an Athearn tandem tractor [to make a long tractor], A $3.00 Boley crane which you might recognized from the Junkyard series, an Imex Ford truck with a dump bed, am Imex peterbilt cab on a Athearn frame, a stack of wheels from the Lifelike dumpbed loads, a Busch Ford Model AA truck, and a trusty Tech DC powerpack.  It worked very well for my testing purposes!  But anyhow...that's just one sill.  the rest of my room flowed like this, one project after another, simply waiting for me to have time to engage. And when time came, I engaged...or moved onto a more meritorious project as it came. 

I made full use of my shelves.  I still have this little unit, and it makes a great weekend project.  The end legs extend to the floor; the table in front effectively keeps the unit wedged against the wall.

No, your eyes do not decieve you.  That is indeed a Mantua Pacific in highlighter pink. My goal includes Allied's Helix Humper drive, .DCC sound, and a number of other things.  And it has it's own colorfull passenger train.  I call it my Cactus Blossom Special; it will run on the future layout between 70 and 90 miles an hour, the running speed for a PROPER steam era passenger train!  It's still being reworked...when I stopped, it was because my trucks under the tender needed pickup.  Yech.  Today, it looks like Bachmann is the best source for trucks already ready to go.

My workbench contains a wealth of good projects...now will I ever get any of them done?  And this next year is scary after march, because that was the month I got a girlfriend.  scary business when building a layout is your main free time passion!

--------------------------------------------------------

Benny's Index or Somewhere Chasing Rabbits

Reply 0
Benny

January 15, 2007

It was apparent that I needed to finish the landings for the bridge - and this meant plaster work. It was another tedious day on the layout...

Once I had the first foundations formed up and poured, I then made up a second level of forms using these results as a foundation.

I then put in the bridge on the lower level - it's basically an N scale truss bridge, cut apart for the appearence of a short, single track and thus lightweight bridge.

The moment of truth: I now put in the upper bridge: Success!

Granted, I misplaced the lower bridge sides during this later ops shoot, but oh well...

Now that I have my bridge footings in place, I guess what I really need next is bridge track!

--------------------------------------------------------

Benny's Index or Somewhere Chasing Rabbits

Reply 0
Benny

Bridge Track

Now that you've seen my workbench, let me show you one of the more tedious projects I have ever done.  The bright light and ample space on the front side of my workbench made this all possible.  You might thing 12"x24" is not that much to work with on that desk,but it was three times over what workbench space i ever had in the Apartment.

You may recall I have a double tracked bridge on the layout.  I needed bridge track.  now yes, i could have bought the track out of the Walthers' catalog, but I decided I could make it just as well as buy it.

The main problem with the walthers' version is the fact that it is code 83, and in this day and age I was firmly rooted in code 100 rail.  But I wanted better looking ties on the bridges.  So I elected to do some experimenting.

It turns out the rail in Atlas code 100 rail has the same bottom profile as the code 83 rail.  Do you see where I'm going with this yet? That's Right!!

I bought two 3' lengths of Atlas code 83 and one length of code 100.  I removed the code 100 rail from the code 83 ties and slowly, meticulously threaded on the code 83 ties, removing the spacers so as to draw the ties closer together for a more "bridge track" appearance.  And then, once done, I took the code 83 rail and made guard rails, first bending them to shape, soldering them together, and then spiking them to the previously formed ties through predrilled holes in the plastic ties.  [In the background you may see a section of Code 83 track I turned into Panel track for a bulkhead flat...nothing was safe from being turned into load fodder!!]

The final results were then painted and weathered.

I then put the track into the bridge...

End result, all done!

Today, I am a code 83 man...so somebody may snag a real deal when I sell these tracks!!!

--------------------------------------------------------

Benny's Index or Somewhere Chasing Rabbits

Reply 0
Benny

March 21, 2007

So this would be in the week after that fateful weekend in which I ended up with a girlfriend... things just happened.  And while I can't find other files, and I know more files exist, this will be the last picture set in this series until I find more data on my doings back around this time.

You might remember my mentioning two projects earlier in this blog.  Well, believe it or not, some of the projects actually got built! 

Here you may see the layout through the caricature of this dump truck, which would take one trip through this layout before going off to one of my friend's layouts as a gift.  And in the background you may see a bulkhead flatcar that has been transferred into the MOW dept for use in wreck and washout service.

My camera was simply not cooperating this nght...le sigh.


The Rix Bridge to the left, and on the right, the control panel for my blocks is back in place.  I never did get to wiring, though...

And that's about it...

The end of this series....

--------------------------------------------------------

Benny's Index or Somewhere Chasing Rabbits

Reply 0
Reply