Chris Adams

I really need to remember to post here at MRH as well as on my separate blog.... Ah well - I'll try to be a bit more regular.


Meanwhile, taking  my own advice from yesterday's blog post, to do more and - um - screw (around) less, I decided to forego reading much/anything about how to do ripples in water and Just Do It.


Well, to be honest, I did watch 

 and read a few paragraphs out of  one of my favorite scenery books before diving into water (effects) - figuratively, anyway. But that's a looooong way from my usual analysis paralysis.


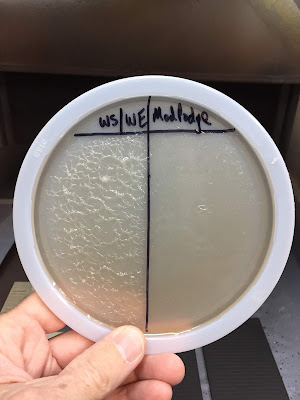
I got started by using some of the new  Woodland Scenics Deep Water Pour product (more on that in a future post) to create a "practice pond" on a whipped topping lid.


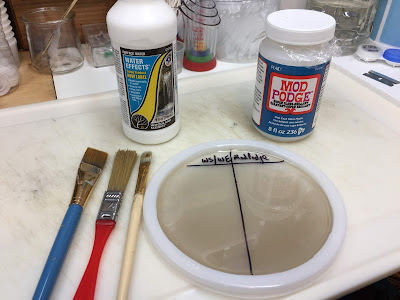
The "water" is murky looking cuz I used the "murky" version of the product. I then marked it in half, and experimented with  WS Water Effects on one side, and  Mod Podge Super Gloss Medium on the other side. 


I poured on the Mod Podge first - and accidentally dumped a LOT on there. After I'd poured most of it back into the jar, I used a 1/2" brush to move the product around and create the best approximation of ripples I could imagine.


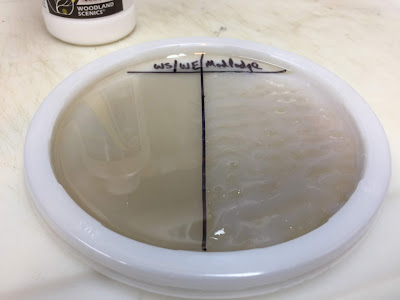
Here's the result, which looks pretty good! Unfortunately, it didn't stay that way....


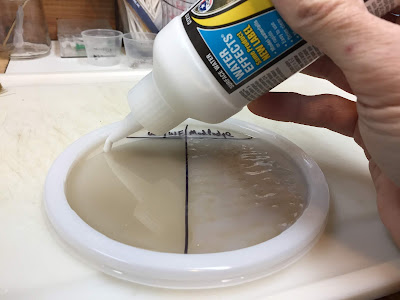
I next squeezed on some of the WS Water Effects . . .


It comes out white and pasty, like 

. But don't worry - it dries clear. And you don't need very much . . .


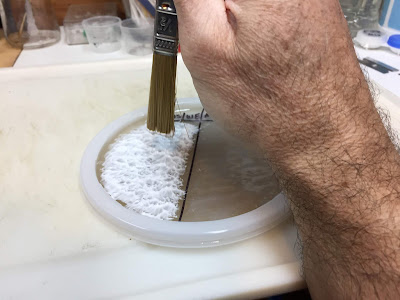
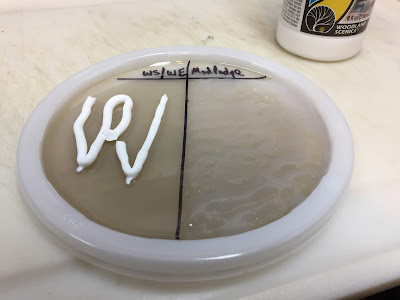
I then used a different brush to stipple the product into ripples/litte waves.


Again, looks pretty good! Unfortunately, you can already tell that the Mod Podge is beginning to level out a bit.


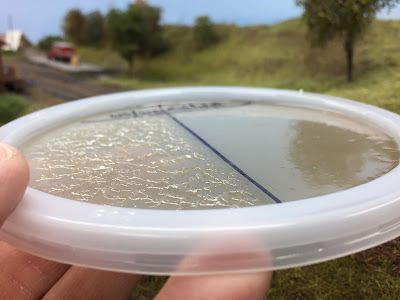
The Water Effects goes on white but dries clear, as you can see above (pic taken after drying/curing overnight).


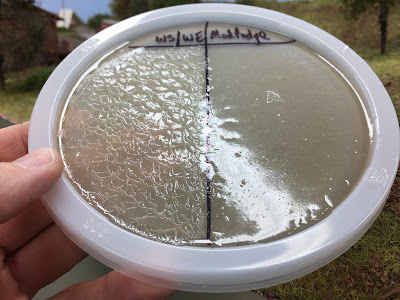
And, unlike the Mod Podge, the Water Effects holds its shape.


If my experiment is any indication, Mod Podge is NOT what I'd use for ripples/waves in the future.


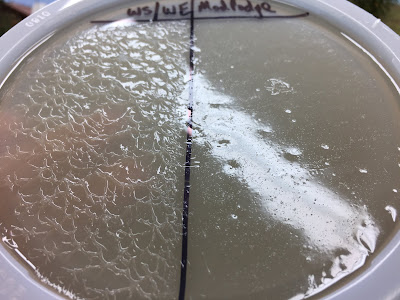
And as if that wasn't enough to convince me to use the WS product instead, look at all those thousands of tiny bubbles on the Mod Podge side. Admittedly, I didn't blow over the surface as I've read you need to do for EnviroTex, and I may have introduced many/all of those bubbles in the brushing/application process, but still. There's no comparison to the Water Effects.


I suspect in modeling water, you may get what you pay for. An 8 oz bottle of Woodland Scenics Water Effects retails for $18(!) compared to  $7 for the same amount of Mod Podge. Yikes! And I readily admit there may be a different technique that works well with the Mod Podge - not to mention there may be a different, less expensive product that works the same, or as well as, the WS Water Effects (if so, I'd love to hear about it).


But if you're looking for something fool proof (insert self-deprecating joke here < g> ), and you don't have a lot of water to do, I think you'd be hard pressed to find something that works as well right out of the box, er, bottle.


The main takeaway though brings us back to the beginning of this post - and echoes yesterday's: There's nothing like actually doing something - trying it out - to help you learn a new skill or technique. And if you don't want to risk experimenting on your layout, get yourself a Cool-Whip lid and try things out there. You'll learn a lot more by doing that than by reading reams of books and watching videos.


Now, I just have to figure out how to make effective ripples in a river, rather than a pond . . .

The Valley Local

Modeling the New Haven Railroad's Connecticut Valley Line, Autumn 1948

Reply 2
barr_ceo

Water Effects = Acrylic Gel

Water Effects = Acrylic Gel Medium. Get thee to an art supply!

The Mod Podge is what you'd use for the basic pour of water, then add the ripples over it when dry.

IMG_1196.JPG 

...and that's the result...

Waves across the river, and where there are rocks, a "V" pointing upstream. The white V's were done with another WS product that dries white, but you can get the same thing by mixing a little titanium white with the gel medium.

Read my Journal / Blog...

!BARR_LO.GIF Freelanced N scale Class I   Digitrax & JMRI

 NRail  T-Trak Standards  T-Trak Wiki    My T-Trak Wiki Pages

Reply 0
joef

+1 for acrylic gel

Yep, acrylic gel. You can always thin it if it's too thick!

Joe Fugate​
Publisher, Model Railroad Hobbyist magazine

[siskiyouBtn]

Read my blog

Reply 0
twforeman

ModPodge

I used Mod Podge. It worked out alright for me. I put on a thin layer and blew on it with my air brush to make the ripples.

Click on the photos for the larger version.

Reply 0
Steve kleszyk

In case you haven't seen it....

Here is Luke's latest where he does water


Reply 0
wp8thsub

Another Perspective

[31248199083_a5555fb7fa_z]

As shown here, Mod Podge leaves distinct ripples if you don't use too much.  The original post shows different results vis a vis WS Water Effects due to different application techniques for the two products. 

With me, I'm less of a fan of the thick Water Effects (acrylic gel) product because of the harder edges to the shapes it leaves behind.  I like Mod Podge because the ripples will settle into rounded forms as it dries. For those considering modeling water, try different ideas to see which works best for you.

Rob Spangler MRH Blog

Reply 0
Chris Adams

Thanks guys!

Thanks very much for the feedback! I especially appreciate the photos of how the different products worked out. I'll definitely have to try out the (much less expensive) acrylic gel - and I'll give the mod podge another try as well. I think I may have used too much (did I mention I accidentally dumped it on at first? yeesh!)

I've also heard about using the airbrush to create ripples from a LOT of folks. Only problem with the particular river scene I'm doing is that the river is flowing towards me, and my understanding of this technique is that it works best when you can aim the air downstream. I'm not able to do that in this case - but I'm curious enough to try on another area.

Thanks again for taking the time to weigh in. Really appreciate the additional info.

Best,

Chris

The Valley Local

Modeling the New Haven Railroad's Connecticut Valley Line, Autumn 1948

Reply 0
Steve kleszyk

Flexible tubing......

"Only problem with the particular river scene I'm doing is that the river is flowing towards me, and my understanding of this technique is that it works best when you can aim the air downstream". a piece of flexible tubing works well for those that don't have an airbrush or in those areas that one can't fit.  Just be sure to work in small areas and take breaks or it will like that time you got light headed from trying to blow up that pool raft....

Reply 0
BruceNscale

Acrylic Gloss Medium & Fan Brush

Hi Chris,

I've had good luck using gloss medium applied with a fan brush. 

One trick I learned was to push up the waves and withdraw the brush, working "against the wind".  It produces a great effect and the lake/pond/surf has a consistent direction.

ignature.jpg 

Happy Modeling, Bruce

Reply 0
jimfitch

My first try at ripples using

My first try at ripples using gloss Mod Podge

.

Jim Fitch
northern VA

Reply 0
barr_ceo

By George!

By George! I think he's got it!

Read my Journal / Blog...

!BARR_LO.GIF Freelanced N scale Class I   Digitrax & JMRI

 NRail  T-Trak Standards  T-Trak Wiki    My T-Trak Wiki Pages

Reply 0
Jim Fisher
20230124_002140A.jpg
Super heavy acrylic gloss medium on top of epoxy.

Jim Fisher

Reply 3
Reply