modelsof1900

A few weeks ago I purchased this Norfolk & Western caboose of class CG, a model that should run with my freight train of the Thirties with my M2 loco of N&W.

I was sure that I had done a good deal with this model which was built by Ajin in South Korea and was imported by Overland Inc. - however I was very disappointed! It's looking well detailed however this was only the first impression.

What's to do? Reworking, of course!

________________________________________________________________________

Cheers, Bernd

My website http://www.us-modelsof1900.de - my MRH blog http://model-railroad-hobbyist.com/blog/20899

and on Facebook https://www.facebook.com/bernd.schroter.566 where I write about all my new projects.

Reply 0
Joe Brugger

Great!

Having some unpainted Overland UP cabooses, I will be following right along. My first step was to improve the rolling qualities with InterMountain's 33" roller-bearing wheelsets, but it takes some detective work to find them now.

Reply 0
Ken Glover kfglover

IM roller-bearing wheelsets...

http://www.ebay.com/itm/111806348055?_trksid=p2057872.m2749.l2649&ssPageName=STRK%3AMEBIDX%3AIT

Ken Glover,

HO, Digitrax, Soundtraxx PTB-100, JMRI (LocoBuffer-USB), ProtoThrottle (WiThrottle server)

View My Blog

20Pic(1).jpg

Reply 0
modelsof1900

Checking and comparing with blue prints

Joe, thanks for your first reply.

Yes it's right, this was the first impression with this model - it's a very bad runner! However I searched for pictures and a great source are the archives of N&W Historical Society, where I found a lot of documents about this class CG caboose (and also a lot of differences at this model). I'm planning to use this model with a 1930 train so I will install the more correct Bettendorf trucks of that time with leaf springs and so all running problems should be eliminated. Two different truck types are ordered, Tichy Bettendorf trucks with leaf springs and Kadee self-centering caboose trucks. All pictures shows that these cabooses were equipped with these trucks. Maybe that the cabooses received these swing-motion trucks in later years, however I do not need them. With this the first problem is solved however this was one of simplest one!

A few more checking showed on underside an AB-brake however with a lot of not fixed connections at brake gear, a fat hole for a missing part and some more incomplete details.

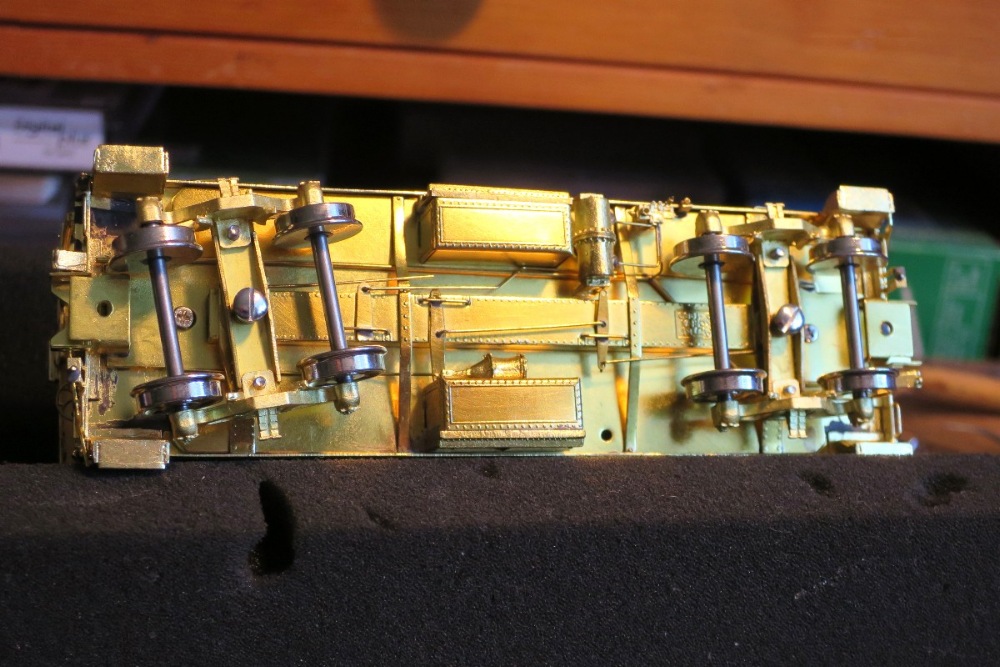
Here the most noticeable mistakes.

A free hanging rod and open holes at levers of brake gear.

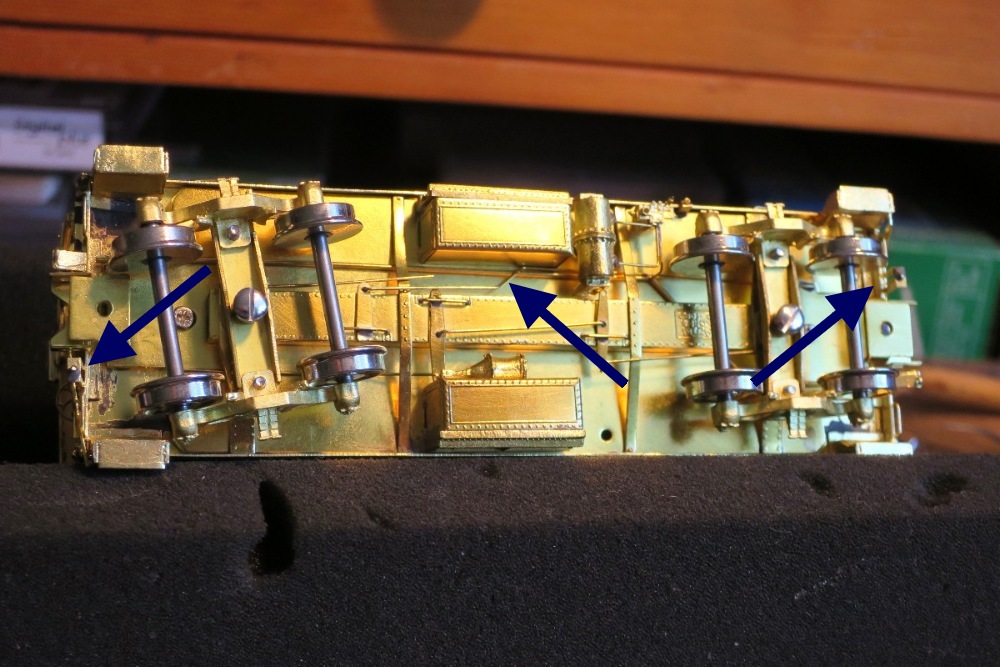
A pull rod to hand brake with sharp bends (!) and missing connections to the both hand brake shafts at platforms.

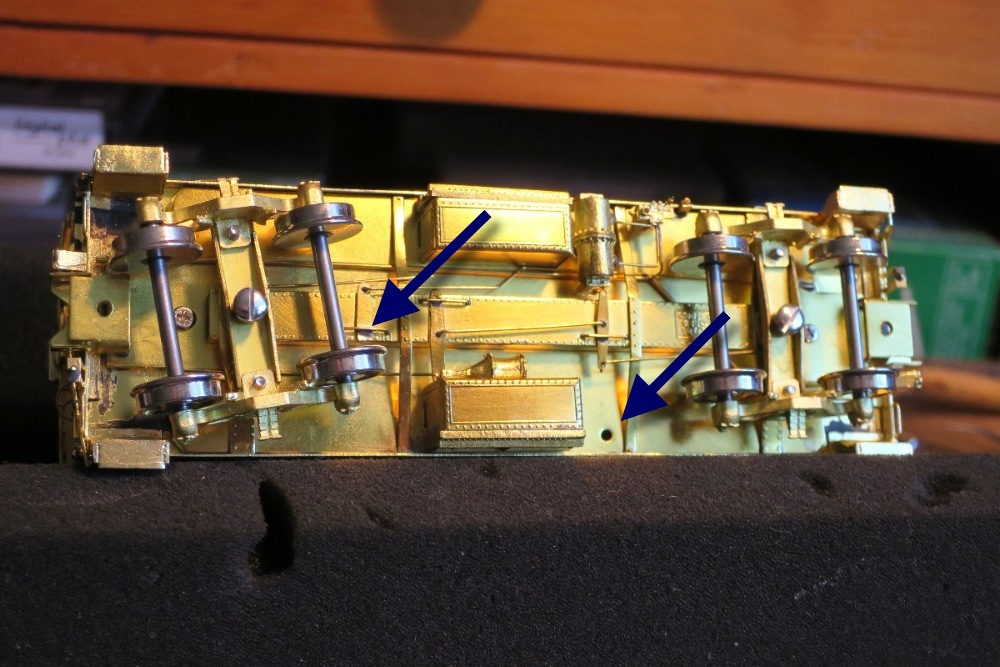
The most noticeable mistake is visible at left lever which has been cut off by a plier in order to give the truck enough play! However which relative short car needs such a spin for the trucks?
The hole is prepared for fixing a sink which I found in a parts bag, however a fitting screw was not inserted. Also I had to search a well fitting screw and I think that I have a lot of different screws. I don't understand because the sink was not fixed to model?

The more closer you look at the model, the more defects you will discover! See bolsters and cross beams here - nothing more than the cover sheets!

However this is not all! The real troubles became visible as I checked and compared this model with the drawings of archives of NWHS - here a link to a related search.
Unfortunately I can't show these drawings here in this post because of restricted permission rights. However you can see these related blue prints on a gallery of my website. I was very interested to study these documents in a high resolution version and so I ordered them for private use on my website by paying a small fee to NWHS. The result was very surprisingly!

I found on documents of this class CG caboose underbody arrangements with a K-brake and also with an AB-brake, however with a very different arrangement! Exactly this underbody arrangement which was built to the model was to find on two different caboose classes, the CH class and the C2 class. Used the producer here an underbody of other caboose models which he produced also? Unfortunately I can't give an answer on this question, however I know that this underbody is wrong! Maybe that the N&W modified brakes in later years how brakes must be changed from K-Brakes into AB-brakes after restrictions of AAR for K-brakes? However definitively ist this model with this brake is not that what I would like to use for my 1930 train! At this time the cabooses of CG class were equipped with the original in 1927 built K-brake!

There were only one conclusion together with all the mistakes of the underbody of my model - I must remove all the brake components and construct a complete new brake, a K-brake of course and maybe exactly built after the blue prints. And about this I will write in next post.

________________________________________________________________________

Cheers, Bernd

My website http://www.us-modelsof1900.de - my MRH blog http://model-railroad-hobbyist.com/blog/20899

and on Facebook https://www.facebook.com/bernd.schroter.566 where I write about all my new projects.

Reply 0
modelsof1900

Some changes on frame ...

... and adding a new brake!

First of all I removed all original brake parts, bolsters and cross bearers received fillers from styrene for avoiding the free perspectives under the frame.
And I mounted a new brake cylinder, a part made by Red Caboose.

The next picture was shown in a other thread already but it must be here inserted again - the new brake gear.
This was a work how all my other brake installations also however with one extension - the slotted guide as a replacement part for short chains how they are used in regularly cases as connection from hand brake to brake cylinder lever. However this guide is exactly built after the blue prints of this caboose and it was a very complicate to be built part. I have begun six times with this part without to have an usable result. At end this is the eighth attempt which I could use here.

Here the brake was mounted onto underbody and all supplementary parts are added, lever guides (or lever carriers how I have read in an older Car Builders Cyclopedia?) and the connection pipe from main line to brake cylinder. All these parts are riveted onto frame or I use additional to CA glue small wire bolts which are pressed into pre-drilled holes. So it looks like real rivets and I hope for stable fixed parts without damages while "playing" after finishing.

A look with the old original brass trucks while the new ones are yet on their way over the Great pond.

Here again this picture in an enlarged view.

Sorry for my own lovingness however it was a complicated work and it was the most detailed brake which I have built. Here you see also how I built the cross lever for the hand brakes, shortened - however without a radical cut off how the builder it has done on original model. (On left end of frame is seen the builder sign still!)

Next step will be some smaller modifications on body and after I will show some new pictures again.

________________________________________________________________________

Cheers, Bernd

My website http://www.us-modelsof1900.de - my MRH blog http://model-railroad-hobbyist.com/blog/20899

and on Facebook https://www.facebook.com/bernd.schroter.566 where I write about all my new projects.

Reply 0
Graeme Nitz OKGraeme

Great...

...Work!

Bernhard you are a master!

Graeme Nitz

An Aussie living in Owasso OK

K NO W Trains

K NO W Fun


There are 10 types of people in this world,

Those that understand Binary and those that Don't!

Reply 0
Bernd

Fantastic

Yes. Great work as always Bernhard.

Bernd

New York, Vermont & Northern Rwy. - Route of the Black Diamonds - NCSWIC

Reply 0
Virginian and Lake Erie

Beautiful work. I always

Beautiful work. I always enjoy the fine details you build.

Reply 0
JR59

Excellent!

The Details makes the difference

Reply 0
modelsof1900

Hallo, model railroaders and photographers, ...

... thank you very much for your friendly words!
Very nice to read your interest in my work. I hope for same success with next steps.

________________________________________________________________________

Cheers, Bernd

My website http://www.us-modelsof1900.de - my MRH blog http://model-railroad-hobbyist.com/blog/20899

and on Facebook https://www.facebook.com/bernd.schroter.566 where I write about all my new projects.

Reply 0
modelsof1900

Train end lamps - help need

Hallo to all,

I have purchased PSC 31334 HO scale marker lampd & jewels for the N&W caboose - and I will try to lighten them. Who can say which colors need N&W rear end lamps of N&w in the 1930ties? I think red at rear end is set. And the lenses in all other directions?

I would like to receive your answers and help! Thank you very much!

________________________________________________________________________

Cheers, Bernd

My website http://www.us-modelsof1900.de - my MRH blog http://model-railroad-hobbyist.com/blog/20899

and on Facebook https://www.facebook.com/bernd.schroter.566 where I write about all my new projects.

Reply 0
Virginian and Lake Erie

@Bernhard

I discovered a website dealing with Lanterns etc that might be useful in answering your question.

http://www.jeffpolston.com/lantern.htm

Now there are reasons to put other colors beside red in the lights. Green could be used on one side to indicate that the train is in the clear on the siding and may be passed safely. Blue lights would indicate it is not to be moved, the equivalent of the blue flag.

From what I was able to gather the only place white or green were generally displayed to indicate extra or following section was on the locomotive.

Reply 0
modelsof1900

@Rob, thank you very much!

I have visited Jeff's website and really, it gives a lot of information about lanterns and their use. And it contains a large link list for further information.
Unfortunately an answer to my specific question was not to find.

So I have written to NWHS and I hope to receive an answer from a member of society. Or I purchased the wrong lanterns?

________________________________________________________________________

Cheers, Bernd

My website http://www.us-modelsof1900.de - my MRH blog http://model-railroad-hobbyist.com/blog/20899

and on Facebook https://www.facebook.com/bernd.schroter.566 where I write about all my new projects.

Reply 0
Virginian and Lake Erie

Your welcome Bernhard, glad

Your welcome Bernhard, glad to have been a little help.

Reply 0
modelsof1900

Small and last changes

First, a small addition to my last discussion.

@Rob,
I have asked the members of Norfolk & Western HS and I received an answer from the discussion group of NWHS. Now all questions have clarified!
The N&W used lamps with four lenses for its train-end lanterns while the steam era. Here a link to such a picture. The rear lens was red, of course and the other three lenses have had an amber color - while the train was in move.
If the train paused on a siding the lamp were turned by the caboose crew so that the red lens pointed to inner side of car and amber lights were to see from all outer directions. This is a very nice feature however not to realize on the model with such small lanterns. And not a real must-have!

There was not to do many changes on the model.

Again a picture of the model in its original condition. Do you see the frames of windows with a very small depth in the side walls? Here I would like to have a better view.

First I removed out all window frames of side walls and added 0.5 mm (0.02 in) filler frames for a bit more thickness of walls.

This is the model with new frames for the windows and I think that the thicker side walls are well visible. The dome windows in running direction are unchanged because they were mounted on outside of dome and so the impression is very close to prototypes.

And now the last two additions. The train-end lanterns are mounted on roof end (drilled and prepared for lighting) and I replaced the original Carmer coupler lifting levers against more prototypical ones. The original levers were very untypical looking and simple bent brass strips only.

Now I think that all is done - out of mounting the right Bettendorf trucks with leaf springs, however I wail now since near to two months for delivery from my "personal" dealer. And after the model will go to my painter. Maybe that I can show the painted and lettered model already with next post.


________________________________________________________________________

Cheers, Bernd

My website http://www.us-modelsof1900.de - my MRH blog http://model-railroad-hobbyist.com/blog/20899

and on Facebook https://www.facebook.com/bernd.schroter.566 where I write about all my new projects.

Reply 0
Bernd

Anothr nice project

Bernhard,

Nice looking caboose. I took a look at the picture you linked to. I noticed a chain going down to the coupler. This must have been used by the crew to uncouple the caboose while the train was still rolling along. I have seen practices like that. The crew would come into the yard and cut the caboose off on the fly so it could be coasted into the caboose track.

Bernd

New York, Vermont & Northern Rwy. - Route of the Black Diamonds - NCSWIC

Reply 0
modelsof1900

@ Bernd,yes, I have seen

@ Bernd,

yes, I have seen this chain also and you are right this is a simple help for uncoupling the caboose from the caboose platform. If the crew will uncouple the caboose while rolling the train yet, maybe. And this would be a nice additional equipment to add this chain, beyond question.
However I have searched also after dates when such pictures with the chain and there is a simple answer, this is a feature of fifties or sixties and not of 1930 where I would like to use this caboose. Compare please also the uncoupling lift rod on this caboose of linked picture. This is not the original Carmer uncoupling lever of before 1930 or '32 but the AAR uncoupling rod which was become a standard in the 30ties of last century.

Yes again, I see this picture and I love this nice difference to other cabooses however I'm very doubtful about this idea to add such chains. Should I add them or not?
Maybe that I will not add these chains on this model of a CG caboose. However I hope to receive a second N&W caboose of class CF, older yet as the CG class caboose, however they all were rebuilt and modernized in later years and maybe that I will modify this into such a more modern version with AAR uncoupling rods and such uncoupling chains how is seen also on this picture.

________________________________________________________________________

Cheers, Bernd

My website http://www.us-modelsof1900.de - my MRH blog http://model-railroad-hobbyist.com/blog/20899

and on Facebook https://www.facebook.com/bernd.schroter.566 where I write about all my new projects.

Reply 0
modelsof1900

Small progress

Now, finally, the right trucks are mounted under the body.

And because I would like to install an internal lighting, I should add certainly also an internal equipment, because I would not like to light up empty walls. But a coarse execution should also reach for that.

The interior equipment which I must install from the underside into the body. Only the beds on ends must be still glued directly into the body after painting. And a stove still.
I'm sure that one of my friend will spend a caboose man for a perfectly looking caboose who will sit on one of the chairs and will watch my running trains.

Again a question. How is to lighten such a caboose of the thirties when not a gas tank or a battery box is visible on drawings? That, what I found on the blue prints did look like an oil lamp.
And so I decided, that my caboose must be lighted by oil lamps!

And these are my both oil lamps which I want to hang under the ceiling. What do you think?


________________________________________________________________________

Cheers, Bernd

My website http://www.us-modelsof1900.de - my MRH blog http://model-railroad-hobbyist.com/blog/20899

and on Facebook https://www.facebook.com/bernd.schroter.566 where I write about all my new projects.

Reply 0
Virginian and Lake Erie

Bernhard, more stunning work.

Bernhard, more stunning work. The interior work is great. I really like the look of those lanterns, you continue to amaze.

Reply 0
jlrc47

Very Nice

Very Nice

Reply 0
Bernd

Stunning Work

Very nice Bernhard. Those caboose seats look very comfortable.

Bernd

New York, Vermont & Northern Rwy. - Route of the Black Diamonds - NCSWIC

Reply 0
Brent Ciccone Brentglen

Oil lamps

I like the oil lamps, how did you make those? That interior looks great too, I wouldn't call that "rough"!

Brent Ciccone

Calgary

Reply 0
modelsof1900

Thanks to all for your

Thanks to all for your interest and friendly comments!

@Bernd,
Yes, the seats are my personal design. The sketches which I used are not very clear on these positions because I do not own the blueprints in original size. So I had a bit of improvising.

@Brent,
It's a simple thing with these oil lamps, however a bit more complicate to me to write about this. Maybe that I should write a "How do" description with some pictures.
There are two pieces of styrene for foot and head and a short piece of clear acrylic glass, all long enough to span them into a jaw chuck of a hand drill machine. They all were shaped with a very fine scalpel and saw blades. Before gluing together a hole were drilled into the formed acryl (the glass) where I inserted a warm-white 0402 led. With a bit of black paint the oil lamps were ready. All.
However I must say also, that I started four times for finishing the second lamp.


________________________________________________________________________

Cheers, Bernd

My website http://www.us-modelsof1900.de - my MRH blog http://model-railroad-hobbyist.com/blog/20899

and on Facebook https://www.facebook.com/bernd.schroter.566 where I write about all my new projects.

Reply 0
Paul Jacobsen

How to!

I would love to see a how to on the oil lamps!  Your stuff is amazing!

age(26).jpeg 

Ranger -- Fort Jacobsen

Scenic Designer FJRR

Track Crew FJRR

my blog

Reply 0
Virginian and Lake Erie

I'll second Paul's request

I'll second Paul's request and put it in the form of a motion!

Reply 0
Reply