p51

I'm modeling the East Tennessee & Western North Carolina in On30 (yes, using Bachmann locomotives). Knowing I'd never be able to do true justice to the real railroad, I 'protolanced' a fictional branch line up Stoney Creek, which in real life is just East of Elizabethton, TN. My parents grew up there.

The layout takes place in 1943 (when both my parents were about 7 years old) and pretty much fills a small (11X10) room.

This installment covers construction:

I went with a track plan drawn by a friend of mine, but I didn't explain the other things that had to fit into the room, and he was thinking in HO and not O scale NG. So, once the sections of the layout were built and assembled (I built it in sections so it could be dismantled if I ever have to move), it simply didn't work. So, I changed the center section quite a bit. I lost a lot of track like that, but it fit the room much better once I did that...

[48401498971_c6f126c63a]

Here's after it all was placed into the room. Track laying and wiring started right away, and in a few days I track laid all the way around. The approaches for the turntables came later.

[48401495391_4e03eacce4] 

The layout is point to point and relatively small, but it is designed for operation in mind. Three major sections have enough operating potential, I think, to keep things interesting. I should be able to run this with three operators.

A few days after the track first started going down, the first train made it all the way around the main line, still need to wire up all the sidings. DCC was soon in place, with plugs in 4 spots along the layout. I have three ten-wheelers, representing the locomotives the real ET&WNC had during WW2, #s 9, 11 and 12.

[48401617982_1f6ca690e6]

You can find the track plan here:  TRACK PLAN

Lee

[35532433422_1a63689aeb_n]

My Flickr website with layout photos

https://forum.mrhmag.com/post/etwnc-stoney-creek-branch-12197690?&trail=25

You can never have too much detail or too many trees!
Reply 5
ocalicreek

A fellow Tweetsie fan

Looks great!  Please keep sharing.

What sort of things will the line be hauling?

a Tweetsie fan,

Galen

Visit my blog, Gallimore Railroading, at ocalicreek.blogspot.com

Reply 0
David Pennington Long Haired David

Great way to go

I read Lucius Beebe's "Mixed Train Daily" when I was a lad (back in 1965) and about 5 years ago I managed to buy my own copy. There is a great section in there on the Tweetsie. I was so enamored with it that we called our first cat Tweetsie in memory of the railroad. Keep up the good work.

David

David
Hi from the UK
Main man on the Sunset North Eastern and now the Great Western
My Blog: http://www.gmrblog.co.uk

Reply 0
ctxmf74

Nice looking trackwork.

Should run great. .DaveB

Reply 0
p51

I'll address a few points

I'll address a few points here:

I'm still working out customers for those spurs, but one place will be a barrel company (I had a tiny little HO scale switching layout when I was a kid and one of the businesses was Oleander Barrelstaves, I always wanted to have that on a more serious layout later) and one spur might be for Army use. I have several WW2 US vehicles, all painted and marked correctly for stateside military use (I have a real 1944 Willys Jeep in the garage). I have several open gondolas, the ones built up from flatcars, as well as several boxcars. More on rolling stock soon.

Probably I'll be handling LcL loads with gons, boxcars and large military and farm loads on flats.

When I was a kid, we went to see my parent's family once or twice a year in ET&WNC country. They all lived in the area, yet few of them recalled the 3-footers. Dad recalls the standard gauge locomotives (207 and 208, now known as Southern RR 630 and 722). The Rayon Mill in Elizabethton still had a Porter fireless 0-6-0, which I saw running several times in my youth.

As for the track, I had a lot of help with that. 99% of the track is Micro Engineering On30 code 83 flex and # 5 turnouts. I had to use two curved code 83 Shinohara turnouts where the Micro Engineering ones just wouldn't fit. Once all the ballast and weeds are in place they shouldn't stand out so badly. The wiring was mostly done by a local model RR guru, I just found out he has the cover photo for the October issue of Trains this year (I saw an advanced copy last night), and he regularly works on the massive HO layout in the Washington State museum in Tacoma. Between him and another pal of mine, I got my DCC humming along very quickly. I'm totally worthless with wiring and never dabbled in DCC before this, so I doubt I would have gotten this far so fast without them.

Reply 0
Sn2modeler

Nice Start...

Nice start on the layout....Based on the photo from your website we are close to the same age.  The MR article and trackplan got me interested in the ET&WNC.   I lost my retainer at Blowing Rock around 1983 or 1984...Ooo my Orthodontist was mad!   I got to tamp the yards in Johnson city, look into the enginehouse, walk the grades around Elk Park, look for the RR in Cranberry and spend time in Boone...

Your models capture the essence of the EW&WNC and Linville River...nice work!  At present you layout is built on a flat benchwork, I pressume your add hills and trees...but allso hope you add gulley's creeks so that your scenery is as compelling as your rolling stock!  Good luck...

Dave K.

http://www.sn2modeler.com

Reply 0
p51

So, why model this RR?

Our family went to Elizabethton, TN, usually once a year to visit all our relatives. Every now and then, I might see some remnants of the old railroad. We'd pass the site of the covered deck bridge near Hampton (though I never realized at the time I was always looking on the opposite side of the highway on those trips to see if I could catch a glimpse of the remains of the grade at that point) or if I was really lucky, we'd go to Tweetsie RR near Boone. In the early 80s, all the men from the family once went to see the remnants of the grade through the Doe River Gorge. I don't think any of us at the time realized that they'd only stopped running trains through there a few years before as part of the ill-fated, "Hillbilly World," the billboard for which was visible from the highway for many years. The local library up there had a copy of the book, "Tweetsie Country," which I drooled over and got a copy of my own as soon as I could afford one.

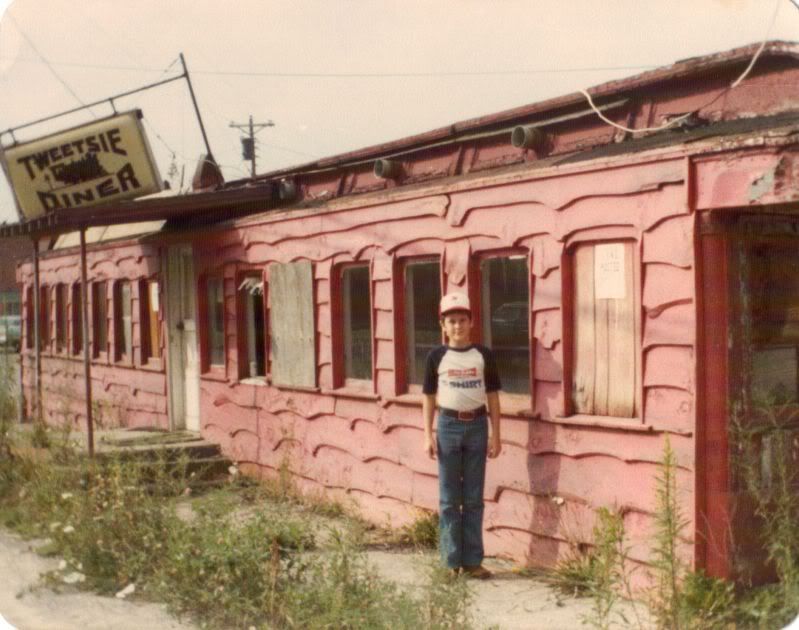
This is me, circa 1982, at the Tweetsie Diner near Newland, NC. This used to be ET&WNC coach # 23. Sadly, it burned down later.

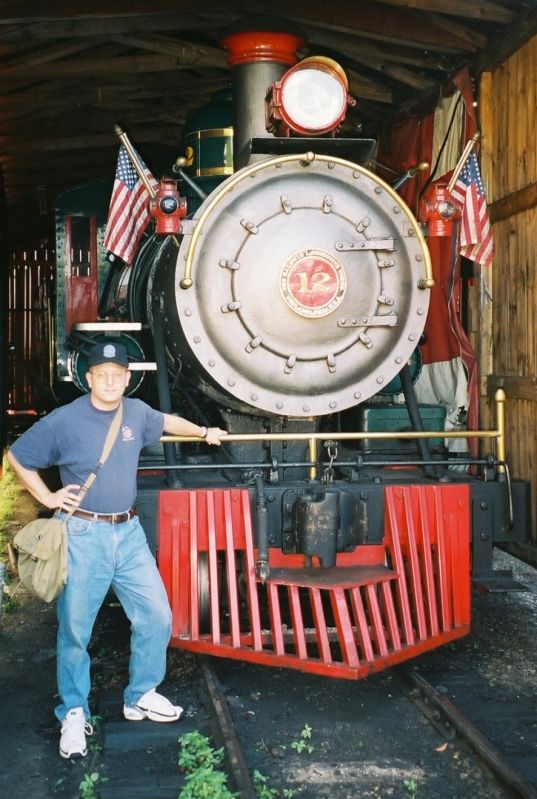
And here I am, 23 years later with ET&WNC # 12, a locomotive I've probably seen about 4-5 times in my life. It's also the only locomotive left from the 3-footer portion of the railroad (though standard gauge engines # 207 and 208 both still exist today).

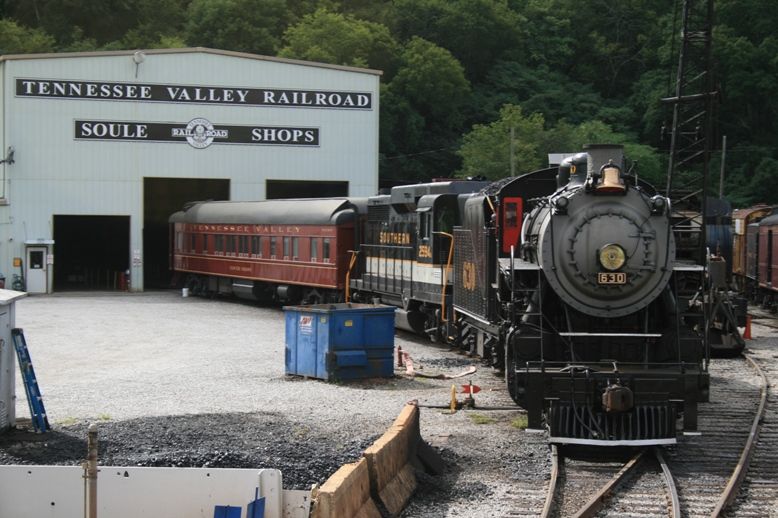
Here's what I refer to as ET&WNC #207; all other train fans refer to her as Southern RR 630. I took this shot in 2012, exactly 30 years after I was first there and got my first cab ride on this very locomotive. Sadly, she was cold at the time but had just run the weekend before. About 100 yards behind 207 is 210, one of the RS-3 diesels the Southern RR traded for the steam locomotive above and her sister engine, # 208 (later known as Southern RR 722). Sadly, the RS-3 is mostly gutted and also unlikely ever to wear her ET&WNC paint job again...

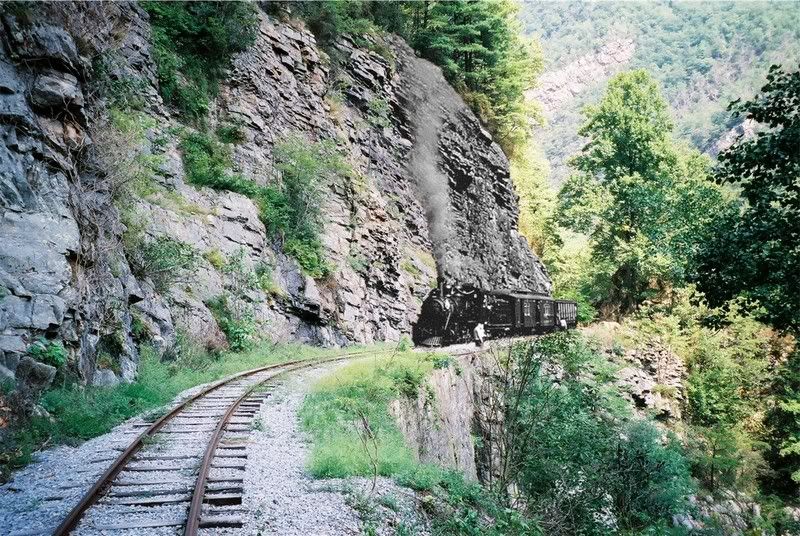
On my first trip to the restored Doe River gorge trackage, I overlaid this shot of a train coming around the same curve, taken from exactly the same spot (the edge of the hillside is from the original photo, proving I was exactly at the same location for my photo).

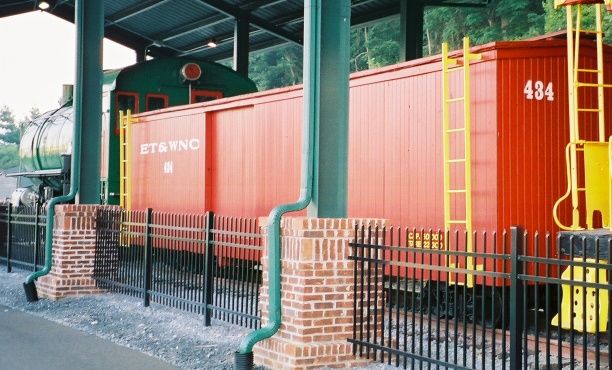
This is one of a few ET&WNC boxcars in existence, at Elizabethton, TN. This isn’t the real 434, when they pulled this car off someone’s property they couldn’t make out the number so they picked one from a list of known sold boxcars when the railroad folded up. Unfortunately, they chose a number of another boxcar that still exists today and is nearing the end of a long restoration. More can be seen on that car here: http://www.tarheelpress.com/etbox/ On the point is North American Rayon locomotive #1, which was the last steam engine in America which ran in interchange with other steam engines. I saw this engine running several times while growing up and even got to sit in the cab once in the 80s while it was under steam (and have the photos to prove it).

I collect ET&WNC stuff, which isn't too difficult (as there's next to nothing out there that's available) as well. I have a few original photos from before the line was abandoned, both the 3-footer and standard gauge stuff. This is a shot in my collection of #11's front coupler, which was an interesting contraption all the ET&WNC engines had, it allowed those 3-footer engines to couple standard gauge cars!

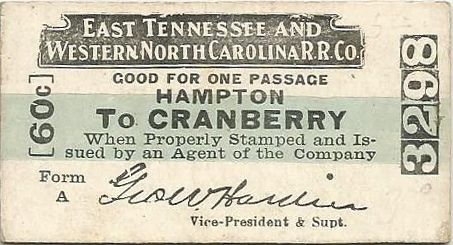
And here is an original ticket from the RR!

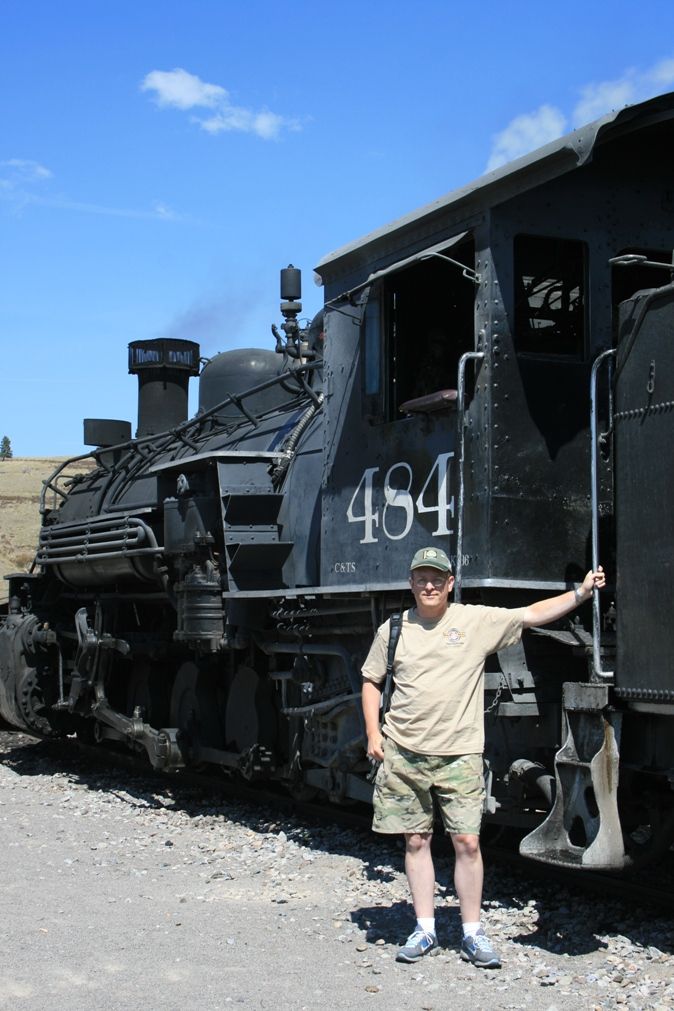
Just in case anyone is curious, yes, I do like 3-footers in other parts of the country. In fact, I've personally been to almost every existing narrow-gauge railroad in the US (including Hawaii and Alaska). Here I am below at Osier, Colorado on the Cumbres and Toltec... All that said, very little attention has ever been given to 3-footers East of the Rockies, it seems (other than the East Broad Top). The D&RGW lines have been modeled to death and there's nothing I add to that.

Reply 0
p51

Dave, Yeah, it's all flat for

Dave,

Yeah, it's all flat for now, but it soon won't be. I read of some new techniques for making hills that I'm dying to try out. Any depressions in the ground will have to be cut out with my keyhole saw. Right now, I'm focusing on getting the turntable bridges built, wired and installed.

I have a large cornfield I'm looking for find just the right spot for now. Not much room for bridges as a lot of the mainline is on curves. I'm sort of depressed about that as I so wish I'd had room to make a scale model of the covered bridge and Hampton...

Reply 0
dkaustin

@ Lee

We don't hear too much about the 3 footers than ran between both mountain ranges.  For awhile my folks lived in Nashville, Indiana.   I was out of the house before that time.  Yet , I found that there were some historical references of a logging railroad that ran through the hills and hallows of Brown County.  Home to such names as Bear Wallow and Greasy Creek.  A small crossroads to the East was always an interesting name, Gnaw Bone.  Brown County also had covered bridges.  Some where still standing along dirt roads in the country when I would visit my folks.  Unfortunately some tourists found it necessary to break off boards as souvenirs to account for their visit.  This caused a lot of damage to some of the old covered bridges.

Now I live in NW Louisiana.  Historically, there were all sorts of small three footers running around Louisiana hauling logs out of the forests for processing at mills.  The lumber was loaded onto Standard Guage at that point.  There are photos of huge wagons hauling narrow gauge Porters into some of the locations, pulled by teams of oxen.  There were low trestles through the swamps.  There are photographs of a track gang working on a trestle and just below, watching the activity, is an alligator.  I have done some reading on the railroads that evolved or died in Louisiana.  The terrain was always a problem, especially in those areas where the ROW had to cross swampy land. Train crews swore up and down that the tracks moved when they crossed those areas.  There is a report on the Claiborne Polk Military RR of losing an engine in a swampy area to quick sand.

Yet, you don't hear much about those forgotten railroads in the modeling community.

Den

n1910(1).jpg 

     Dennis Austin located in NW Louisiana


Reply 1
p51

NG wasn't just in Colorado...

Dennis,

You are quite correct about how many NG RRs there were in the South. People mostly associate NG stuff to Colorado and New Mexico any more. I've ridden almost every NG RR in this country at one time or another (including Alaska and Hawaii).

The ET&WNC had a route through the Doe River Gorge, outside of Hampton, TN. The tracks were re-laid in the early 60s as part of an ill-fated tourist RR that was totally dead by the early 70s after several failed attempts. A Christian camp bought the place in the 80s, rebuilt the track and now runs equipment as far as they can (not to the twin bridges across the river which are in very poor shape). The place rivals anything you'd see on the old D&RGW.

As for the Camp Claiborne RR, they called that the "Crime and Punishment RR" from the road initials on the equipment and the terrible conditions endured while operating it (the area hasn't improved, it was still a festering pit when I went through Ft Polk as an Army LT for a month-long JRTC rotation). Such a shame the roadbed is abandoned today, it was a true engineering marvel. I have a keen interest in WW2 military railroads, too.

Reply 0
p51

Layout concept

Like many modelers, I'm taking an alternate reality stance to the planned layout as there wasn't really a railroad along the creek after 1932. Yes, Stoney Creek is a real place, just outside Elizabethton, TN. The places named are also real spots along the way. Here's my fictional history of the Stoney Creek Southern/ET&WNC Stoney Creek branch and locations in a modern-day context:

The railroad was started in 1898 and by 1900, cut East by Northeast from Elizabethton, paralleling old state 91 on the south side of the Watauga River. It crossed the Watauga at the bend in the river just east of the modern Lynn Valley Road bridge. Paralleling the current highway 91, it ran up into the hills where logging traffic kept the railroad going into the depression era. The railroad got as far as Dry Branch where locomotives were turned around and log cars were loaded. Originally chartered as the Stoney Creek RR, the line added 'Southern' to the end of the name to avoid confusion with state tax collectors over a competing logging line which ran mostly on the south side of the creek.

There were various station stops once the railroad crossed the Watauga River, notably at stops such as Hunter, The Speedwell, Unaka, Muddy Branch, Hurley Hollow and Dry Branch. The line was chartered to go as far as Shady Valley, but never got that far.

The line saw very little passenger traffic but the logging provided revenue until the 1930s. By 1936, trains were running only once a day, if that. Drowning in red ink, the Stoney Creek Southern offered a buyout of stock to the parent company of the East Tennessee & Western North Carolina RR. By the fall of that year, SCS-marked rolling stock started to vanish and ET&WNC equipment started running up the valley. Although a separate corporate entity into the WW2 years, the SCS was in effect another branch of the 'Tweetsie'.

The 1940 hurricane (storms weren't yet named at this time) caused much flooding in the region and washed out the SCS's Howe truss bridge across the Watauga. The ET&WNC filed for abandonment soon afterward, citing declining traffic and the cost of rebuilding the bridge. The ICC ruled against the ET&WNC once they reviewed the current condition of the rest of the line. The Watauga River bridge was the primary damage to the route, which saw surprisingly little damage from flooding along Stoney Creek as the line was built well above the level of the creek in most spots. Only a short section near the Speedwell was washed out and a review of revenues showed a lack of interest in running mixed trains as opposed to a lack of customers, most notably the logging and ore loadout near the end of track and the large barrel component factory midway along the line. Several sections of rail were brought out of Boone when the Linville River Railway was abandoned. The ICC strongly pushed for use of the roadbed of the recently-abandoned Virginia and Southwestern RR (later owned by the Southern Railway) where it crossed the river. However, the railroad was rebuilt where it was. This remains the only known case of a standard-gauge railroad being abandoned in favor of a narrow-gauge common carrier in American history. ET&WNC crews would often point out the remaining abandoned SRR trackage and joke with traveling soldiers and newcomers to the valley that, "we even outlasted the big railroads!" Still, the line continued to struggle from lack of operational interest by parent ET&WNC.

Pearl Harbor changed all that.

By late 1941, the Army had already considered placing an infantry training camp somewhere in the Shady Valley area, but the lack of good roads prevented this. By the spring of 1942, the Army placed the 796th Railway Operating Battalion into the valley with the specific mission to rebuild the aging SCS mainline (by now referred to the Stoney Creek branch of the ET&WNC) as an extended training exercise. This was for the shared purpose of training Army forces in rebuilding damaged railroads for the future liberation of Axis-held nations and also to provide a good transportation hub into the valley for a projected training camp for the Army ground forces. New 55-pound rail was laid and new ballast brought in for the main line before the Summer of 1942. Many soldier-railroaders who cut their teeth on the ET&WNCs ten-wheelers went on to run trains on the White Pass & Yukon in Alaska as well as meter-gauge rail lines in Africa, Europe and Asia.

By the Spring of 1943, the soldier-railroaders who'd rehabilitated the route were mostly gone. In their wake, the SCS had been rebuilt into a line the locals could be proud of. The tracks were still weed-covered in the summer months and the sidings weren't exactly to any Class I railroad standard, but the track was in better condition than it had ever been. Commuter trains heading for the rayon mills in Elizabethton provided hundreds of skilled workers for needed defense work. Soldiers still used the Stoney Creek branch to occasionally transport various loads of weapons, munitions, vehicles and supplies. The 3-foot line into the valley had never seen such traffic before, especially now that gas rationing had rendered civilian motor traffic all but useless without available gasoline.

It is now late summer in 1943. Locomotive #s 9, 11 and 12 haul mixed freight, acid wood, ores, military traffic and passenger trains for the mills almost round-the-clock. The Army is also using the line for defense purposes. It is the high-water-mark for the three-footers along Stoney Creek.

Reply 1
p51

Structures and vehicles

Any layout needs structures, even one taking place way outside of any city. I have some kits for flag stops yet to build and have some scratch built stuff. I like how this depot turned out, even though I couldn't get a perfect match for the right colors. It's close to the ET&WNC red color they trimmed their depots with prior to 1945. And the rest, I blasted with Pullman green. I then created a scale train bulletin chalkboard. If you take a magnifying glass, you can actually read the thing. I made three, for this and the other two pending flag stop stations. I have no depot sign on it yet as I'm still unsure which station spot this will occupy, will probably by the Dry Branch station.

I also have to put some scale chain on the spout for this water tank, but otherwise I really like how it turned out:

I finally got all three scale early WW2-era GCCW 2 1/2 ton trucks done. The unit are markings for an Army railroad operating unit (it was relatively common for white bumpers and black markings in some cases, as you could see those bumpers pretty well in blackout conditions). The truck with the tarp over the back was actually a French fire truck when I got it, it took a lot of modifications to get it looking 'GI'. All three are diecast from a company called Solido and are not easy to find today. Nobody makes a 1/48 scale plastic kit of a closed-cab cargo GCCW for some reason. These Solido trucks are 1/50, so they'll have to be slightly toward the background as otherwise they'd look odd with 1/48 scale figures alongside them (I have a 1/50 scale Sherman as well, that'll be back toward the background, too if I can find a place to put it on the layout). These will probably be in a parked pose, with the noses sticking out toward the viewer/operator as the back ends aren't all that great looking. I also have a few civilian cars, with 1943 TN license plates (most have the correct county code). They'll be in the foreground as almost nobody makes true 1/48 scale cars.

I also have two Jeep kits, I need to get those built, too (one of those will be made to look like the 1:1 scale 1944 Willys MB I have in my garage).

Reply 0
p51

Labor Day labor, depot building...

I finished two Grandt Line small depots over the long weekend, the only thing lacking are the station names and the train chalkboards for the fronts of them. I decided to detail the interior of one of them, I printed interior walls on sticker paper, and even included a calendar and a Vargas girl print from a month before the layout takes place in 1943. I doubt anyone will ever see it when it's in place, but I know it'll be there. I put a stove and a chair in here as well as these will be mostly flag stops.


Reply 0
p51

New coach

Just completed coach 23, a re-painted and detailed AMS On30 coach. I like the looks of these, they're far more accurate than the Bachmann coaches.

I didn't like the lighting system so i yanked all that out, then added passengers to each seat.

I modeled this specific coach as it's the only one I ever saw in person, as it was made into a diner after the RR folded up in 1950. sadly, it burned down after I saw it. That coach wasn't a Jackson & Sharpe one, but I decided to go that way anyhow.

Reply 0
RF an O Ry

The Tweetsie #205

I model the Cadiz Railroad in Cadiz, Ky, which had an 0-6-0 #205... formerly ET&WNC #205 and Richmond, Fredricksburg & Potomac #104. It was sold in 1954 to Crabtree Coal Co in Isley, Ky

Reply 0
p51

I night I got both the

Last night I got both the turntable pits assembled, painted and weathered. I just did both of them to look pretty much the same way as this one photo:

I painted them with alternating layers of grey primer (for a ‘pebble’ looking finish to appear as rough concrete) and light tan spray paint. The rest was dry-brushed with various hobby paints. The bridges will be started tonight.

The ET&WNC didn't have any turntables on the RR by the 40s (there was one at Cranberry, NC but it was gone long before WW2) and all the engines faced one direction most of the time. But for operational sake, I didn't have room for wyes and wanted to run locomotives 'smoking end forward'.

Once the tables are in place, I can finish the approach tracks and then I'll need to figure out how to wire the things up for DCC. But at least I'll finally be able to run trains once they're in.

Reply 1
p51

Completed turntables

I finally finished my two turntables. One, I left pretty much as-is, and weathered it to represent a relatively new bridge in an older pit.

The other, I didn't like the bridge decking as it looked to toy like to me. So, I added new real wood decking*, then weathered it with various shades of grey inks, then weathered with grime, rust and oil stains all over the deck. I like how it turned out.

* I had bought a huge box of cheap birch coffee stirrers. They work great for O scale lumber!

Reply 0
p51

Updates

I haven't done a lot of obvious work to the layout recently as I was very busy with a NASA trip as well as doing some cartoons for a book project. But I'm back to working on the railroad.

I was thinking of adding a scale Civil War memorial to the layout once the scenery is underway. Looking into a scale artillery piece for that, I found that nobody makes a good scale Civil War 6-pounder field gun in 1/48 scale. I'd wanted one of those because my Father has one of those, he'd built himself back in the 1960s and I grew up crewing it at re-enactments and competition shoots (yes, I had a very cool childhood). My Dad took it upon himself to help me out with that, by making a scale M1857 12-pounder 'Napoleon' barrel out of brass. He chose that type of barrel as it was easier to turn on a lathe and was quite longer than a 6-pounder barrel. Here's what he did, in his hand:

The plan is to make a scale 'concrete' pedestal for the gun, as a field carriage wouldn't have survived the 80 years since the end of the Civil War to the 40s when the layout takes place (and nobody was making reproduction carriages for parks at that point that I'm aware of). The finished result will be very similar to gun tube at the memorial in downtown Elizabethton, TN:

As for the tracks, the entire route is now complete. The two dead spaces got wired, the two (Peco) turntables were wired and the first train ever over the entire line was completed, including turning the locomotive at each end. The first real 'Train' ever over the line was run by Robert (the guy who drew the original track plan, helped me install the sections and did a lot of my wiring), with locomotive # 12 and coach # 23. This was ironic, as they represent original rolling stock from the ET&WNC that I've actually seen in person in the past.

I think I'm going to rotate that gas station 90 degrees from where it is, to have a road crossing the tracks at about where the white panel van is in this shot, going away from the camera.

On the turntable. Peco makes a split contact ring for the electrical pickup that makes wiring a breeze. Other than the sound system going out for a split second when you're turning it, there are no problems. I'm fine with a momentary gap in sound for a setup so trouble-free!

First trains to make it all the way around and have the locomotive turned under its own power. The opposite end of the layout is in the background, just to the right out of frame

There's a few thing I see I need to do now that I can run the entire route, mostly found out since I'm now running locomotives in the opposite direction I'd ever run them before:

  • The turntables need to be weighed down as they ride really high on their contact springs.
  • One curve is way too close the edge of the track, I'll be adding some width to the bench work there.
  • A couple of dips in the track need to shimmed as well.

In short, not too many substantial problems, but they need to be resolved before I can consistently run trains and start the scenery.

I also need to break out all the freight cars from their boxes and find all the brake wheels for them to install...

Reply 0
p51

I have a few updates: The

I have a few updates:
  • The long-planned fascia is finally mounted. One section I had to cut three times and another really should be cut again, but all in all it's almost completely done. I've drilled all the holes for mounting screws for the DCC plug faces and the throttle pocket holsters. I just need to prime and paint it before mounting all that hardware. Soon, I'll be mounting the blue-points for the turnouts.

  • Recently, I got a crude drawn version of the layout track plan done, but it needs to be better rendered. But at least it'll give people an idea what I'm looking at. This is how you'd see it oriented for when you walk into the room:

  • The room is slowly being decorated in the proper style for a layout room (no RR crossing signs, though), I just scored a Fogg print of the ET&WNC as well as a few period photos to greet visitors. The photos are an original 8X10 from between 1943 and 1947 and a shot from the Elizabethton engine house sometime between 1948 and 1950. The RR logo at the top is by Stoddart Limited:

Reply 0
ocalicreek

Great Progress, Nice Decor

Lee,

Glad to see an update! 

I recently pulled together the Tweetsie memorabilia that I have had planned for the walls of my layout room.  Not ET&WNC, but Tweetsie RR, the theme park.  Got a decorative license plate with a rudimentary #12 and 'coach' (rebuilt flat) on the trestle.  Unfortunately, it is a depiction of #12 with the garish balloon stack they had on her for a while, and she is drawn/painted as a 2-8-0.  Fortunately, however, it is the license plate that was on my grandparent's car while they were working there, so there's great sentimental value.

Also have a decorative plate showing scenes from the park including the Mouse Mine, Palace Saloon, etc.  The real collector's item, however, is a TRR logo - cast metal painted yellow, like the ones on the sides of the coaches, or the water tower.  It is smaller, however, and I'm not sure where it was intended to be used, just that it came out of an order the shops had made some time ago and it was surplus, so my grandfather was able to keep it after he retired from there.

Anyway, I think it is these things that make a 'train room' a unique place beyond just a room with a layout in it.  Glad to see progress, and I look forward to more updates from your train room.  Some day if I ever get my decorative pieces up on the walls, I'll have to post a picture.

Galen

Visit my blog, Gallimore Railroading, at ocalicreek.blogspot.com

Reply 0
p51

Galen, When I was last at

Galen,

When I was last at Tweetsie in 2005 (I was up there visiting family, and demanded to go as there was a chance then that they might close the park due to landowner issues the following year), I bought a license plate that has a decent side view of # 12. It's hanging in my garage over the door, I need to get that down and put it on the wall in the toy room or maybe alongside of the fascia on the layout. I bought a lot of Tweetsie swag that day, just short of 100 bucks worth (but that included a copy of Johnny Greybeal's vol ! ET book). My wife was less than thrilled. I bought it all from the depot building, which burned down afterward.

I did find a sandblasted and unpainted TN license plate from 1942 on eBay recently, from the county for Knoxville (I'd love to find a Carter County plate from 42), which I will be re-painting and will either put it on the wall or mount it on the fascia. Not sure what but It'll be in the room for sure.

Still can't run trains really as the turnout points are free-floating and I need to get the blue points mounted so I can then run trains. I have all the blue points, op rods and all the mounting hardware (it helps to stockpile stuff you know you'll need while you're planning, I found out) but just need to find the time to mount all that stuff to small sections of plywood, then screw them to the plywood tabletop on the benchwork. At that point, it'll still be a 'plywood central' but at that point there's nothing stopping me from starting the scenery.

I have too many structures, it turns out, so I'll be selling a few soon, I think...

Reply 0
p51

The fascia is now painted,

The fascia is now painted, the DCC sockets are back in place and the throttle pockets are installed. The black cup things are PVC end caps, where the pulls for the turnouts will rest inside, to protect them from being brushed up against and damaged. I left them black because they pretty much matched the pockets for the throttles. I also have boxes for the car cards ready, they're going in right after the turnouts are operational.
The only thing lacking now is to install the Blue Points, which are all mounted on individual blocks of plywood to be mounted under each turnout. Once they're installed and the pull rods ready to function, I'll finally be ready to run trains!
Not bad considering this was a pile of lumber and a track plan as late as July...
Reply 0
p51

Mission Impossible: Blue point version

If you've never seen a blue point controller for a turnout, they're small and you mount them underneath the turnout directly.

SO, imagine this: You have a slot 2" wide with bolts running through it. You're not 100% sure it'll fit at all in there or line up with the hole. You have to run a section of wire smaller than piano wire, through a hole in the center points tie in a turnout which is exactly the same size, with your arms stretched all the way out because of course, it's the turnout furthest from the edge.

Then, you have to hold it exactly still while you grab a power drill and drill it, one-handed, from above while you hold the rest with your other hand from below. And the pull line is sticking out right into your chest.

Yeah, you could say I'm a little happy it worked out. I was prepared to just buy a ground throw, that's how unsure I was it'd fit at all!


Reply 0
ctxmf74

"SO, imagine this: You have a

Quote:

"SO, imagine this: You have a slot 2" wide with bolts running through it. You're not 100% sure it'll fit at all in there or line up with the hole. You have to run a section of wire smaller than piano wire, through a hole in the center points tie in a turnout which is exactly the same size, with your arms stretched all the way out because of course, it's the turnout furthest from the edge.

Then, you have to hold it exactly still while you grab a power drill and drill it, one-handed, from above while you hold the rest with your other hand from below. And the pull line is sticking out right into your chest."

 A couple of things I learned from installing blue points on my N scale layout are:  First drill the hole larger than the switch  throw so the wire has plenty of room to clear the roadbed. Then align the Blue point with the throw rod position from above before the track is glued down and drill the four mounting holes all the way thru the roadbed( blue point offers a jig for this but I just set a controller in place and mark the mounting holes with a sharpie) . Once the holes are drilled and the track glued down leave the throw wire long and thread it up thru the throw rod and bend the top at 90 degrees to hold the controller while you go under the benchwork and install the screws(two screws can be installed part way then the controller slid onto them and the other screws added) Once the controller is aligned and the screws are tightened then cut the throw wire to it's final length(just enough sticking thru the throw bar to keep it in place). Before deciding on the benchwork framing it's best to layout the track plan and then avoid putting cross braces near the points locations as it a lot easier to install blue points or tortoise motors in a clear location.....DaveB

Reply 0
p51

What I did was to mount the

What I did was to mount the blue points to small squares of 1/2" plywood. I wasn't thinking when I built the benchwork and used 1/4" ply and I later worried that the blue points might flex if screwed into that.

While installing them, I found it was best to drill a 1/2" hole directly under the points, then putting the op wire onto the blue point, slide it underneath and by hand, move it around and find the right spot for where the points work best. Then, I'd use 3/4" wood screws from above into the plywood block below.

The flex track is spiked down every ten or so ties, so I remove all the adjacent spikes when I'm close. I've found that in a few cases, it was a matter of just shifting the turnout over just a fraction of an inch to ensure the blue point was snapping the points into their correct spots. Then, I'd just put the spikes back in (and the ballast will hold it all down once I'm at that point). That worked really well on that 'hard to reach' blue point last night.

That way, I was able to assemble the whole thing at the table and not upside down under the layout. It's a little clumsy on the install, I have to admit, but other than 2 locations on the layout, the turnouts aren't that inaccesable. I've just heard so many horror stories on assembling a blue point underneath a layout to consider that as an option.

Reply 0
Reply