JodyG
Note: I plan on adding more pictures and details to this entry as I find them on my computer. 
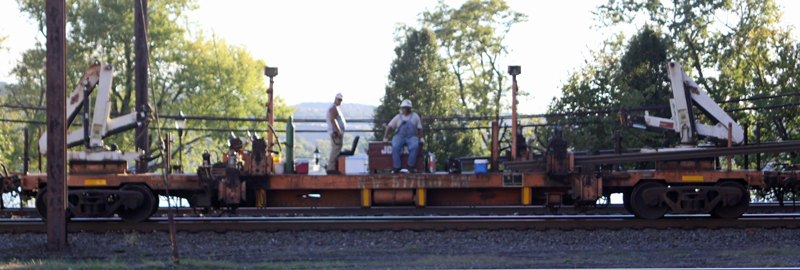
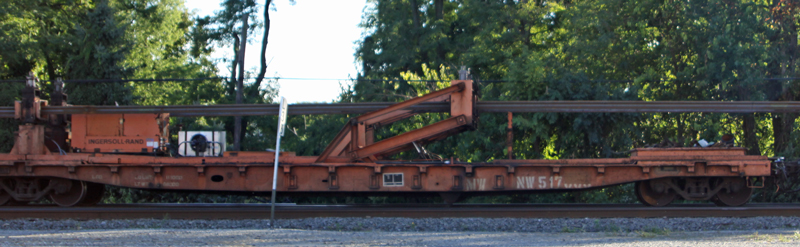
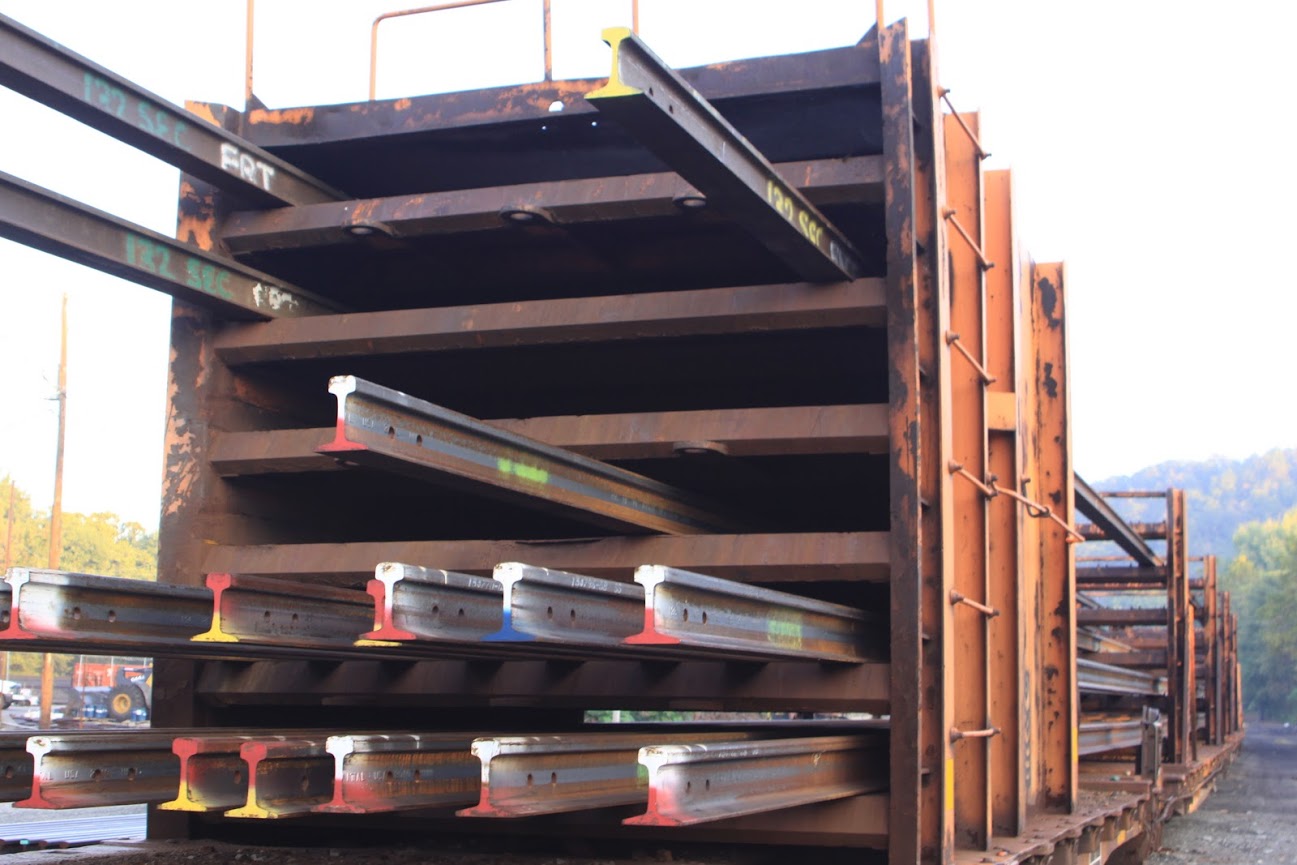
In 2009, while railfanning along Norfolk Southern’s Port Road line in Lancaster, PA, I came across a
continuous welded rail train parked on a siding. At the time, I thought to myself “This would make a 
really interesting model if I could figure out how to do it someday”. I took quite a few pictures of the 
subject, and stashed them away for later use. The prototype was still wearing Norfolk and Western 
reporting marks. All of these cars on my prototype were based on a 53” GSC flat car. I have also seen 
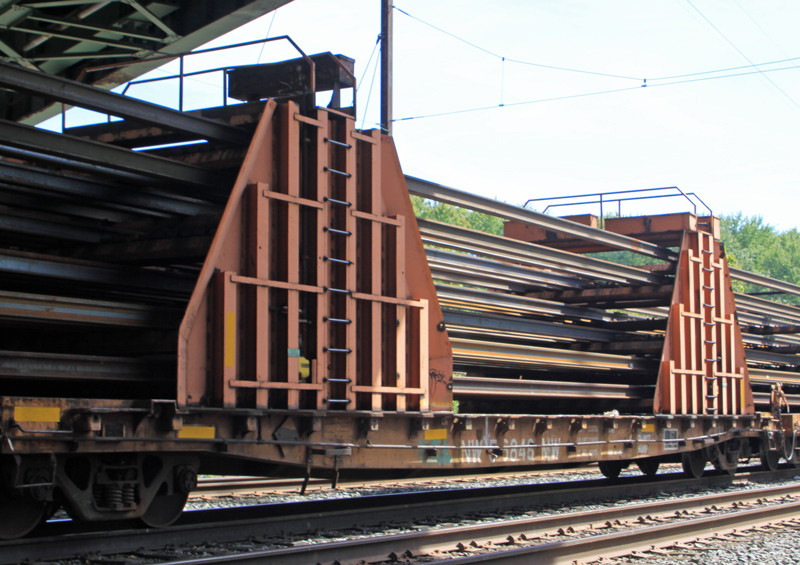
these trains with old 40’ riveted body flat cars as well. At the head end of the train, there is usually 
a “threader” car that helps get the rail onto and off of the ROW and into the guide chutes. After the 
threader car comes a guide car. This car has a set of movable guide chutes and a set of fixed guide 
chutes. These chutes help direct the rail into the next car, the “power car” or sometimes called a 
“puller”. This machine helps pull the 1/4-mile long segments of rail onto and off of the rail storage cars. 
After the puller car, another guide car helps direct the rail into the storage racks on the train. Both guide 
cars are identical copies of each other, with the fixed guide chutes oriented closest to the puller car. 
 
After doing some research, I learned that these specialized pieces of equipment were built by a single 
manufacturer and sold to several railroads over the years. Some have been modernized and retrofitted 
with some newer machinery, but the basic puller and threader cars are all fairly similar. The greatest 
area of variety lies in the rack cars that store the long lengths of rail. Some railroads have racks that 
store 3-4 shelves worth of rail. Others, like my prototype, have upwards of 9 levels to them. 
 
Fast forward to a few short years later to 2012. I had recently began to learn the craft of 
solid modeling on the computer as a new part of my job. Around the same time, I was tasked with 
learning the ins and outs of our new 3D printer we purchased for producing prototype parts. 3D 
printing has rapidly grown in the last few years, and the possibilities of their use seem to be limitless. 
At the time, producing entire HO scale models was not a possibility due to cost and lack of fine detail. 
However, a light bulb went off in my head- what if I use this technology to replace some of the difficult 
scratchbuilding tasks in my modeling? Then I remembered that rail train…a perfect candidate for 
exploring 3D printing.
 
After some experimentation, I decided that a mix of scratchbuilding, kitbashing and 3D printing 
could really change the way I approach my modeling projects. Through trial and error, I learned what I 
could and could not print effectively. Thankfully, the modeler now has many more resources available 
to them to help them learn how to design 3D printed parts. Shapeways.com has a guide that helps 
illustrate how thin walls and posts can be in order to maintain their shape and minimize warpage of the 
part during and after printing. Once you are familiar with these guidelines, you will be able to effectively 
design parts for your own use. 
 
Modeling: 
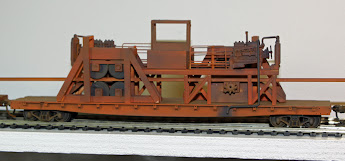
I decided that since my prototype was based on a 53’ GSC flat car, I would use the old Walthers
3 in 1 GSC flat car kits. These have become hard to find lately, so I also used the Tichy #1000 53’6” GSC
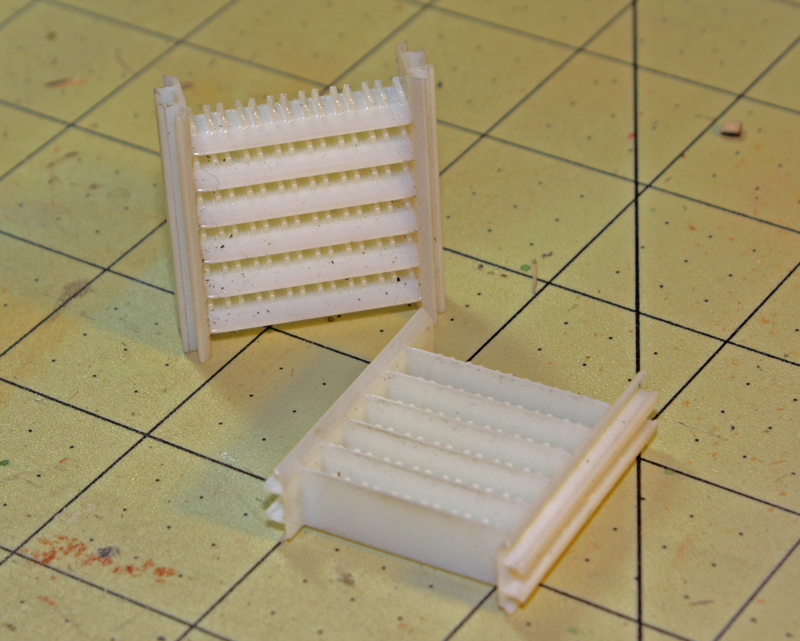
flat car kits. The easiest and most plentiful car that needs to be modeled is the storage rack car. A typical 
train has about 30 of these cars in the consist. I chose to model 16 of them for my own train. Scratch 
building them out of styrene seemed like a daunting task, and this would cause a lot of modelers to not 
even consider taking this project on. The racks themselves are rather complex to model accurately, so I 
decided to draw a scale model of these racks using Solid modeling software. Using the design 
constraints listed on the Shapeways website, I was able to develop a convincing rack model for my 
storage cars. When I was happy with the model on the computer, I saved the file as a .STL file, and 
uploaded it to the Shapeways site. The nice thing about Shapeways is that you can set up a storefront 
easily and allow the public to purchase your models. All of my 3D printed models in this series are 
available to purchase through the Shapeways site. 
 
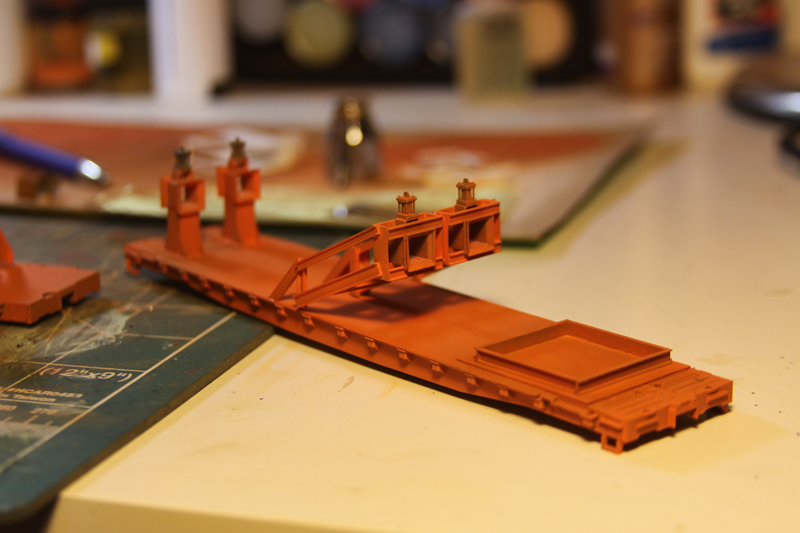
Once the parts arrived, they will need to be cleaned thoroughly to remove any residual support 
wax left over from the printing process. This is very important; you will have trouble getting paint to 
adhere to the parts if this was has not been removed. I added .010” styrene strip and .080” channels 
onto the printed parts with CA adhesive. I prefer the Gorilla brand CA when working with 3D printed 
parts, because it is supposed to have some flexibility to the cured glue that the other brands do not 
have. I drilled and glued a couple of brass wire posts to the bottom of the rack to make the connection 
between the rack and the flat car stronger. Once dry, I added the final support braces to the sides of the 
rack. These support braces would have been too thin to print out on the original printed part. Once the 
support braces have been glued in place, I painted the entire car a light primer grey color. Once dry, I 
finished up with a top coat of MOW orange paint.

Car #1- this car guides the rail onto the railbed. I cut town a Tichy flat to make it narrower, like the prototype.

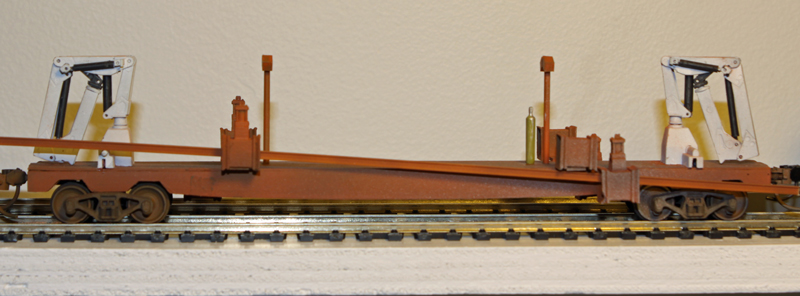
Second car- Fixed and adjustable guide chutes. Tichy kit with printed chutes and also the fixed chute stands are printed.

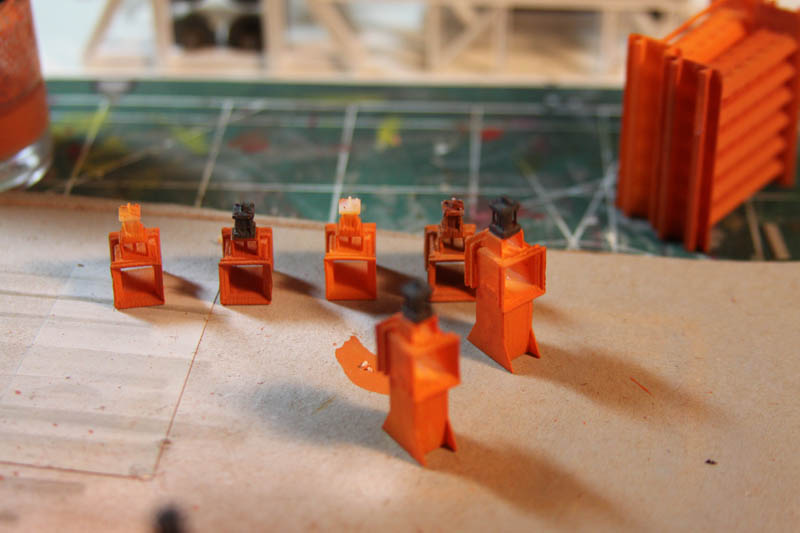
3D Printed guide chutes:

Car number 3- Puller unit...this is all scratchbuilt, no printed parts.

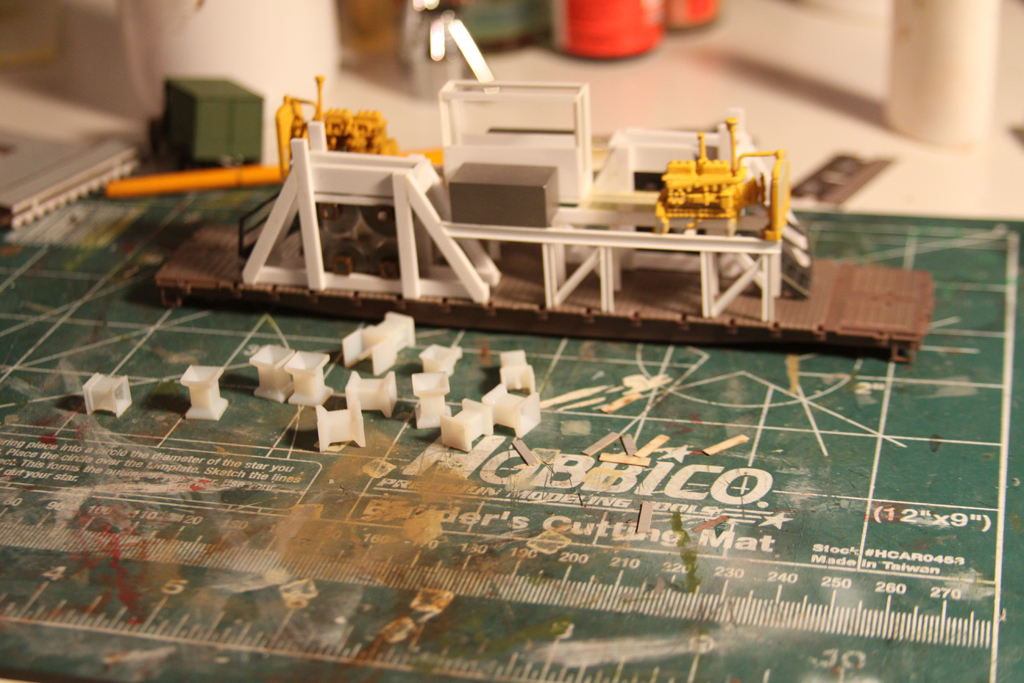
Car 4- second car with fixed/adjustable chutes:

Again, plastruct shapes and printed guide chutes.

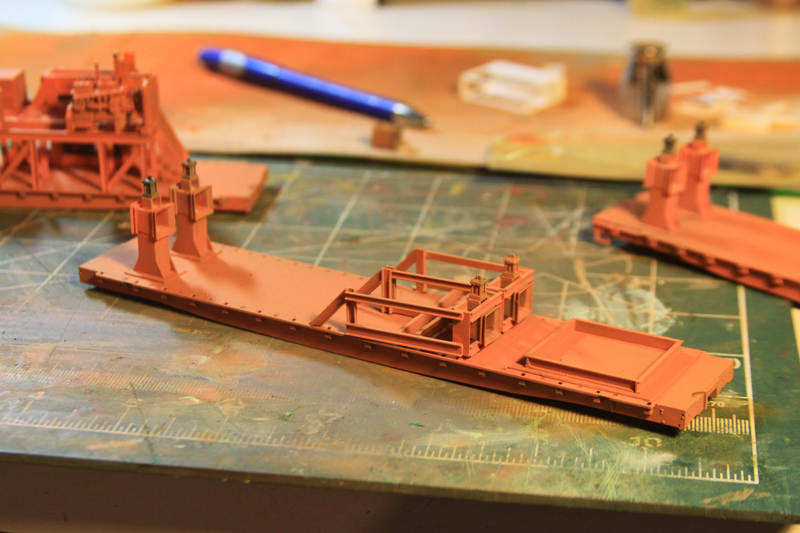
Car 5- The beginning of the rail guide car:

Rail rack cars (5-15 units):

Natural finish of the 3D printed part:

Middle anchor car (not built):

Then there are 5-15 more rack cars, followed by another end rack car.

 
Entire threader assembly lined up:


Youtube videos of the train in action:
 
 
.
 
Reply 0
johnybgood18

Very impressive!  I never

Very impressive!  I never thought someone would actually do the whole thing!

You can visit my layout Facebook page: Freelanced Perkins subdivision

Reply 0
AnEntropyBubble

@JodyG

That's just plain cool.  Well done!

Andrew

Reply 0
JodyG

Thanks guys, I am kind of

Thanks guys, I am kind of thinking I need to take this out of storage and apply what I know 3 years later to this model to make it even better. My other thought was to just build a whole new one to Conrail spec. 

Then there is the complete Loram rail grinder train that is about 1/3 of the way finished....LOL.

So many projects...so little time! 

Reply 0
IrishRover

WOW!!

That is amazing.  I never thought I'd see that built and running, either.  Even on a side track, parked, it sets the time and location beautifully--no 39' clickity-clack here!

Reply 0
pschmidt700

Well done!

Superb. And so is the layout's scenery. Paul Schmidt
Reply 0
Bill Brillinger

Amazing!

Great Work Jody!!! I'll catch up with the video later.

Bill Brillinger

Modeling the BNML in HO Scale, Admin for the RailPro User Group, and owner of Precision Design Co.

Reply 0
ctxmf74

I'd give that the model of the year award:>)

The obvious question is where do you find train length HO rail?    I saw a real rail train go around Tehachapi loop once and was wondering if it was going to fly off the tracks like a big coil spring but it seemed to bend fine with no problem...DaveB

Reply 0
pschmidt700

Rail

You'd be surprised at how flexible real rail is, Dave. No real "memory" to speak of. Paul Schmidt
Reply 0
ctxmf74

You'd be surprised at how flexible real rail is

Yeah, actually I already knew that. when I was a kid in the summer I sometimes rode the speeder the SP section gang and watched them work. The gang would line rail with a long bar while the foreman kneeled  down and sighted it fair by eye. I always think of that and smile when I read of guys trying to make their track plan mathematically perfect with spiral curve formulas and autocad.....DaveB

Reply 0
Dave O

Way cool ...

... something you certainly don't see everyday.  Would have made for an interesting article as well.  

3D printing will soon be 'mainstream' sourcing for materials/parts to hobbyists; purchase a file of what you want, send it to the "printer", and 'presto' you have your part(s) ... supply on demand.  No more trying to guess at production quantities.  No more inventory management of small pieces/parts hoping for a customer who wants one.  No more expensive tooling.  No more 'out of stock' issues.  Really, a wonderful time to be in the hobby I'm thinking. 

Thanks for sharing.  Dave O

Reply 0
caboose14

Awesome!

That is one of the coolest modeling projects I've ever seen. Really well done Jody!

Kevin Klettke CEO, Washington Northern Railroad
ogosmall.jpg 
wnrr@comcast.net
http://wnrr.net

Reply 0
WCRC.CF7s

Outstanding!

Great job! When I see these work trains in the proto world I'm taken away at how large of a project the MOW crew is working on. Now to see it in scale... Outstanding. A true craft and talent. Thank you for sharing!!
Reply 0
crowfan

It is the best of times and....the best of times

It is the best of times to be in this hobby, and the best of times to model almost any thing. The sky is the limit as they say. And by the way great built I always thought it would be to difficult to pull it of, because of the many parts involve. But you prove me wrong! Is good to be in the age of all this cool technology. Are you going to upload new videos of the train and your awesome layout? Great job very inspiring. Thanks a lot for not keeping it for yourself. RT

Reply 0
herronp

Jody..you are a patient and wonderful model maker.........

................I am curious, does the model rail bend enough so the cars can go around a curved section or is this more of a static display for viewing/photography? 

Peter

Reply 0
35tac

Rai Train

Outstanding model work. Congratualations!

Wayne


Reply 0
JodyG

Thanks for the nice comments

Thanks for the nice comments guys. As for the rail flexing, the piece in the photos does bend around curves. It is actually just a piece of Evergreen I beam. I don't think a whole train of that would work though, given the relatively light weight of the cars. I have not attempted to load the train up, but I plant to at some point when the train is permanently docked on my own layout. The layout in the photos is the Short Line Model Railroad Club in Ephrata, PA. They can be found at http://www.slmrc.com or http://www.facebook.com/slmrc.

I didn't realize how far along I was in writing an article about this project...I just found that I already have some prints drawn for the for the puller machine frames. 

rame%20A.jpg 

Reply 0
dhatman

Thanks for the nice comments

Is it safe to assume that the measurements are in inches, or fractions there of?


Doug Hatman
Model Locomotive
Engineer/Conductor
Humble, Texas 77338
Reply 0
JodyG

Great point Doug, I will be

Great point Doug, I will be sure to amend the drawings to show the units being in inches, and drawn to HO scale. 

Jody

Reply 0
BNSFFAN

Fantastic model

This is really a great project. It is very impressive. Since there are more and more files getting out there but for different scales, can they easily be converted from scale to scale or is it not there yet?


Reply 0
Shay Farley

Why I love this hobby!!

That is just the coolest thing I've seen for a while. Never thought anybody would attempt to build a welded rail train. Nice detail pictures and the finished product is stunning.


Very clever, I'm interested to see what you dream of next.

Reply 0
lexon

Impressive

Very impressive.

A little over a year ago, 156 lb rail was put in either side of the mainline for the Pan Am Railway upgrade in Western Mass. Amtrak wants to use a section from Springfield, to Greenfield, Ma.

Three loco's pulling a bunch of flat cars with strips of 1/4 mile long ribbon rail

Never thought I would see this modeled.

Rich

Reply 0
nrider

Welded rail train

Do you make any of these parts to sale?

Reply 0
barr_ceo

I recall seeing a welded rail

I recall seeing a welded rail train modeled in N scale several years ago, though it was just the transport cars without the rail-laying equipment. It was fully loaded - the rail was made from some kind of extruded rubber and was quite flexible, so there were no problems even on the tight turns of an N-Trak layout. I'm sure the same kind of approach would work for H0 scale.

Reply 0
garrpete

loading & unloading CWR

When we first got CWR in the 1960's on Welded Rail Trains , there were no guide cars and rail pullers.  We used a long steel cable tied to the crossties and pulled the train out from the the rail. We learned that if the rail bent too much vertically it would kink or break. So guide cars were invented.  Then came the puller cars to get the rail on and off the train. Your model is quite impressive, now to get some flexible rail to make a loaded train.

Pete Silcox retired from CSX

Pete Silcox

Reply 0
Reply