We left off last week with the straight(ish) stock rail in place, congratulating ourselves on a good evening's work, considering we started with bare plywood. This week, we got through most of the rest of the engineering, with the exception of the switch rods. I hope to get those and the remaining details done by the end of the week so I can get back to house construction, and clear up the turnout mess. 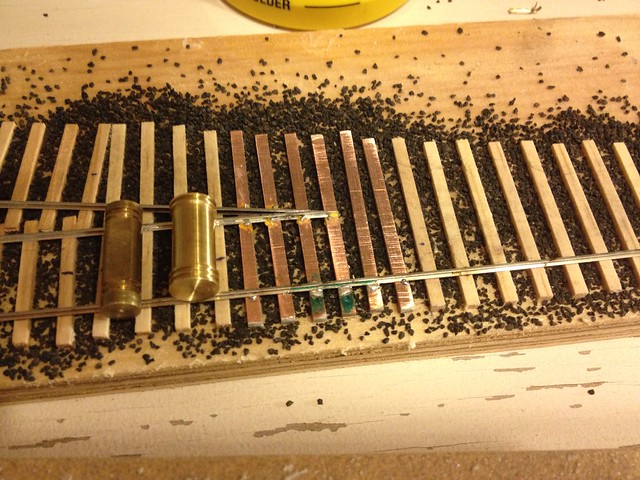 The first step was to place the frog. This was relatively easy to do with a couple of roller gauges. But wait! I'm forgetting the frog-filing contraption. You see, I've never been happy with my filing jig for making frogs, and it's even less satisfactory for points. Now, I'm sure the Fast Tracks tools are excellent, and I can't deny the smiles on the faces of their demonstrators at the shows as they happily swipe away at trapped pieces of rail. But, I'm only making a few turnouts, and a jig to make so few seems an extravagance. The Proto:87 Stores sells prefabricated frogs, and they're dead on for Proto:87. They're also reasonably priced, and boy, I am tempted. However, I grew up making my own frogs, and I don't think it's that hard. Just boring, that's all. Well feast your eyes on this beauty!
  That's sure to take the boredom out of filing rail! Sure, I still have to tweak the end and file it straight by hand to ensure the point is supported by rail web, but the filing operation itself takes all of about 5 seconds once my Black and Decker Workmate starts amplifying the roar of my belt sander! When we start on the track for the layout, we'll make all the frogs at once. I bet they'll be done along with the points in an evening. So, as I was saying, we positioned the frog so its nose was supported on the appropriate tie, and soldered it home. Then, I was all ready to start on the curved stock rail because that's what I've always done in the past, but Andrew interjected and said that he sometimes finds the lead doesn't work out quite right when he does it that way. Better, he said to get the two closure rails in place first. "Okay," I thought, "let's try that." I have to admit, this approach worked well. We got the straight closure rail on next, bending its wing rail against the same X that I used to solder up the frog. When we dug out a test truck, it rolled through silently. You can't argue with perfection; I guess I'm a convert to laying the closure rails before the second stock rail now.
  For the point hinge, I'm using the H-shaped rail joiners from Proto:87 Stores. These are an excellent product! They are easy to use, and so far they work perfectly. I did well to remember to put them on both closure rails before soldering and Pliobonding the rails in place. Once the curved closure rail was done, I was back to the Rube Goldberg belt sander to form the points. As with the frog, this getup made quick work of the points. I formed the vertical face using the fence, clamped at the correct angle. Rather than figure out the exact angle for the undercutting of the foot, I simply eye-balled that, and held the rail against the sander - an effective way to trim my finger nails! I then slipped the points into the rail joiners at the heel of the switch, and held them in place while I rolled my truck back and forth through them. Again, it worked like a charm.
  Next is the reinforcing bar along the face of the points, as well as the throwbar and switch rods. Unfortunately, my soldering iron is still MIA, and so, I'll either have to wait for Andrew to bring his back, or look for another. Well, it was time for a break anyway.
Rene Gourley
Modelling Pembroke, Ontario in Proto:87
Read my MRH blog
Read my Wordpress blog